Quantcast
Channel: Diary of a Chain Stitcher
Viewing all 396 articles
Browse latest View live

Purple Marbella Dress

$
0
0
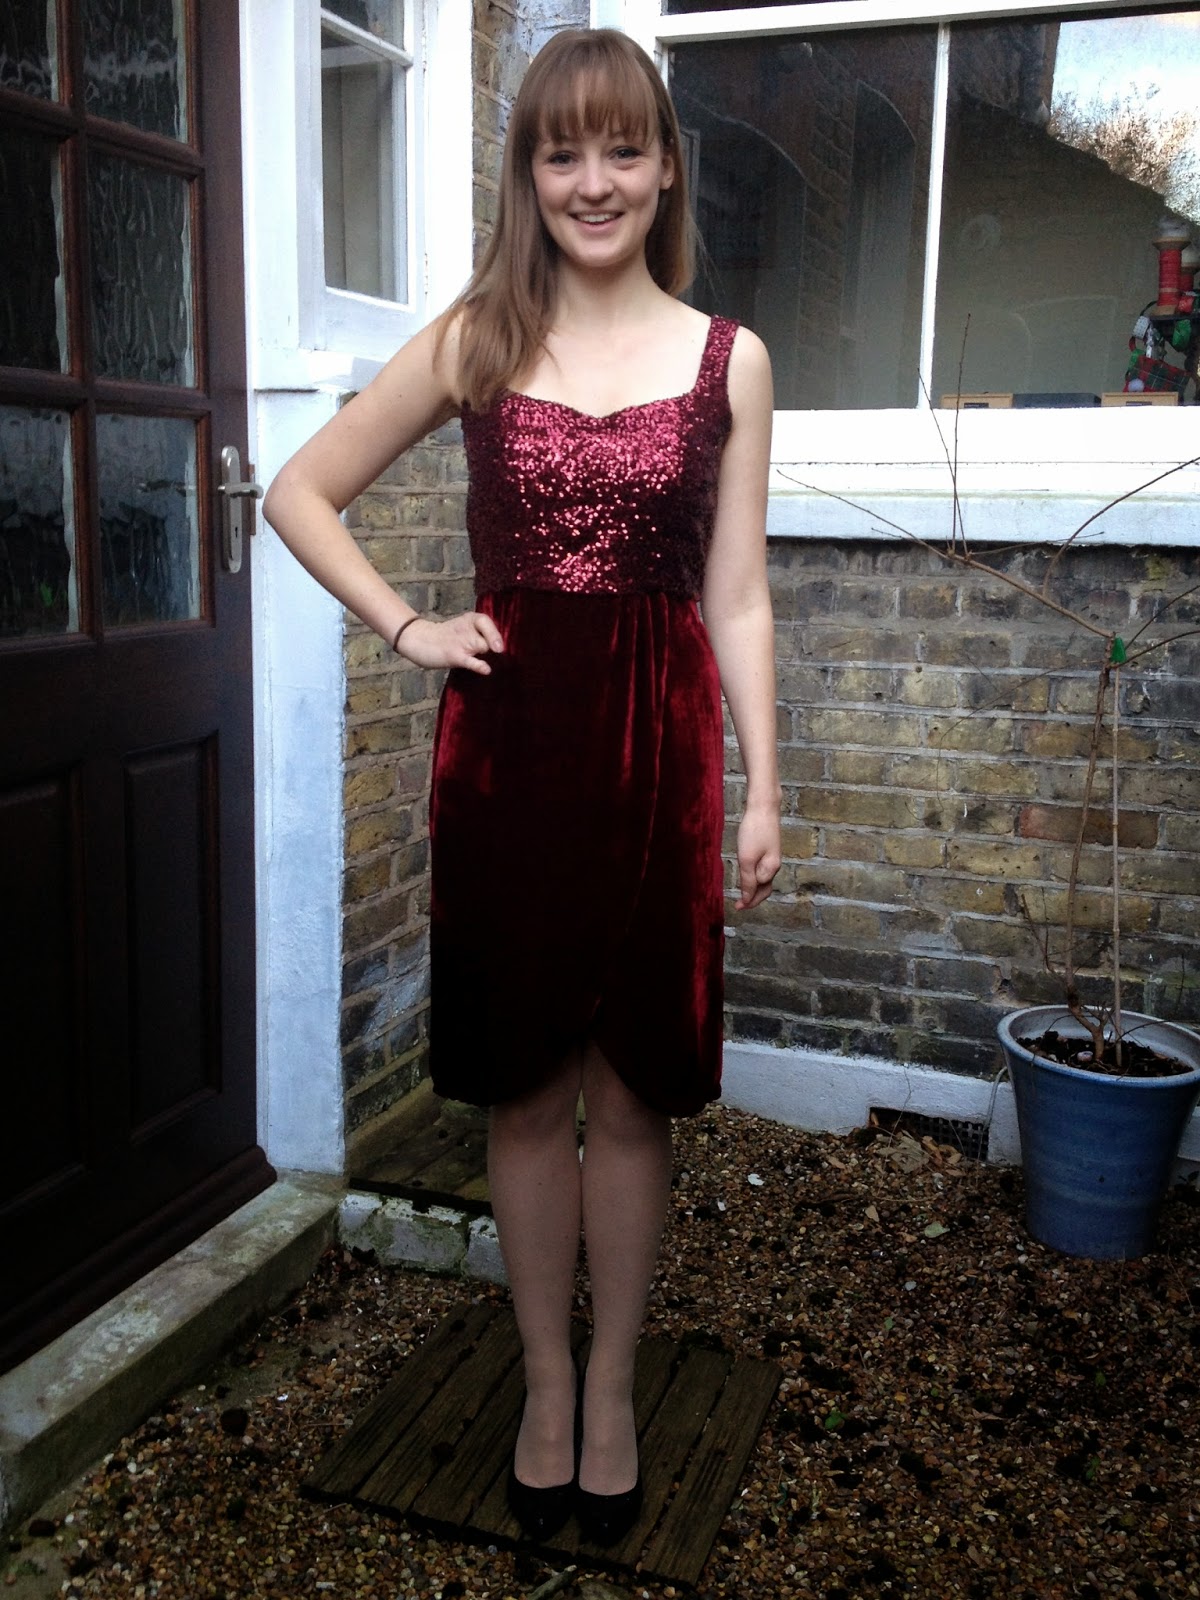
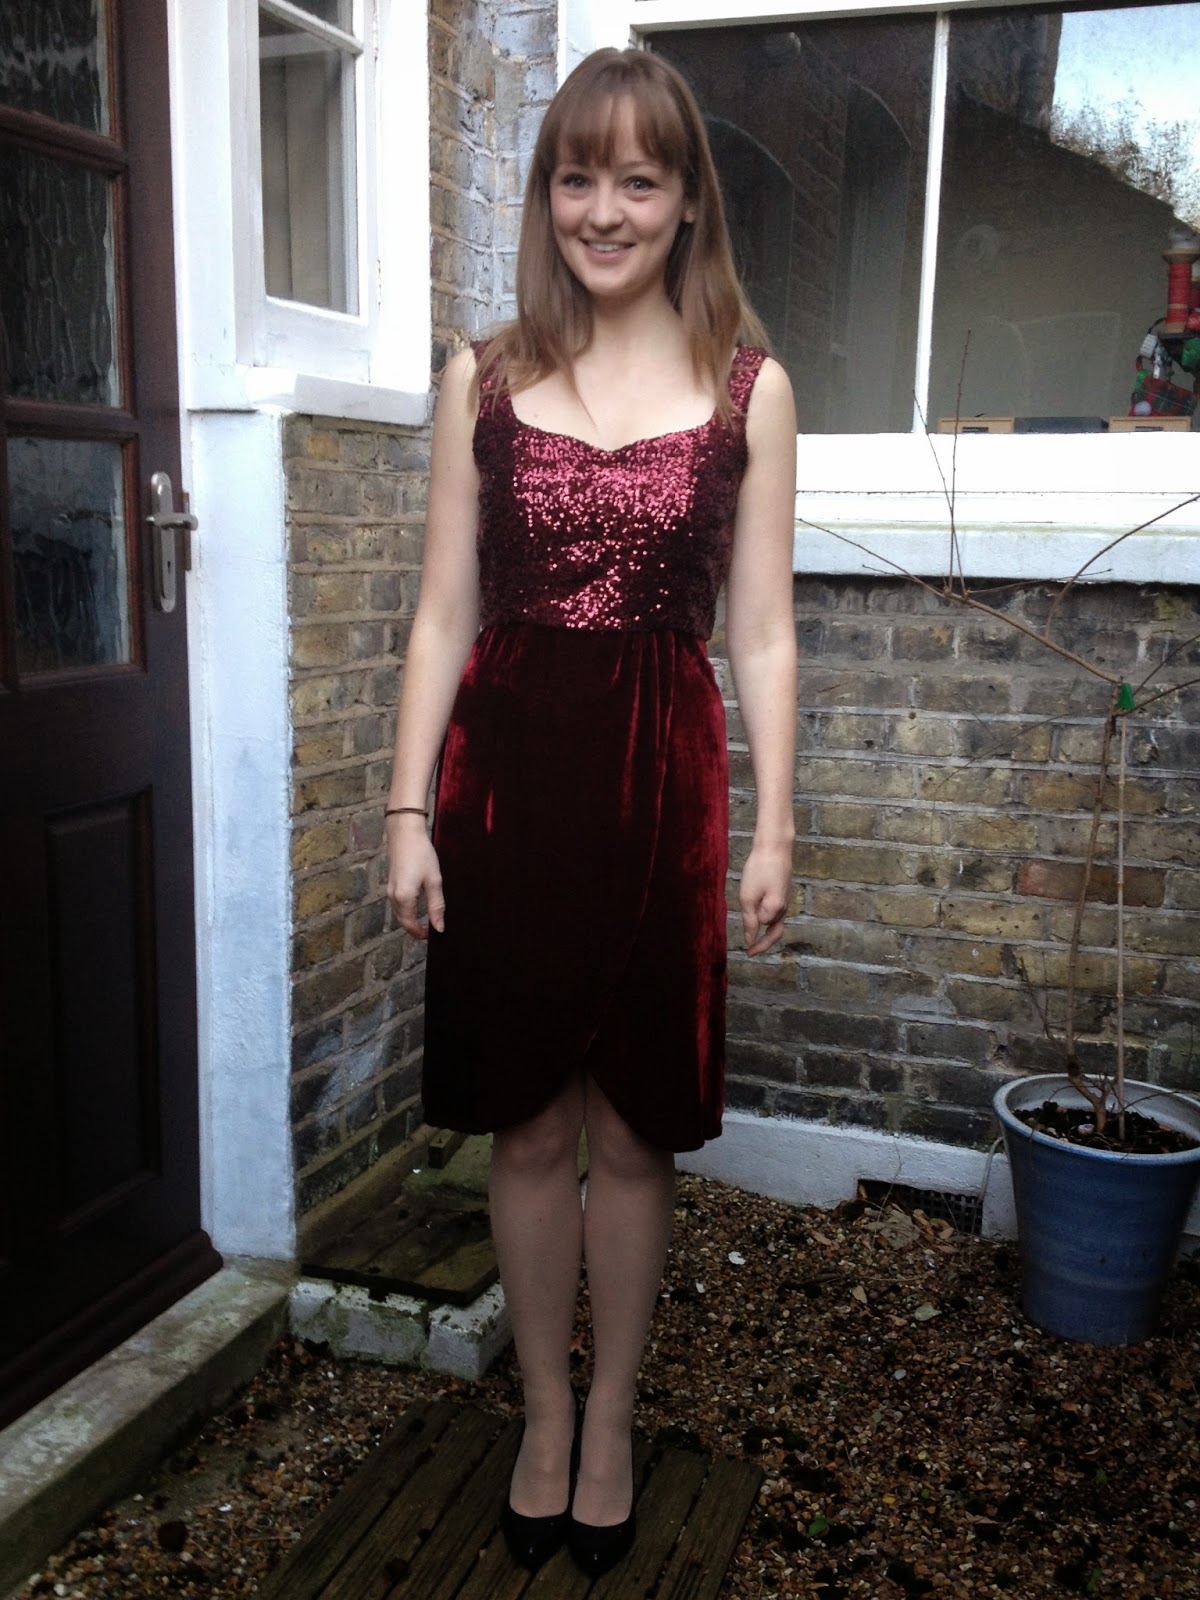
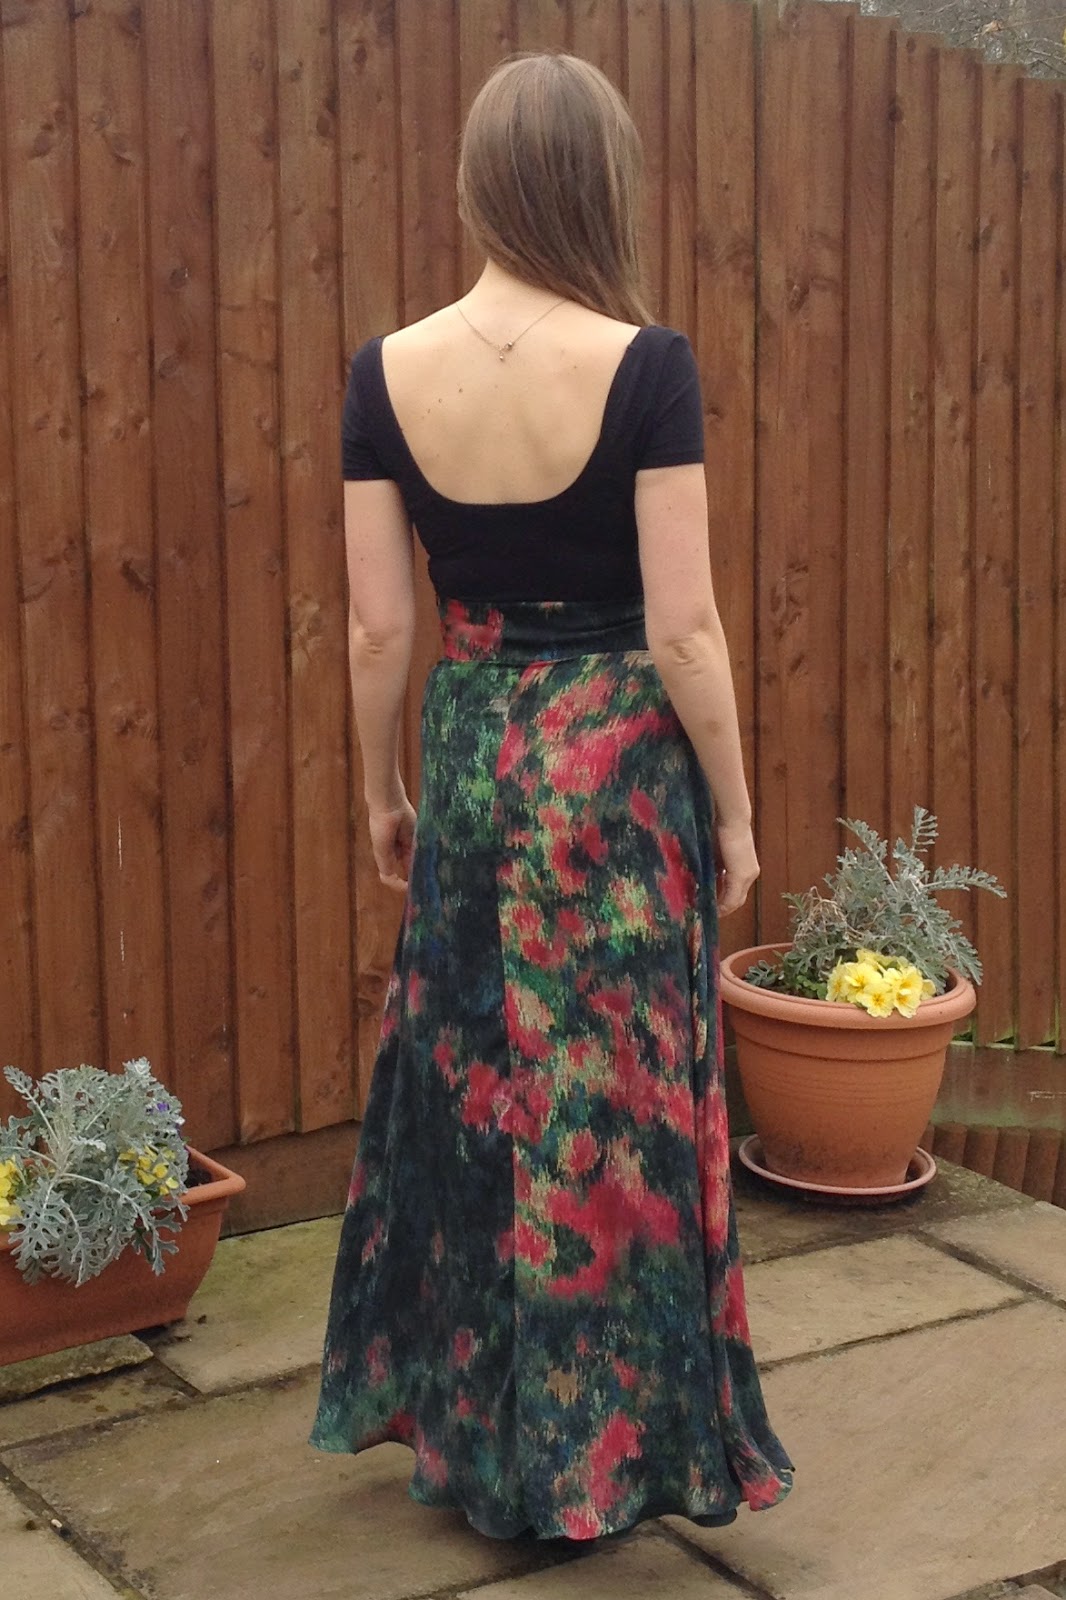
I'm really excited to share my thoughts on my latest completed garment as it's from a new pattern company! Kennis from Itch to Stitch contacted me a little while ago to see if I would like to try her very first pattern, the Marbella Dress. I wasn't immediately inclined to sew it up as I already have quite a few dresses in a similarly classic style but I was intrigued by the option for different cup sizes (A-D) and really wanted to try out a pattern from a new company. Let me spoil the ending for you, Kennis clearly knows what she is talking about when it comes to sewing and I'm so pleased with the dress! This review is very much positive but I want you all to know that it is my truthful opinion of my experience with this pattern and it has not been swayed by the free pattern.

Diary of a Chain Stitcher: Purple Marbella Dress from Itch to Stitch

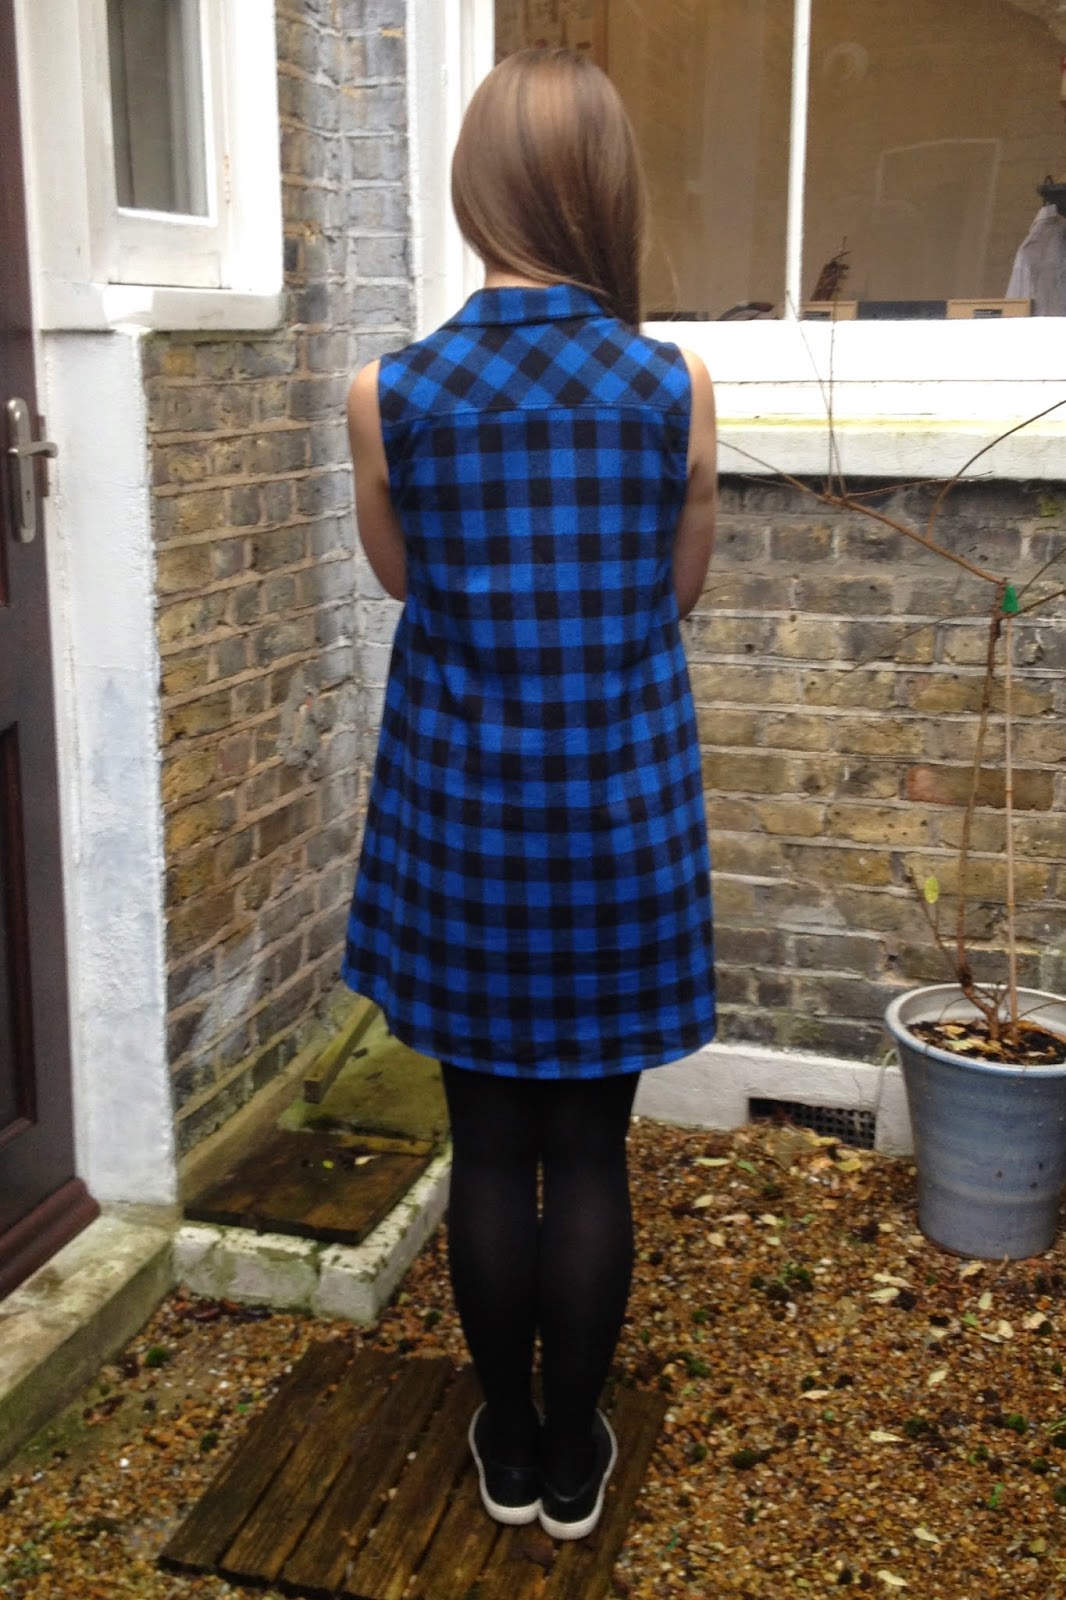
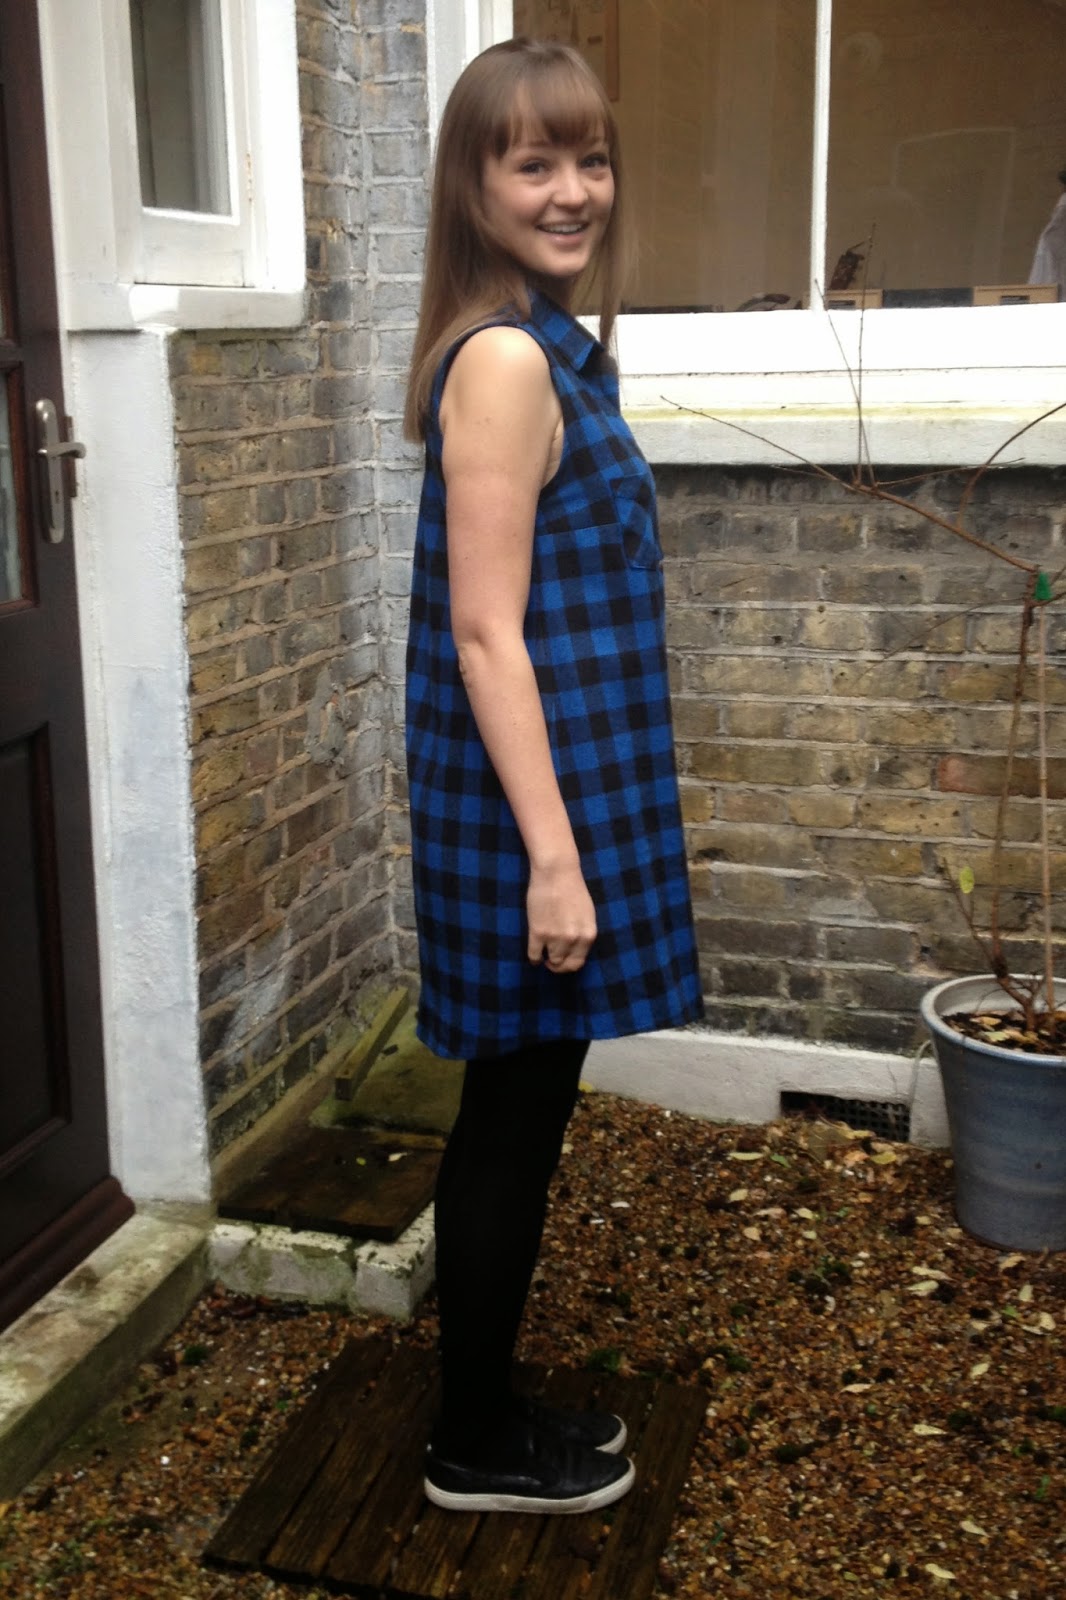
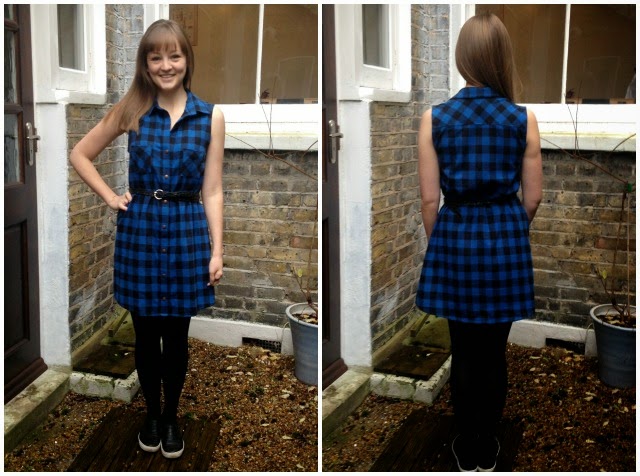
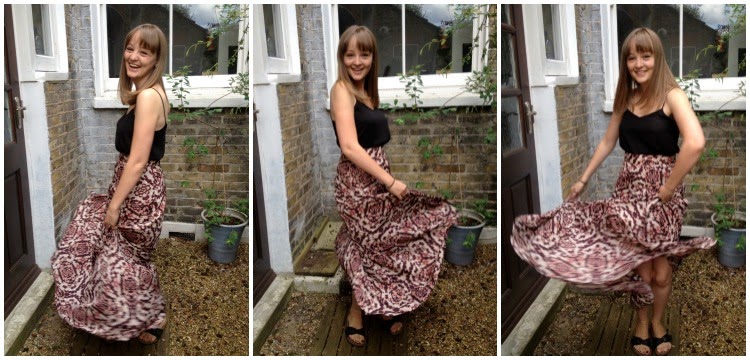
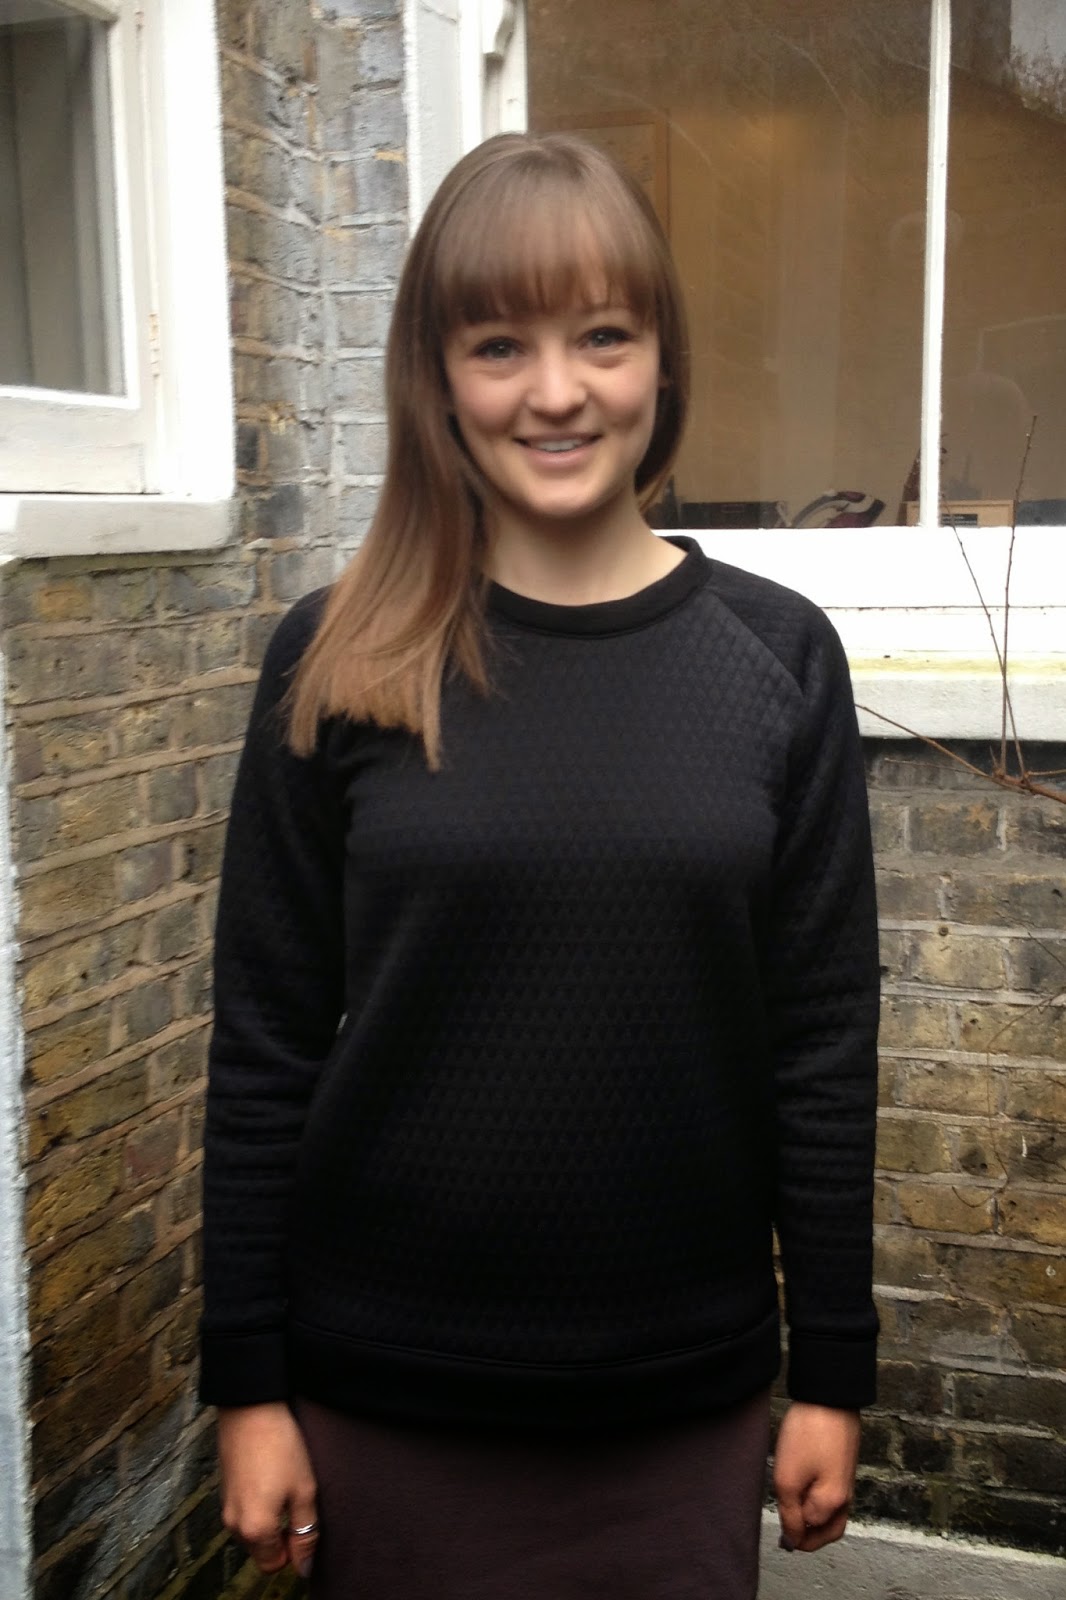
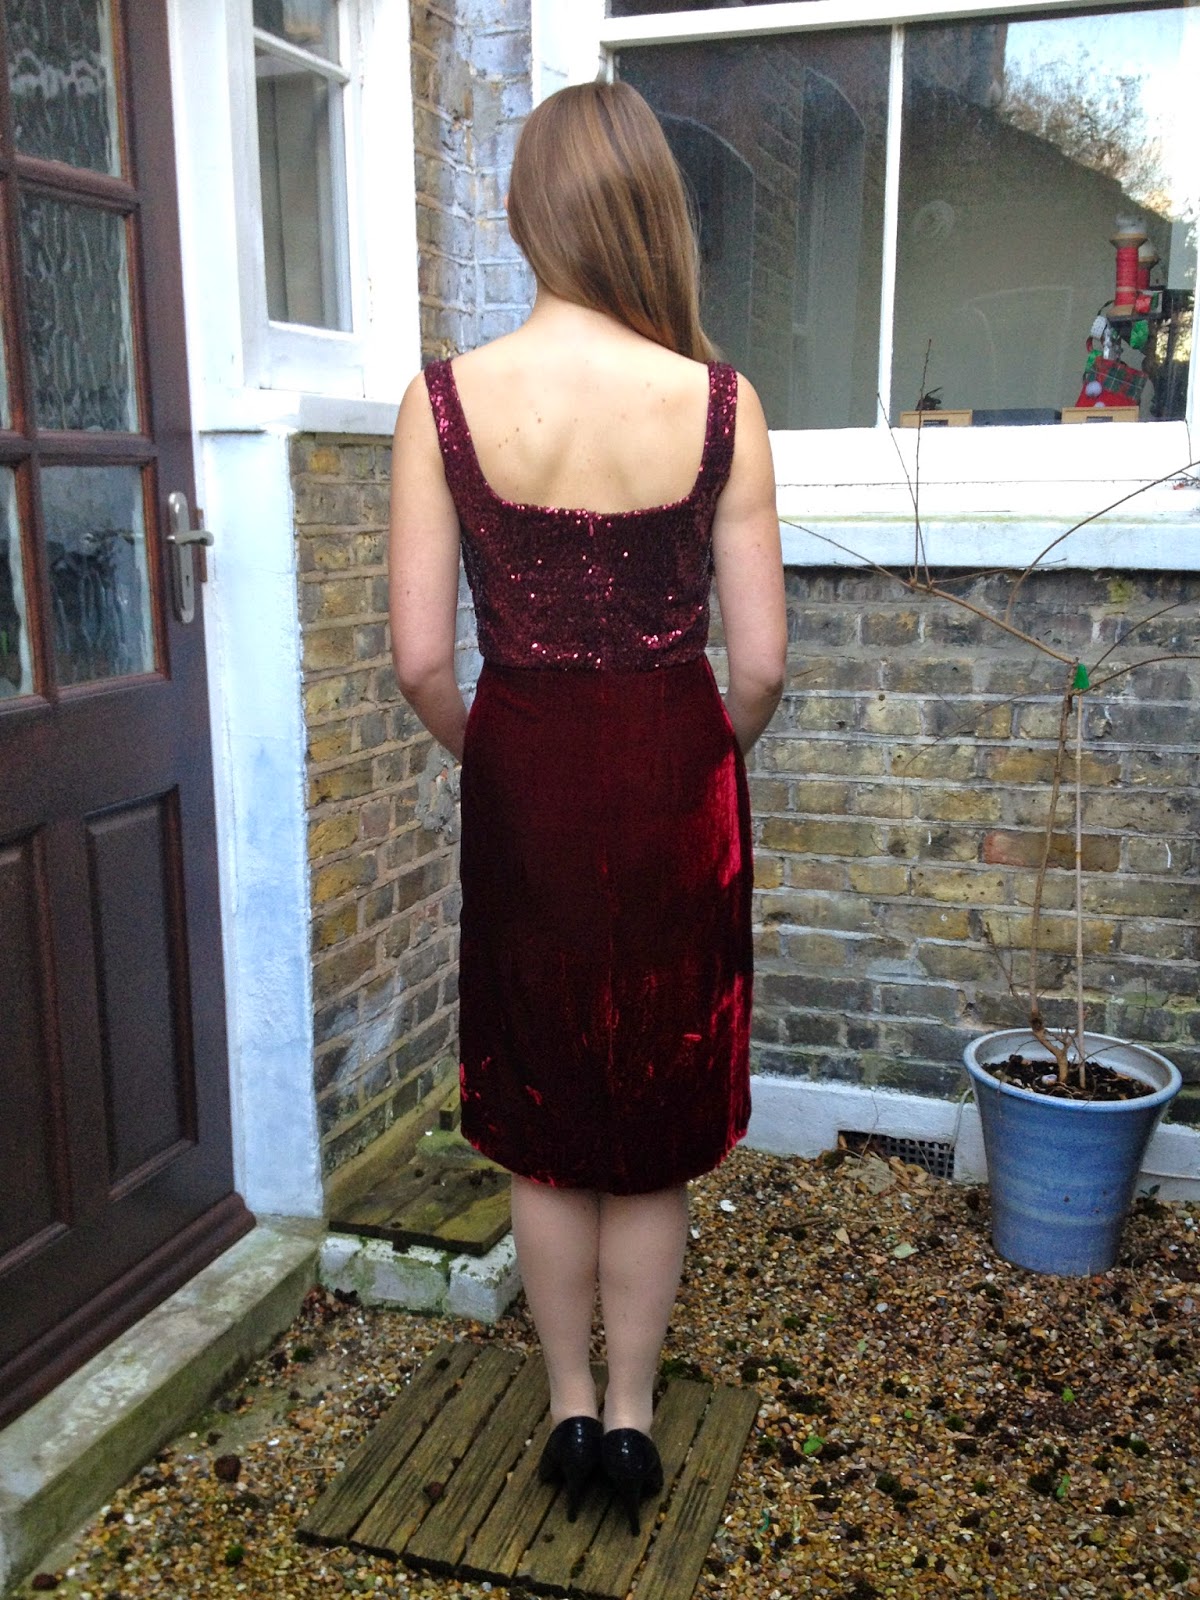
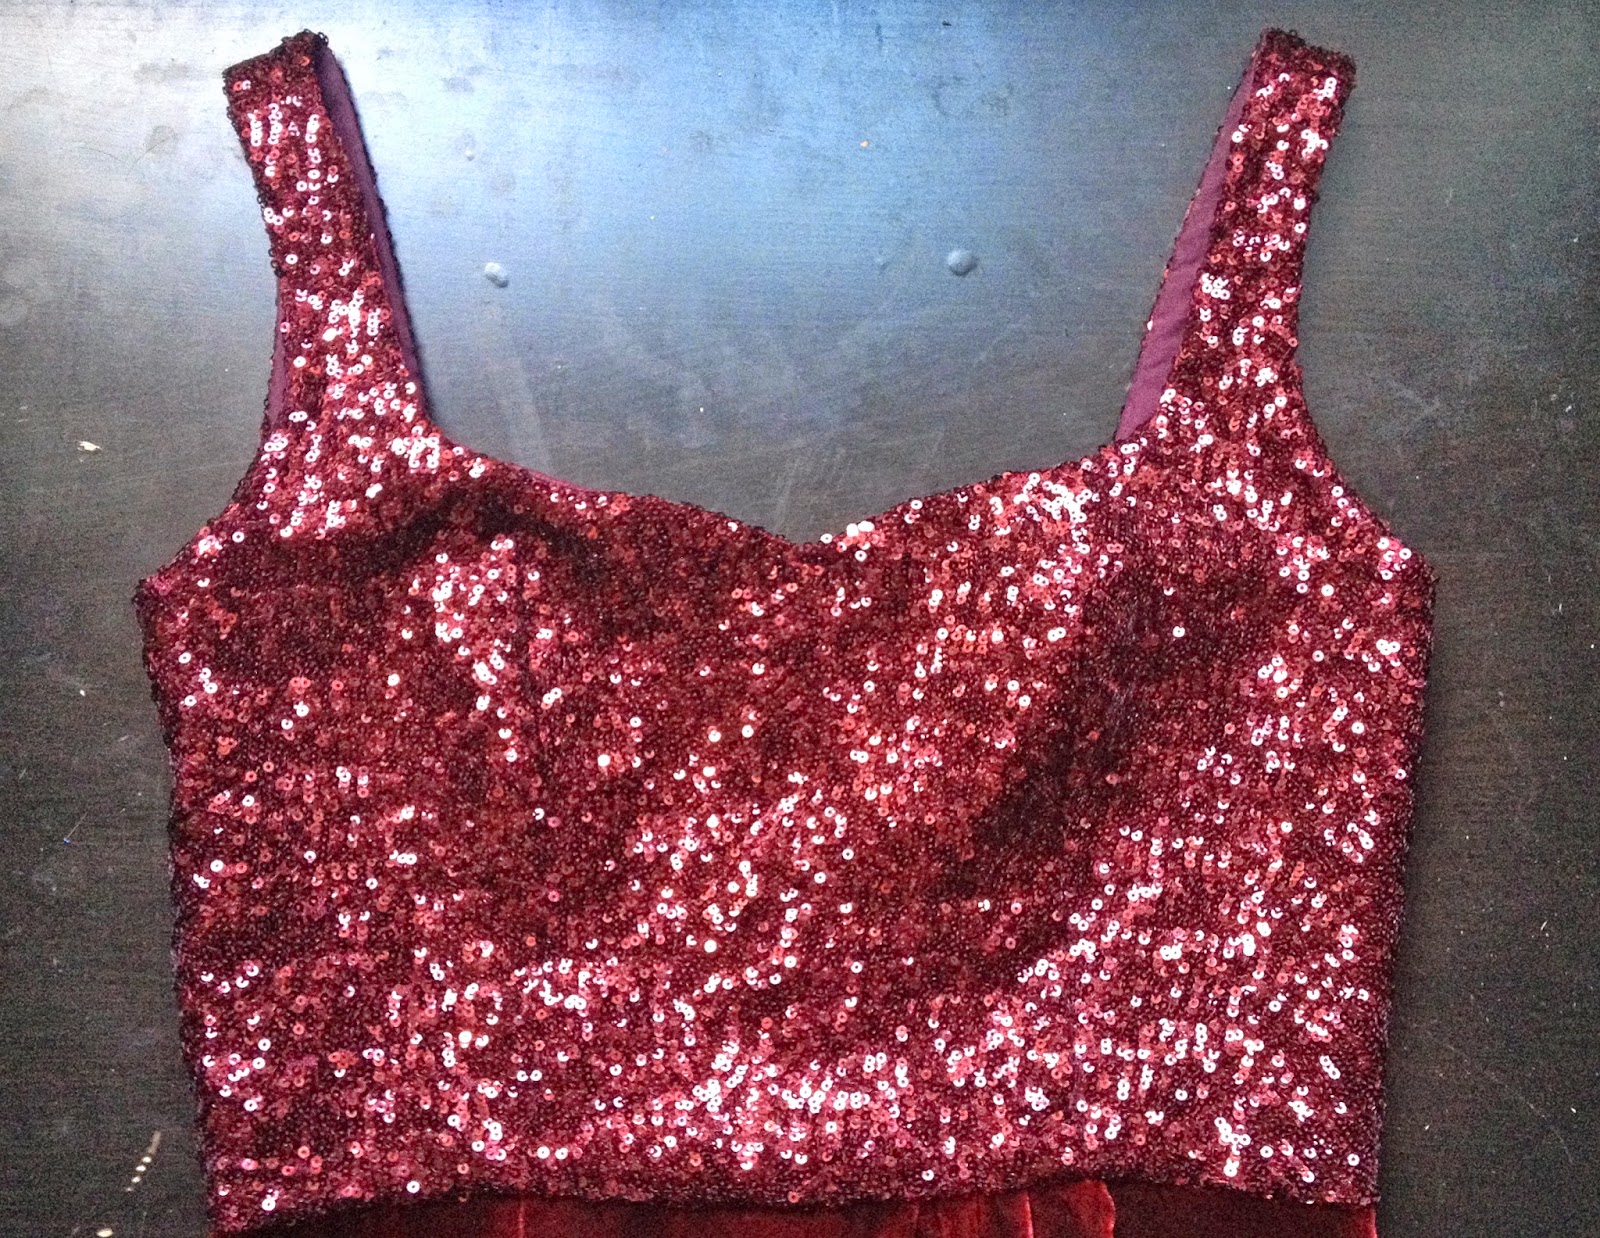
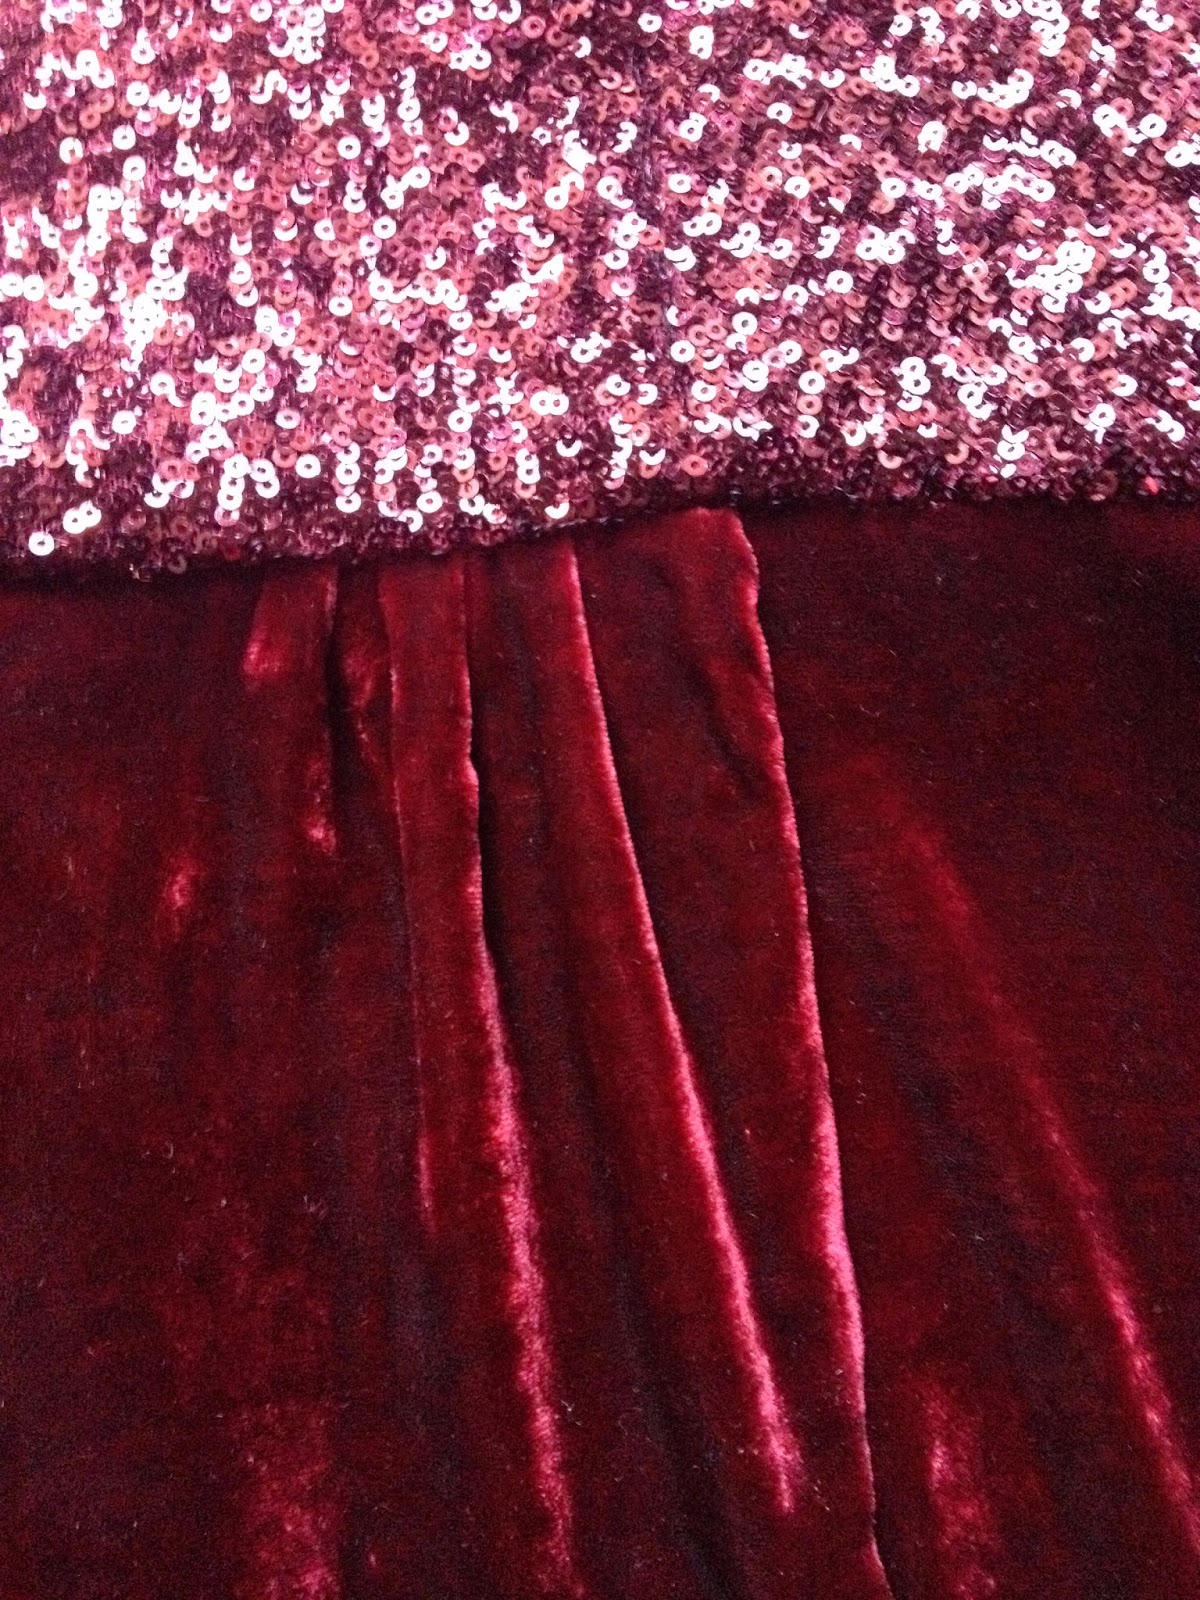
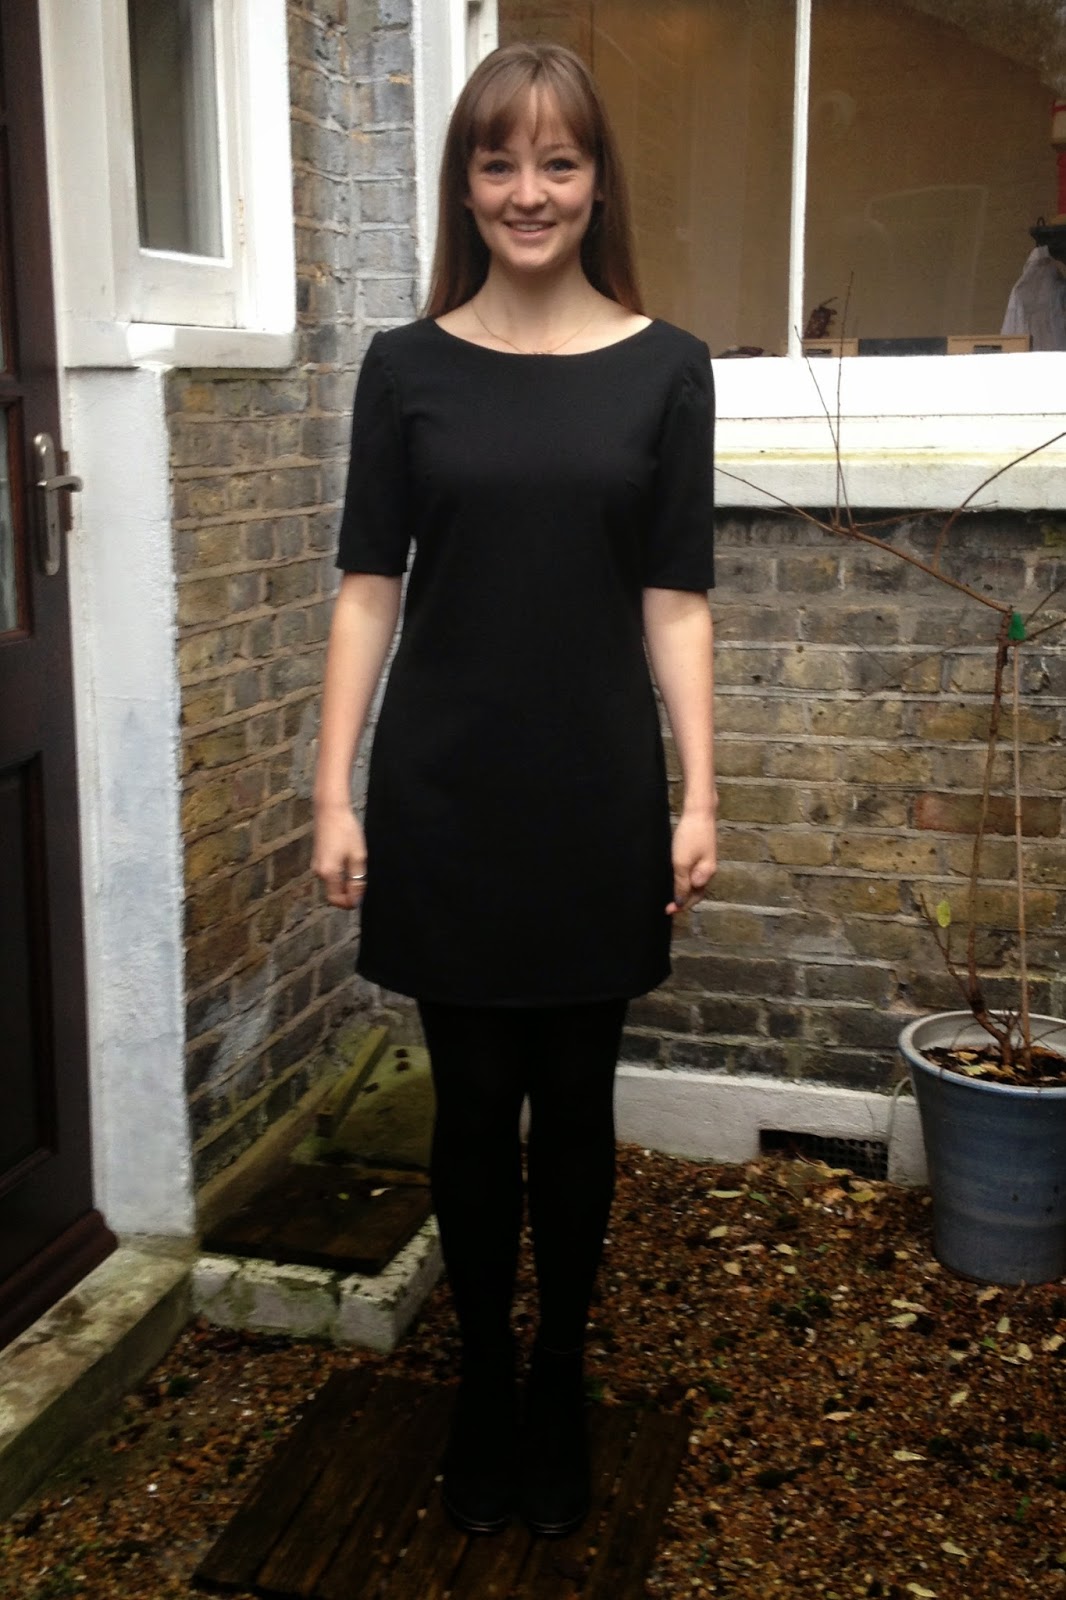
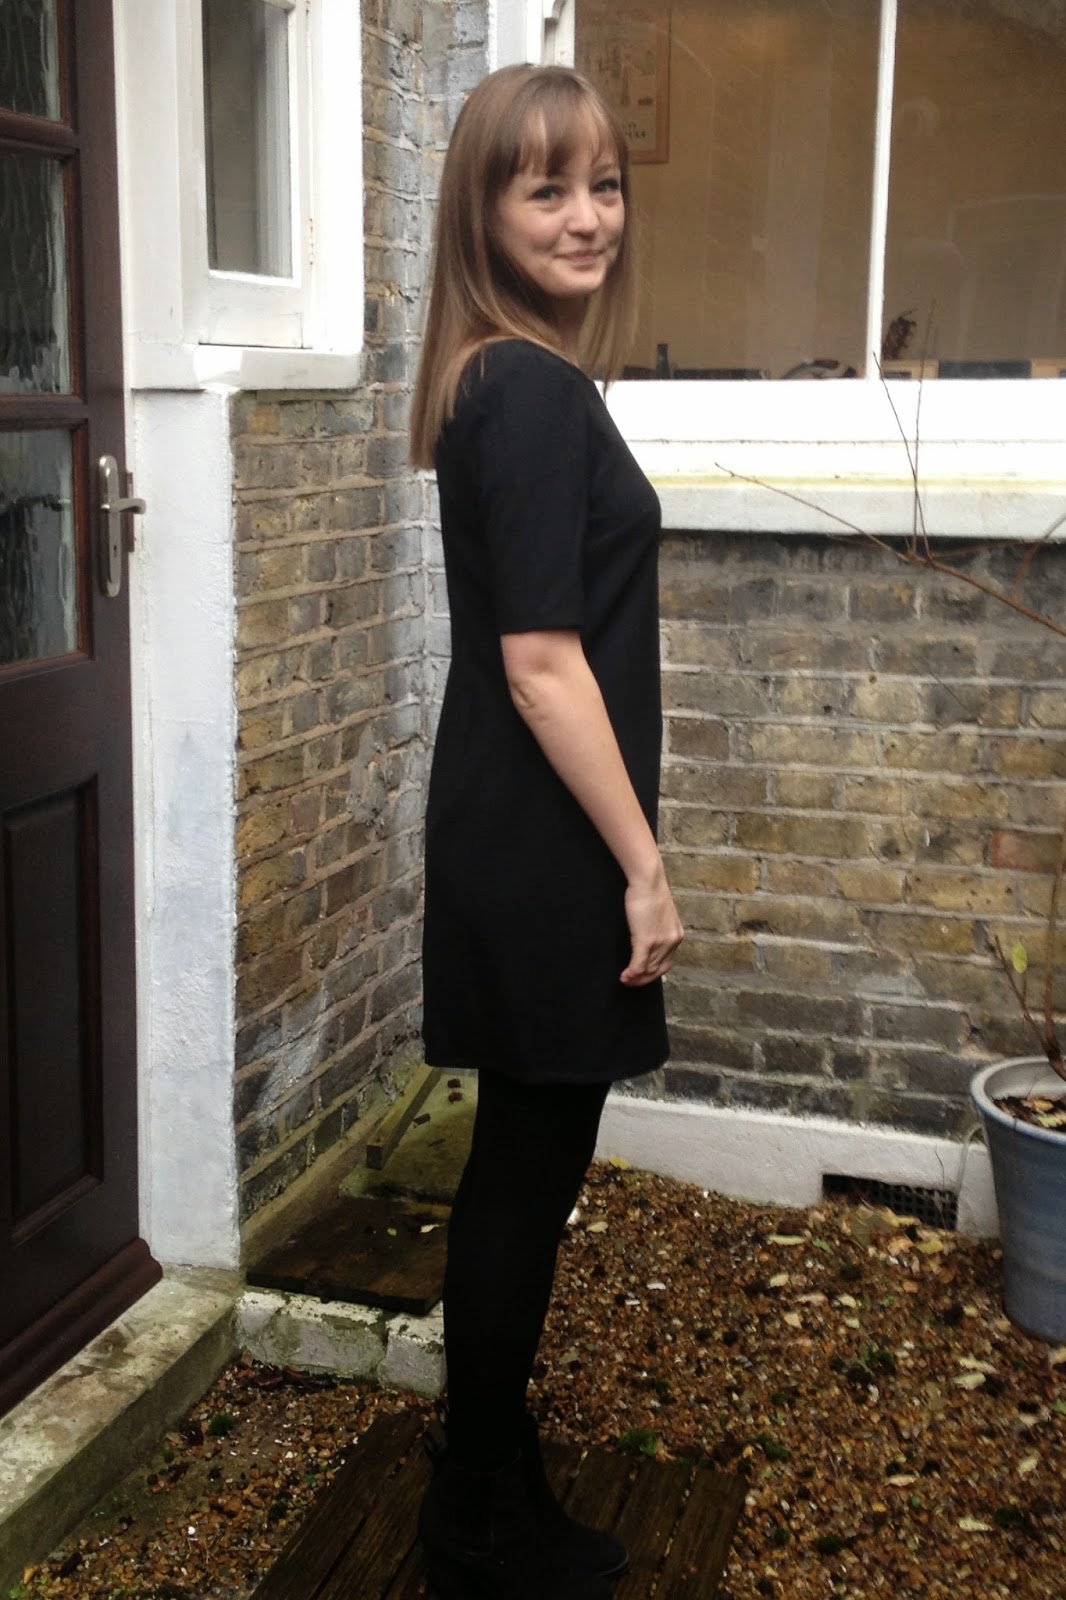
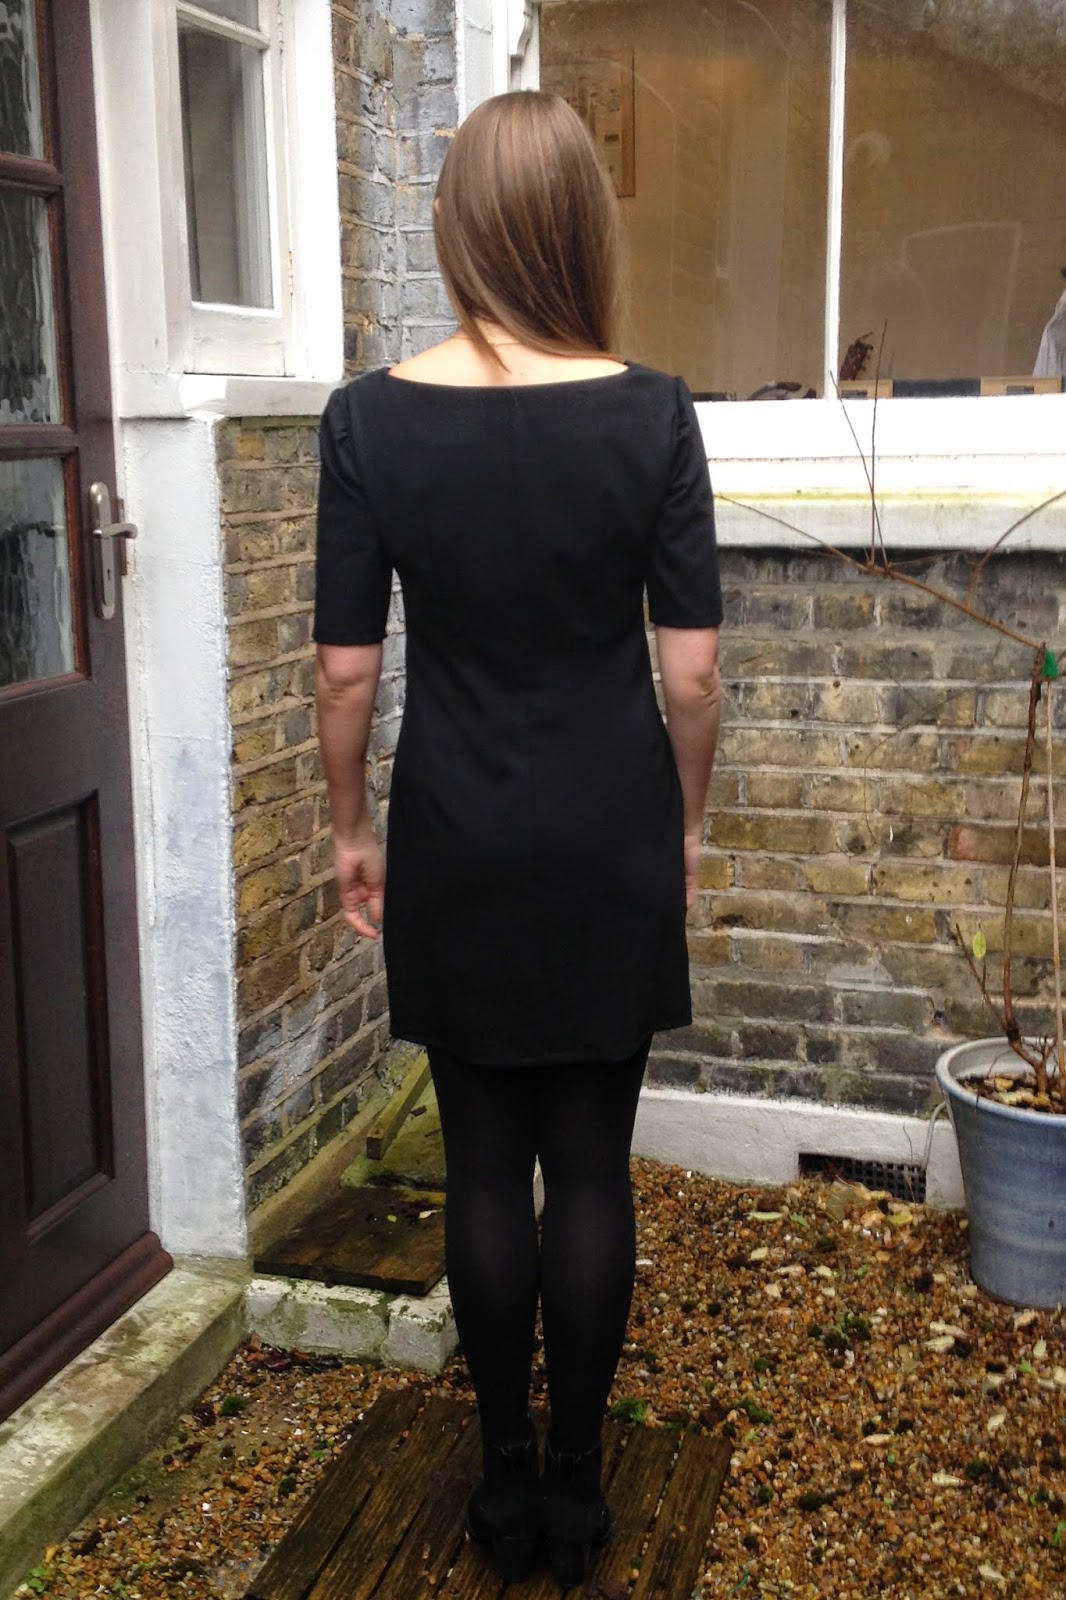
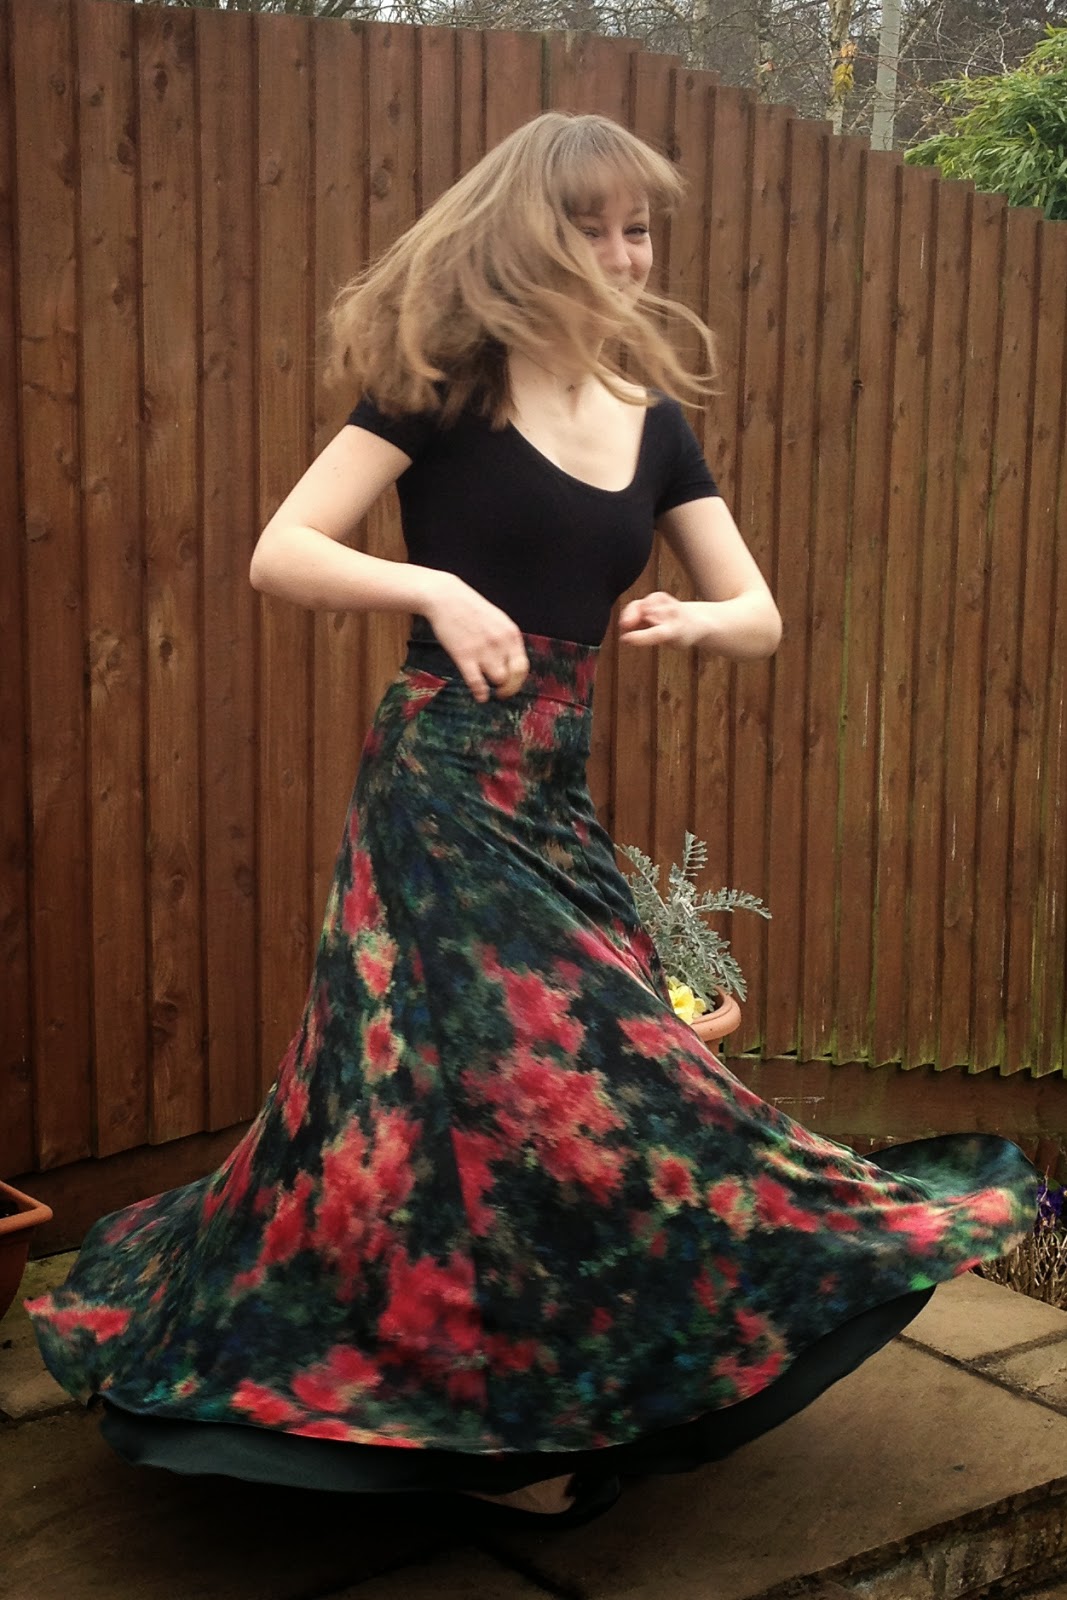
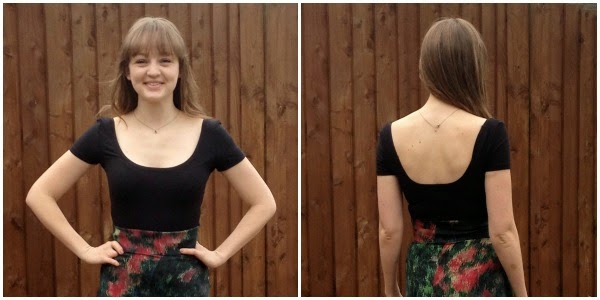
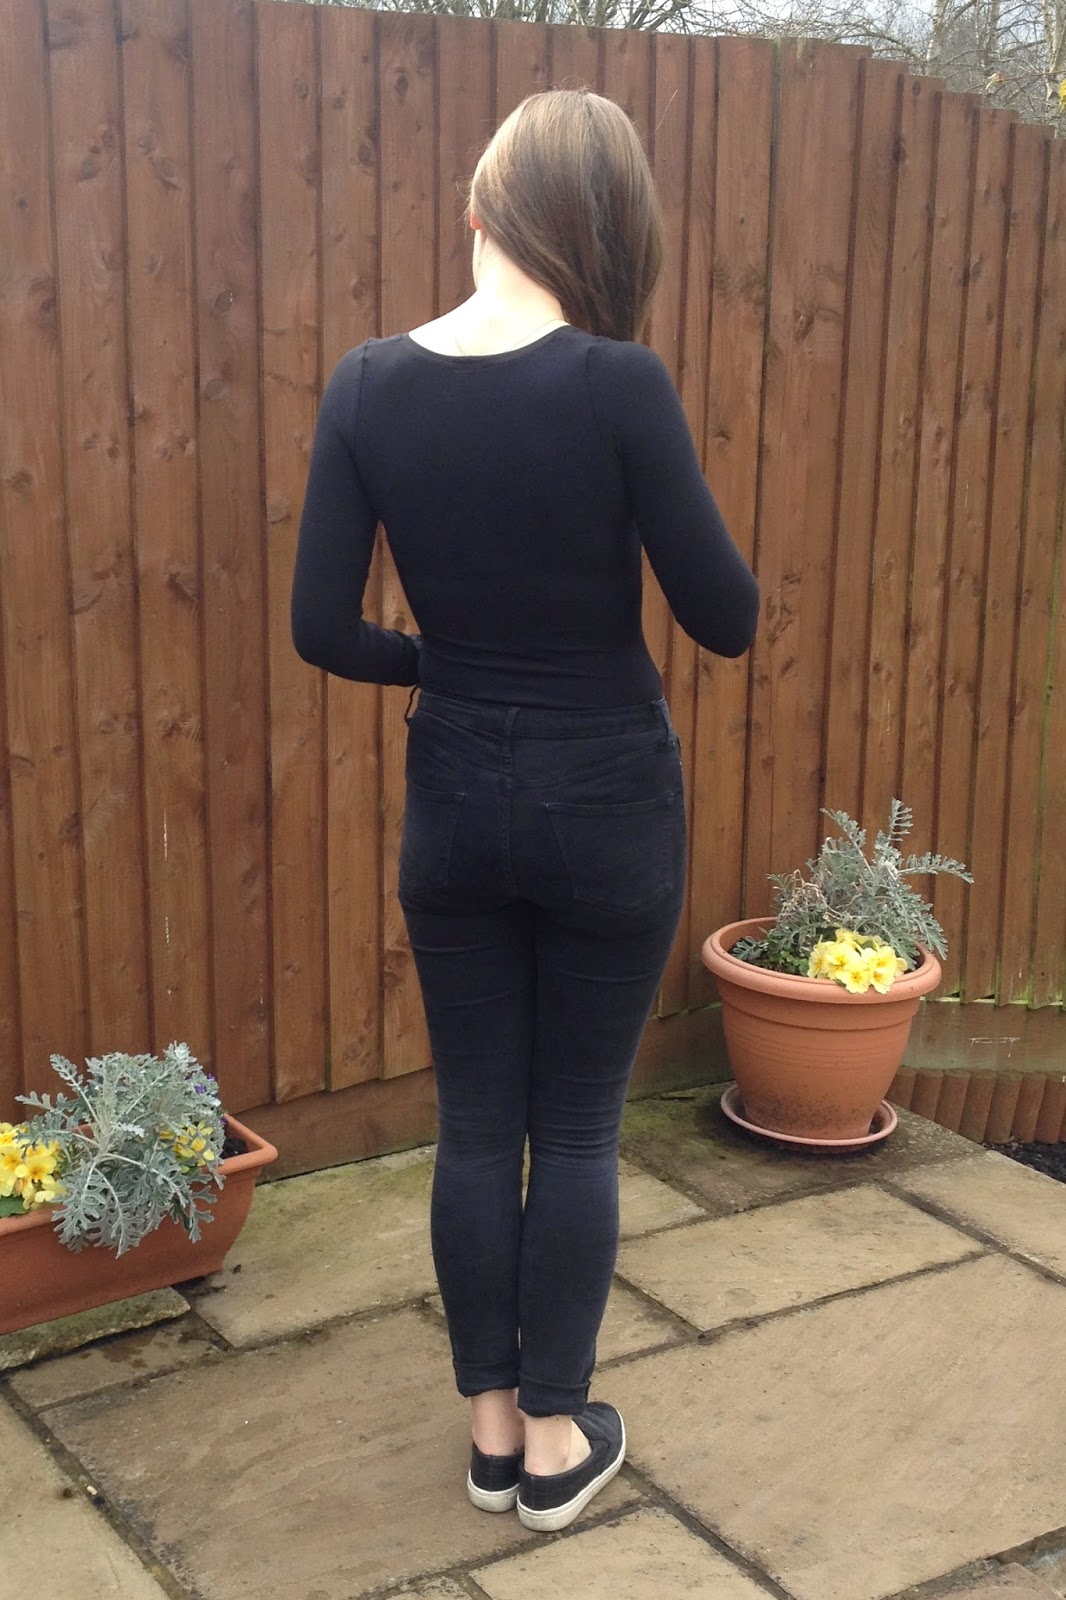
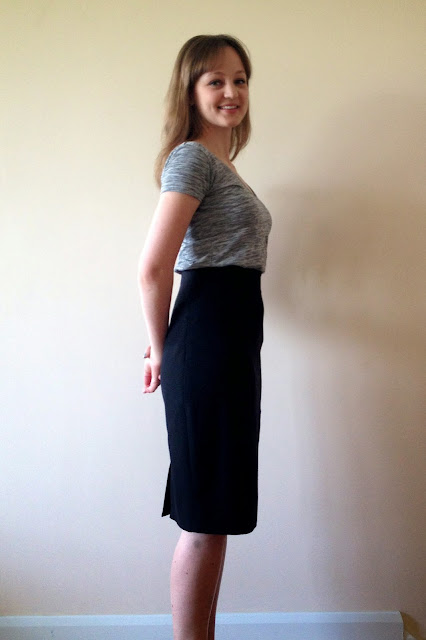
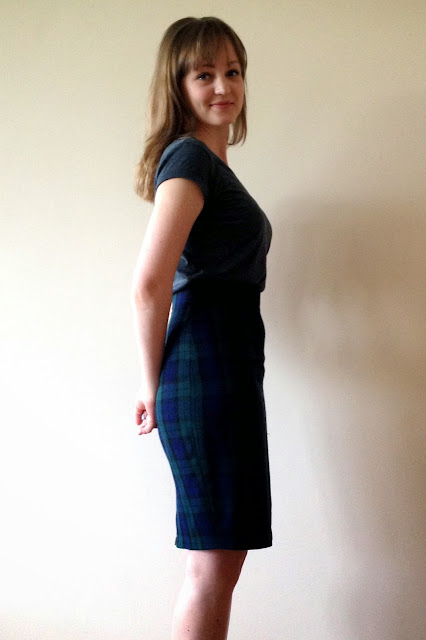
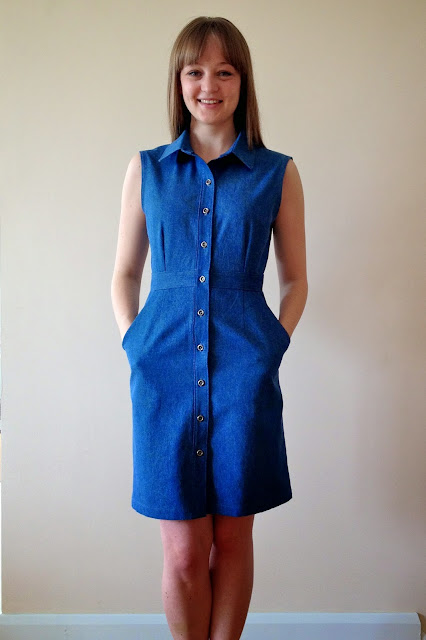
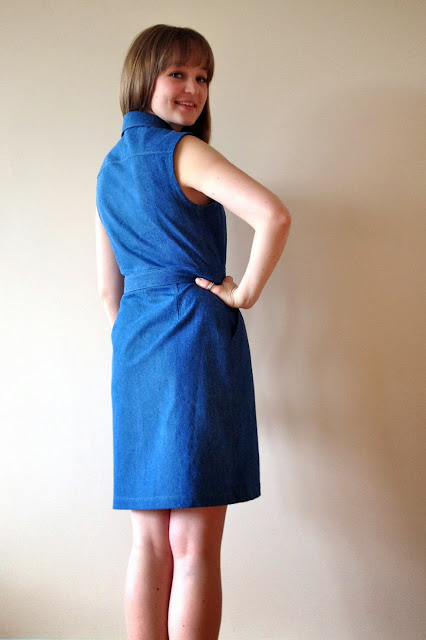
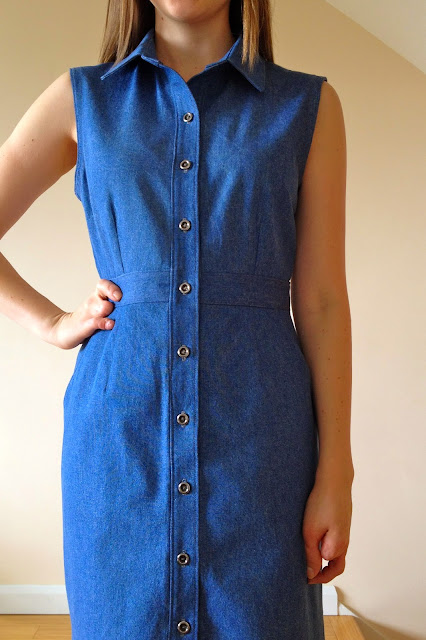
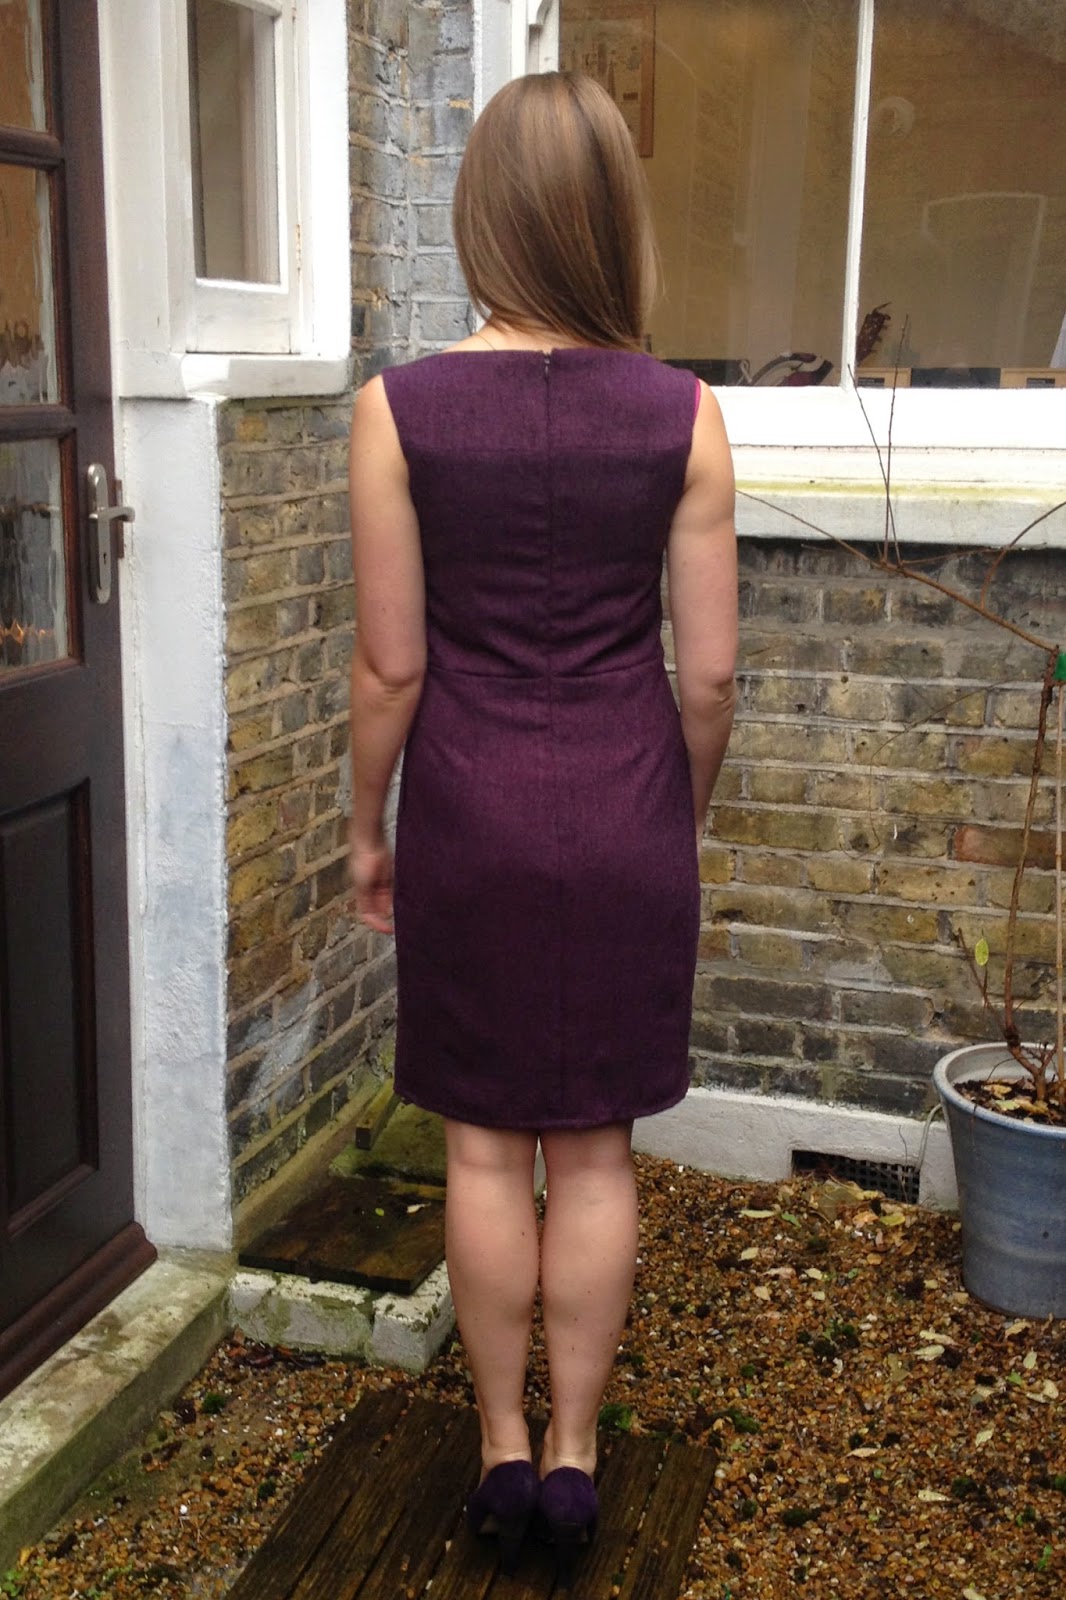
The instructions start with really detailed general information including a thorough list of completed garment measurements and specific yardages. I cut a size 0 which is a smidgen smaller than my measurements (particularly at the hip) but there is a fair amount of ease built into the finished measurements and I prefer a close fit. I would say be wary of downsizing too much at the hip though as most of the ease is in the front of the skirt because of the pleats and you don't want the back to end up too tight. I was a little confused about picking the cup size. The instructions suggest to go with your usual size so I went with the D although I was doubting my choice when looking at the shape of the pattern piece. I should have trusted Kennis' advice as it fits like a glove. I was overthinking things though and wondering if perhaps the initial size should be chosen based on the high bust measurement as a separate cup size is then chosen. I don't know enough about drafting to say for sure but I think it worked out for me as I downsized slightly. I'm really pleased with the fit in every area; the skirt is slim yet still walkable and the bodice is comfortably snug all over. I like how the neckline and shoulder area lays so flat. I have got some wrinkles at the lower back which I'd like to look at next time. I'm not sure if I need a tiny sway back adjustment or if they are drag lines caused by something else. Anyone got any ideas?

Diary of a Chain Stitcher: Purple Marbella Dress from Itch to Stitch

One of my favourite things about the pattern is the layers option on the PDF. It means you can super simply, in just a couple of clicks, print only your size. They are also instructions for which pages you need to print for which cup size so you are not printing anything unnecessarily. When assembling the PDF you just need to piece together fairly small sections rather than one huge sheet. I did feel there was a bit of paper wastage but I figured some of the blank space would be filled when cutting a larger size. I was really impressed with the quality of the PDF in general, and hope other designers looking at patterns like this will mean a step towards more user friendly PDF patterns.

Diary of a Chain Stitcher: Purple Marbella Dress from Itch to Stitch

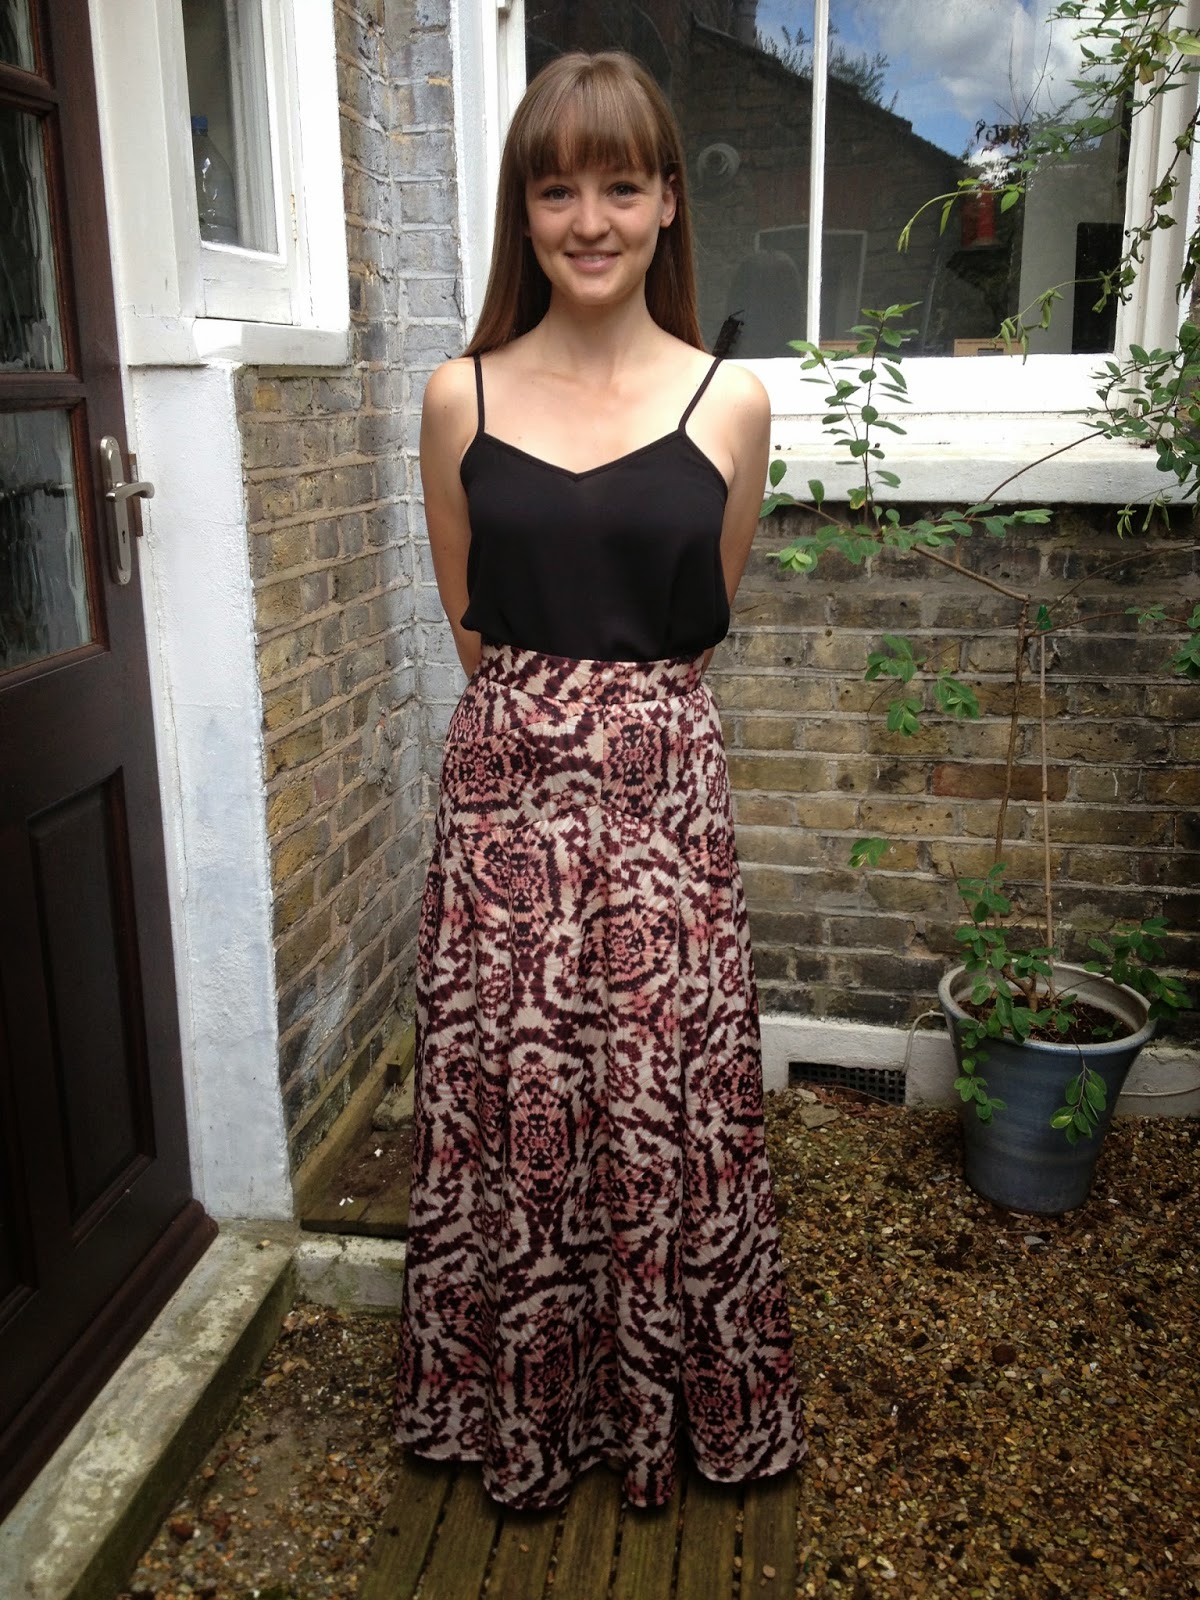
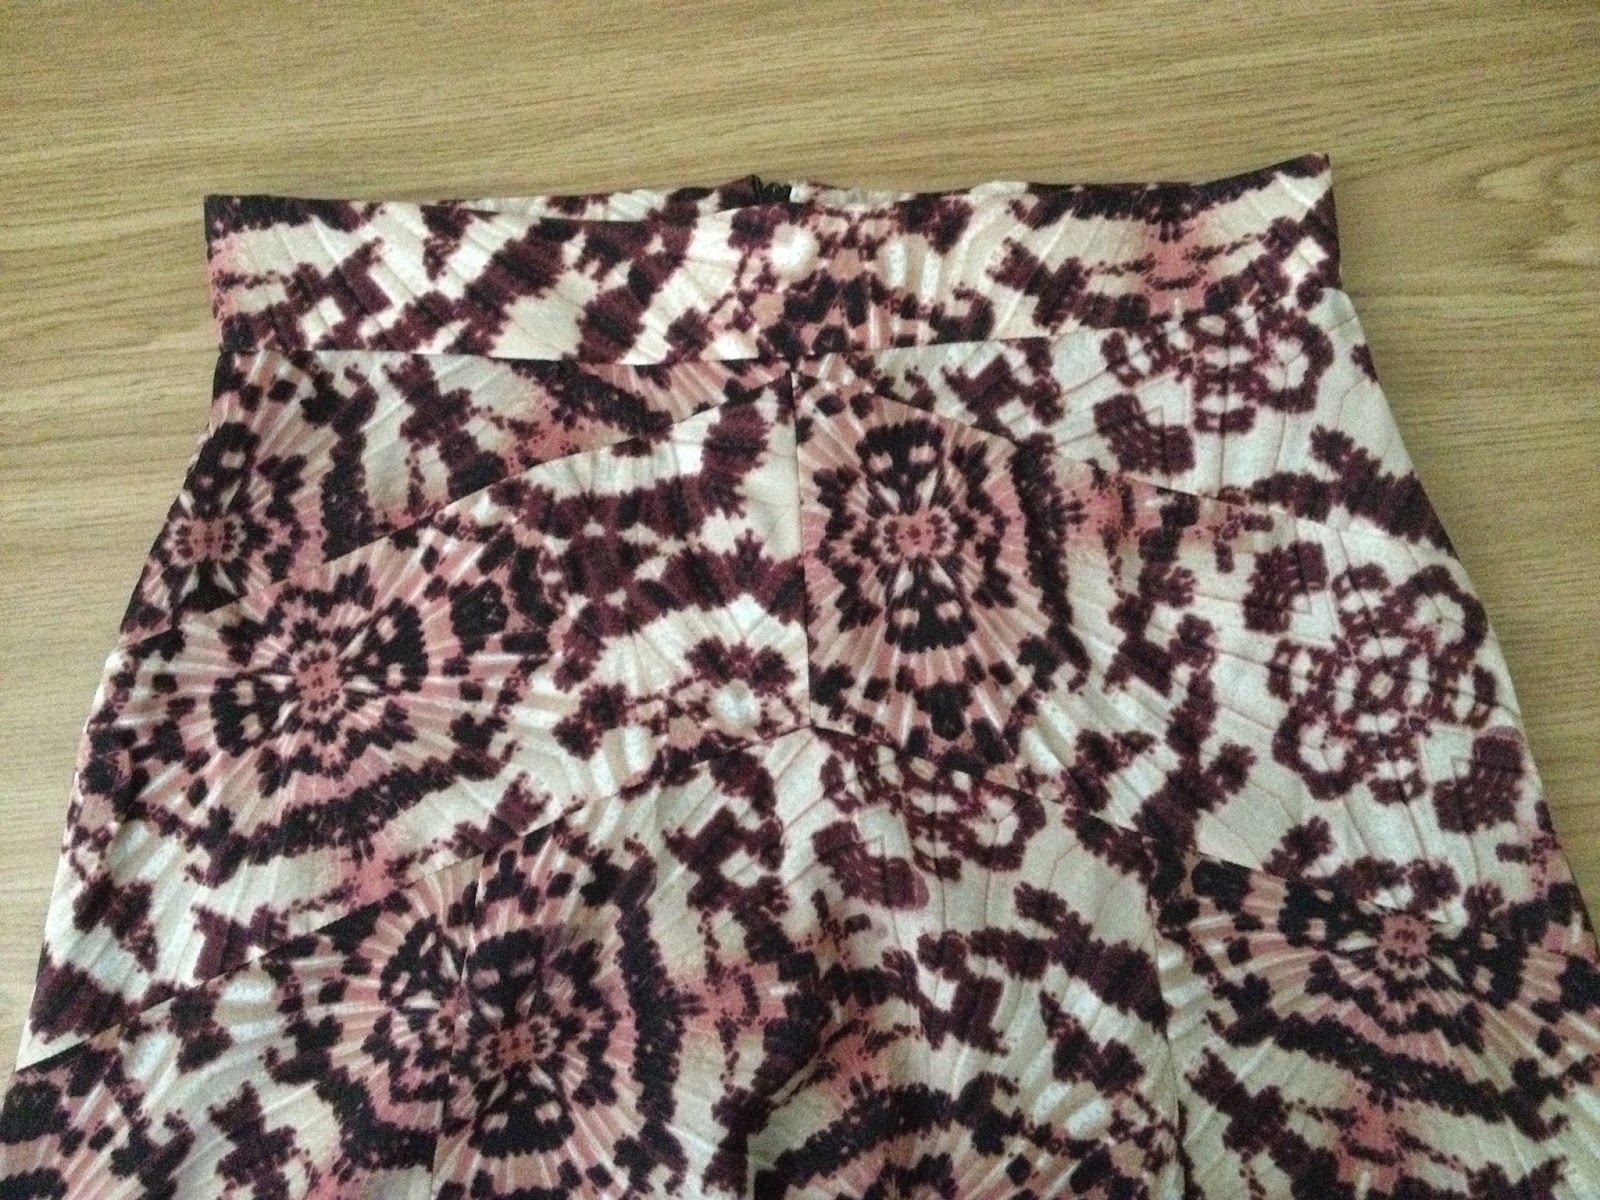
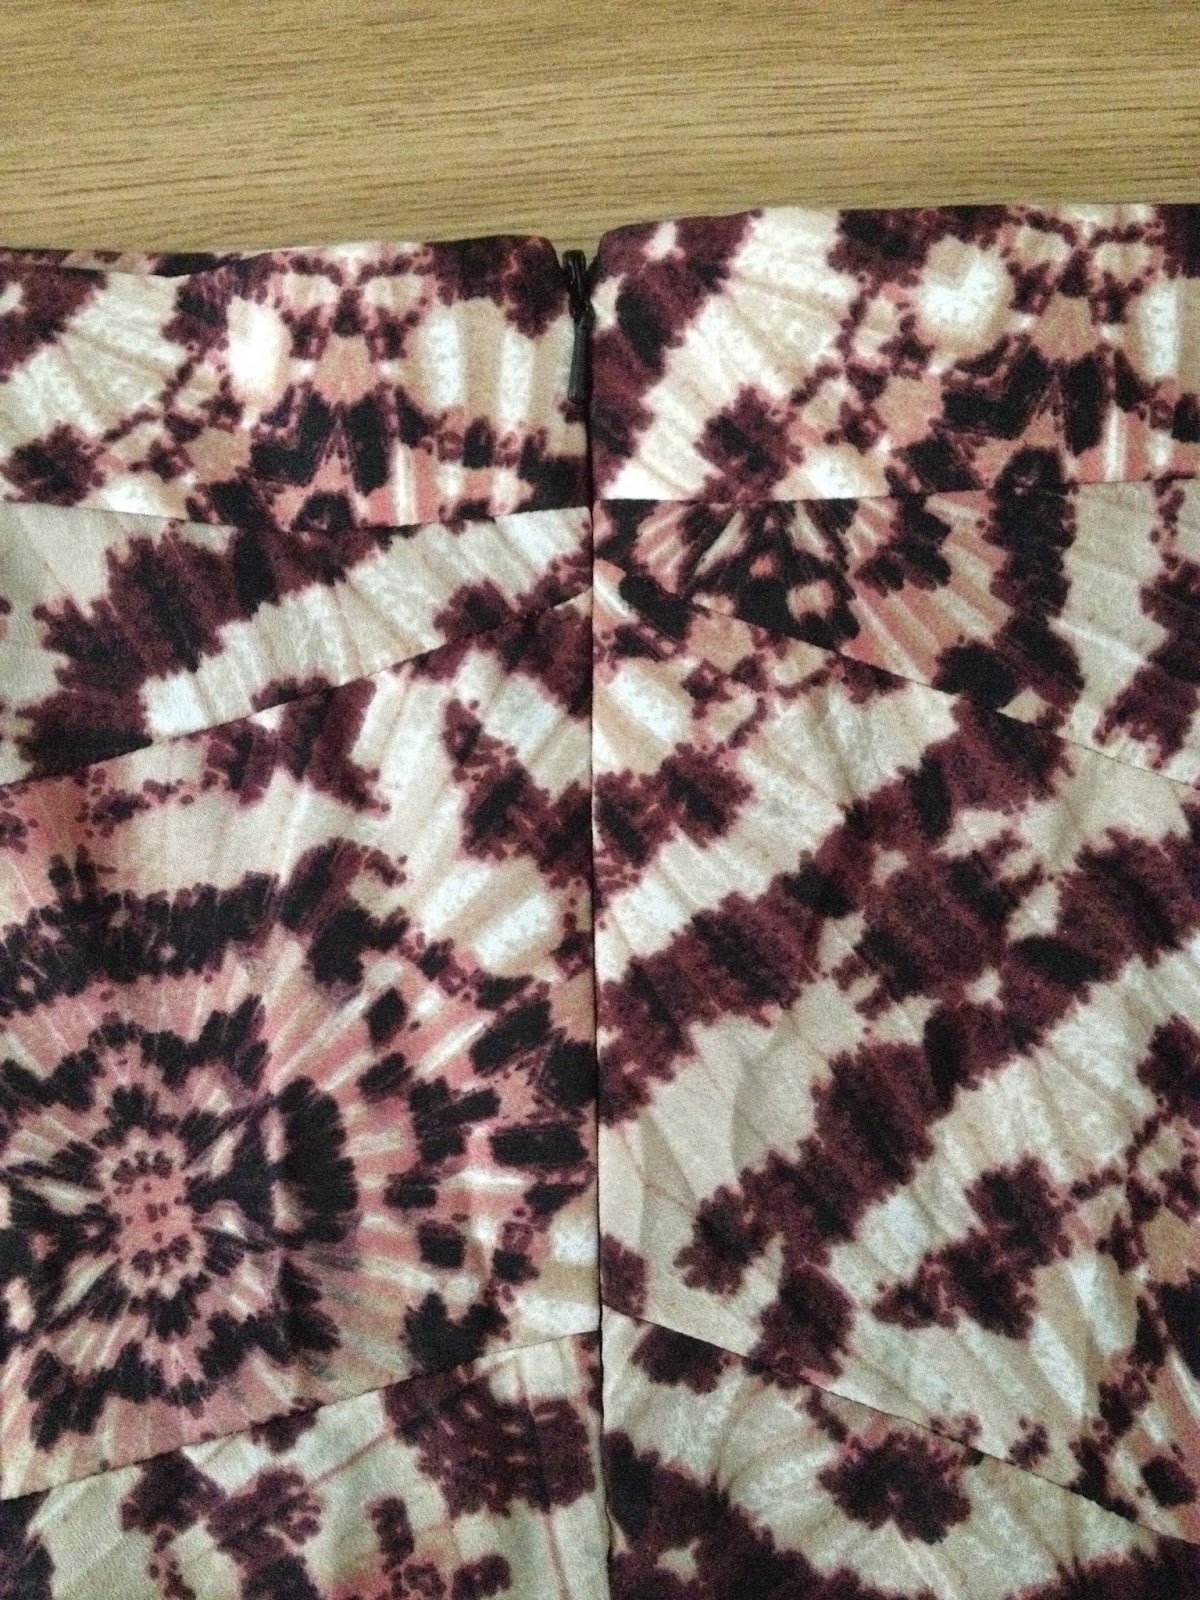
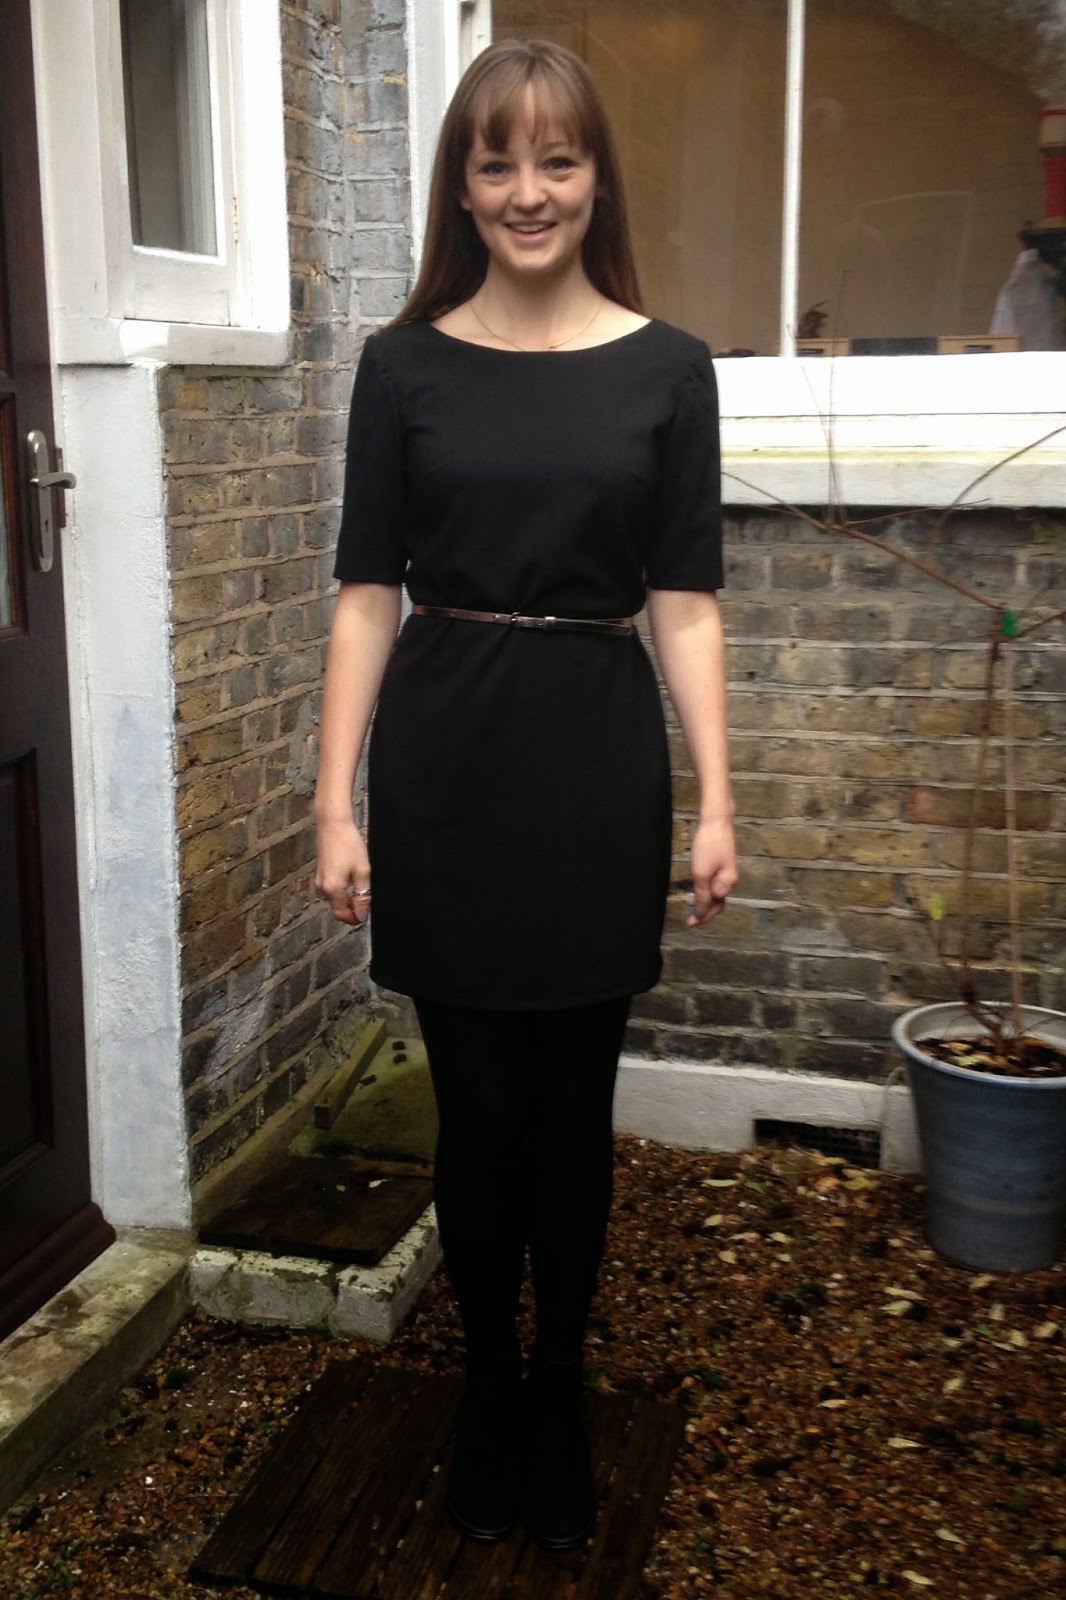
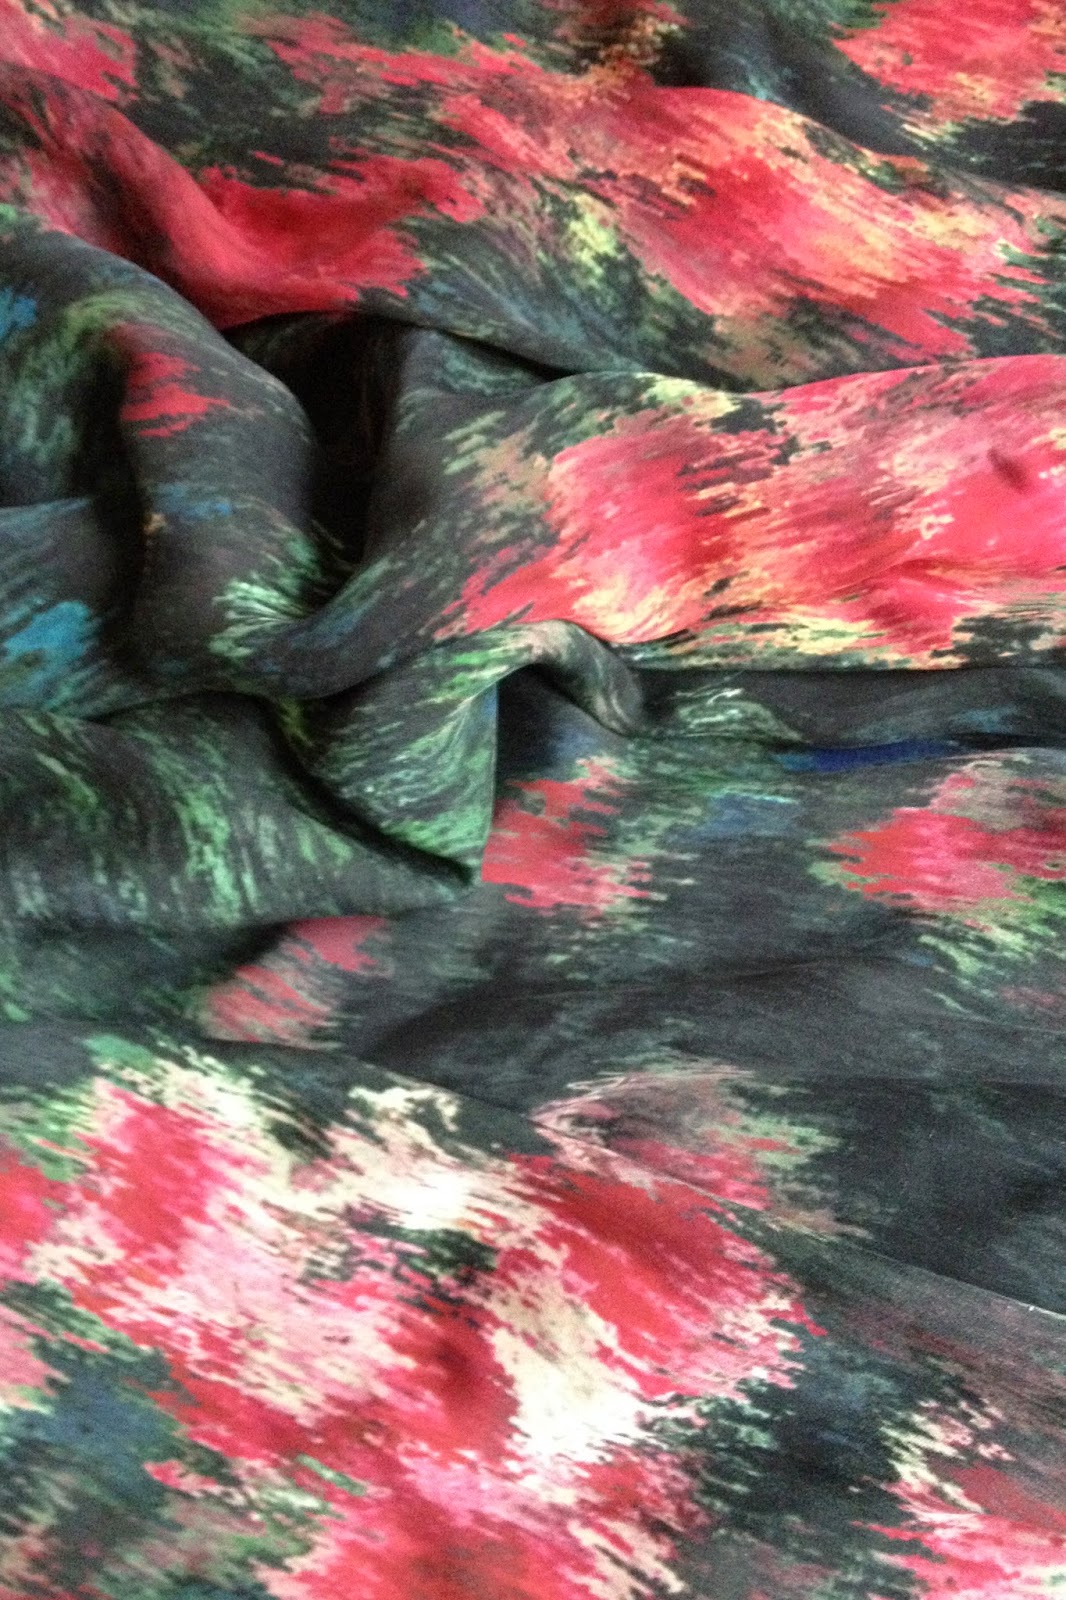
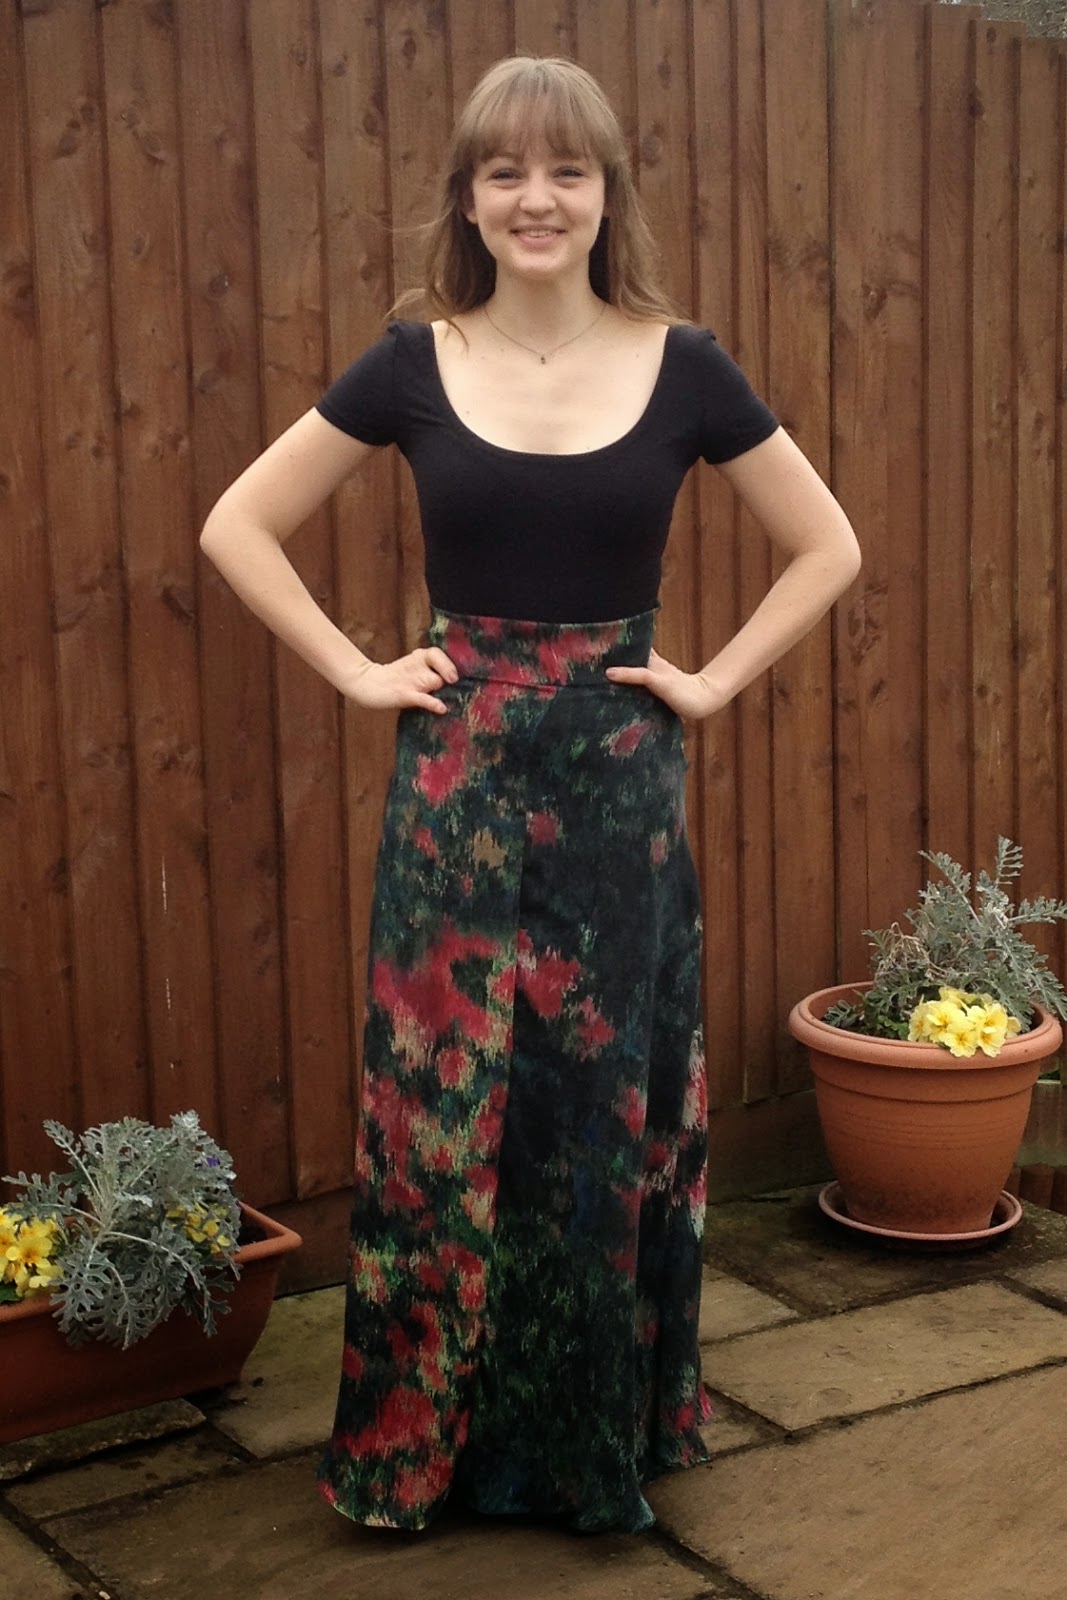
Despite treating myself to some bargain fabric purchases recently I'm really making an effort to sew through my stash and picked this synthetic mystery which has the appearance of a fine crepe and a subtle fleck in the colour. I got it in Walthamstow and it was actually one of the very first pieces of fabric I ever bought! I needed just 1.3m (at 145cm wide). It is a beautiful rich purple and the weight and body of it worked perfectly for this dress, however it was not so lovely to work with. This felt like quite a lengthy make to me and at points I was finding it difficult to get excited about continuing with it and it was all because of the fabric. It frayed like crazy, didn't respond particularly well to pressing and just wasn't very nice to handle. I was disappointed as I thought the poor fabric choice would turn this into a dress I wouldn't get any wear out of but I'm still delighted with the finished dress as the fit is so great and the instructions result in a really lovely professional finish! Still that'll teach me that I'll enjoy sewing more and would struggle less to get professional results if I invest in a quality fabric to begin with! 

Diary of a Chain Stitcher: Purple Marbella Dress from Itch to Stitch

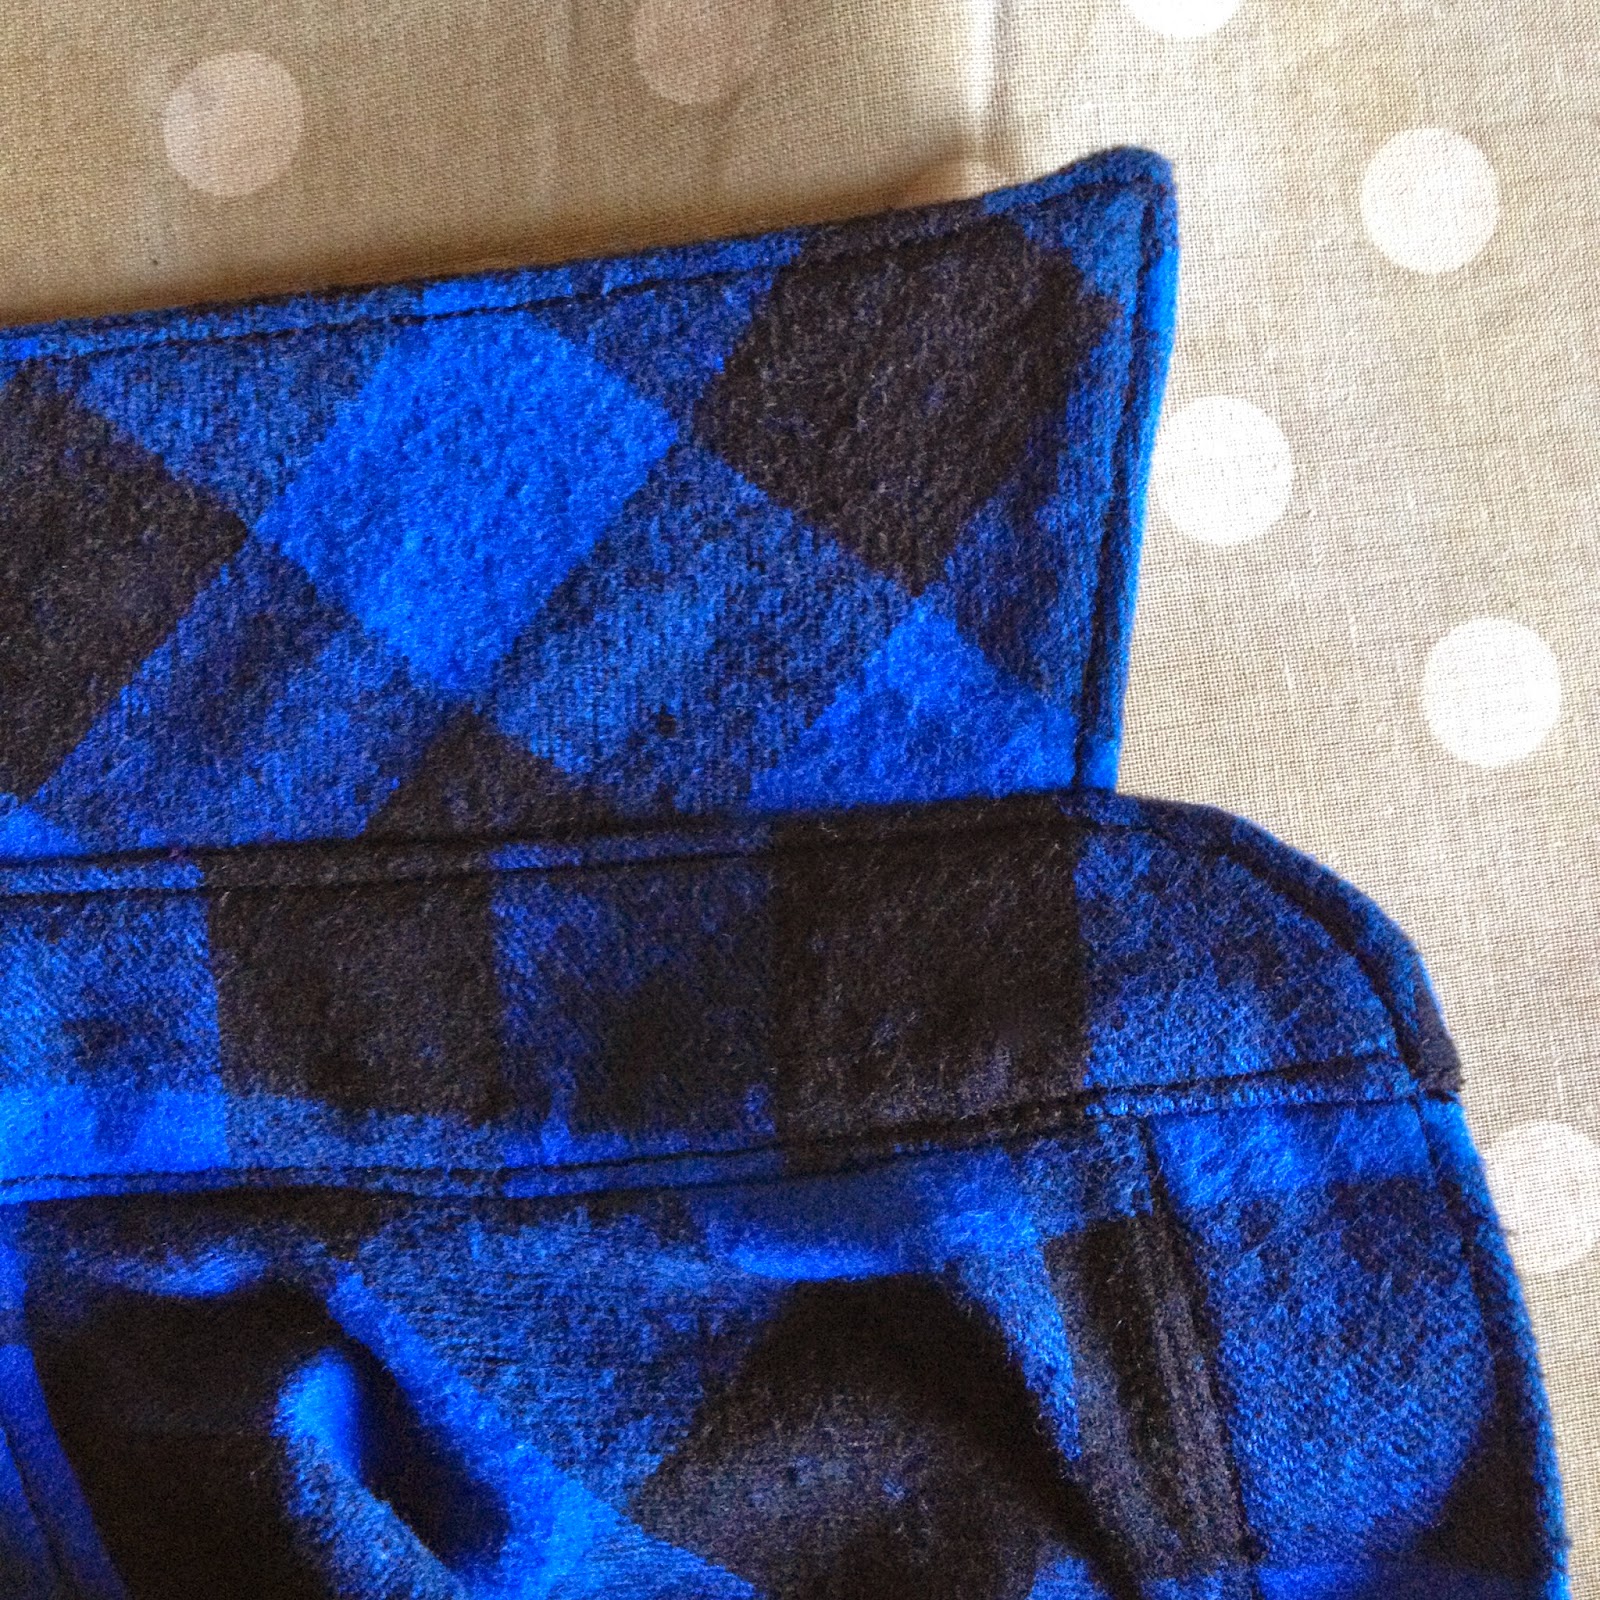
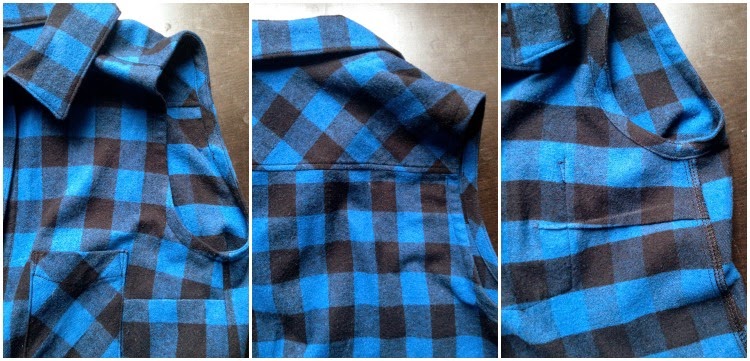
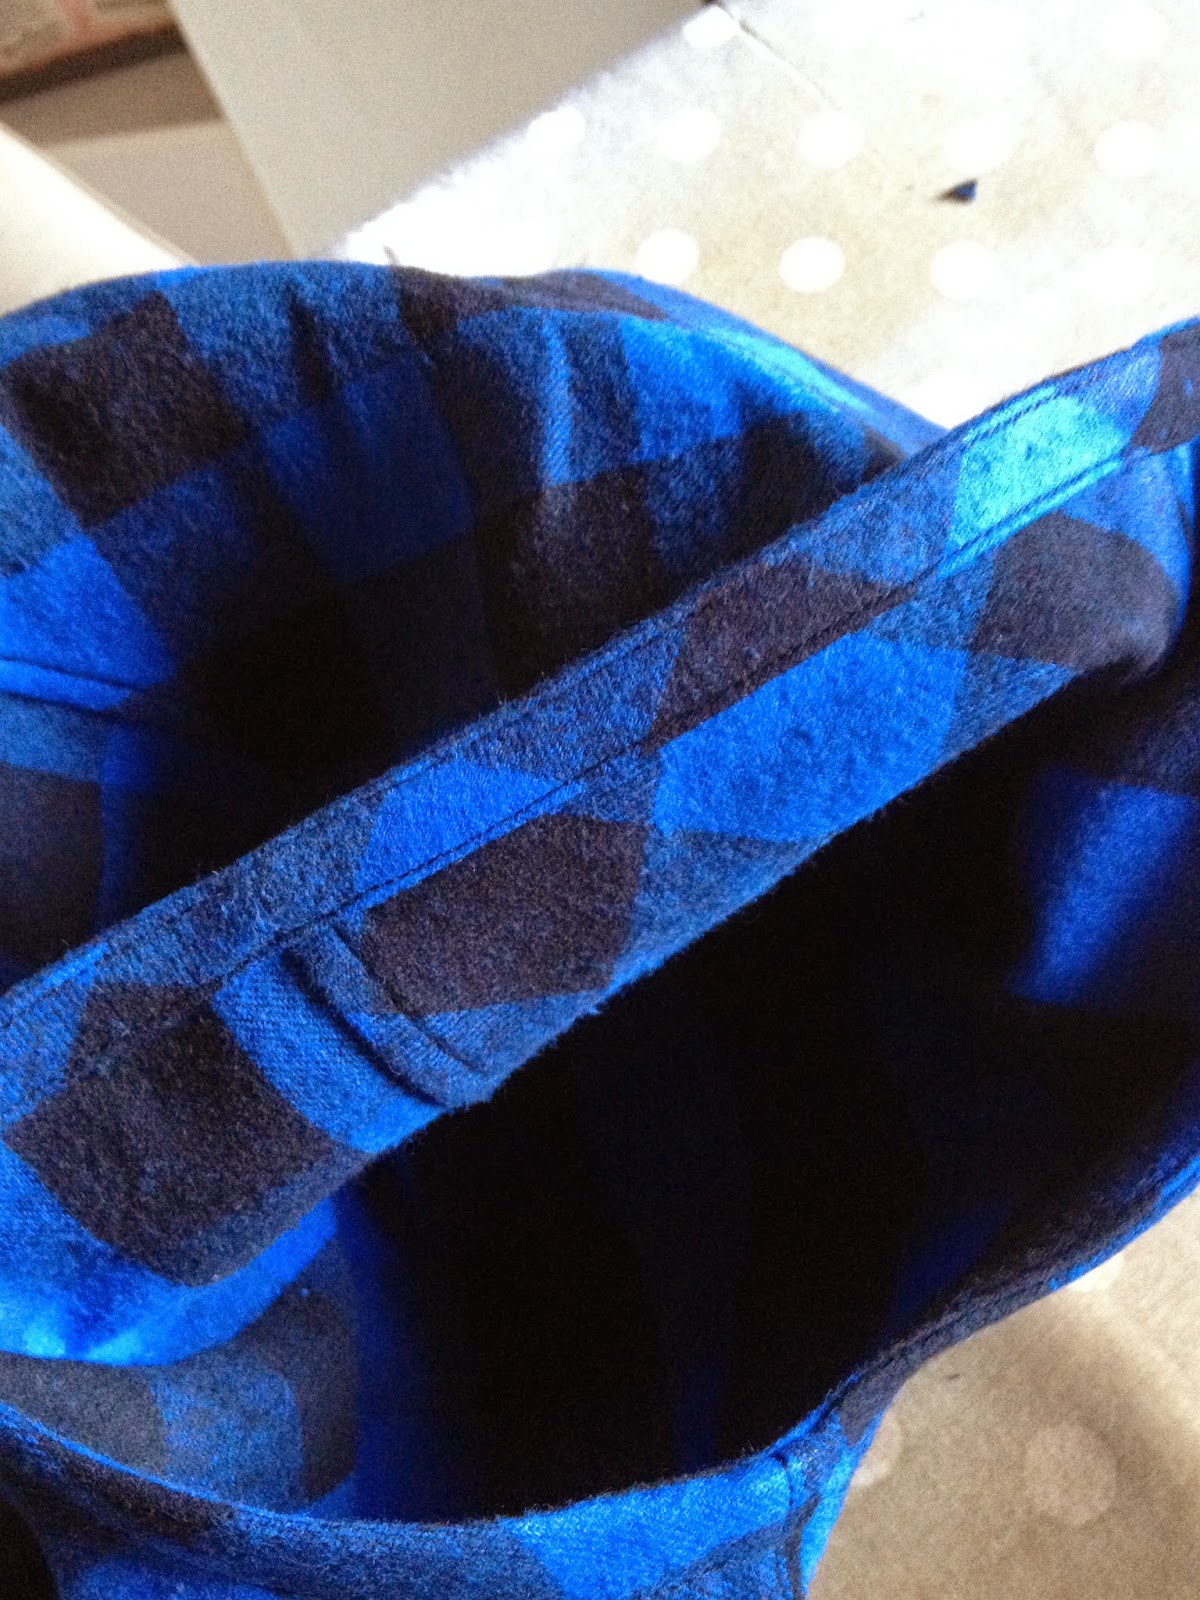
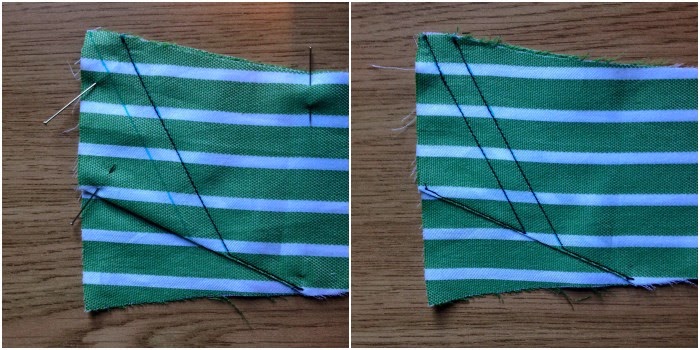
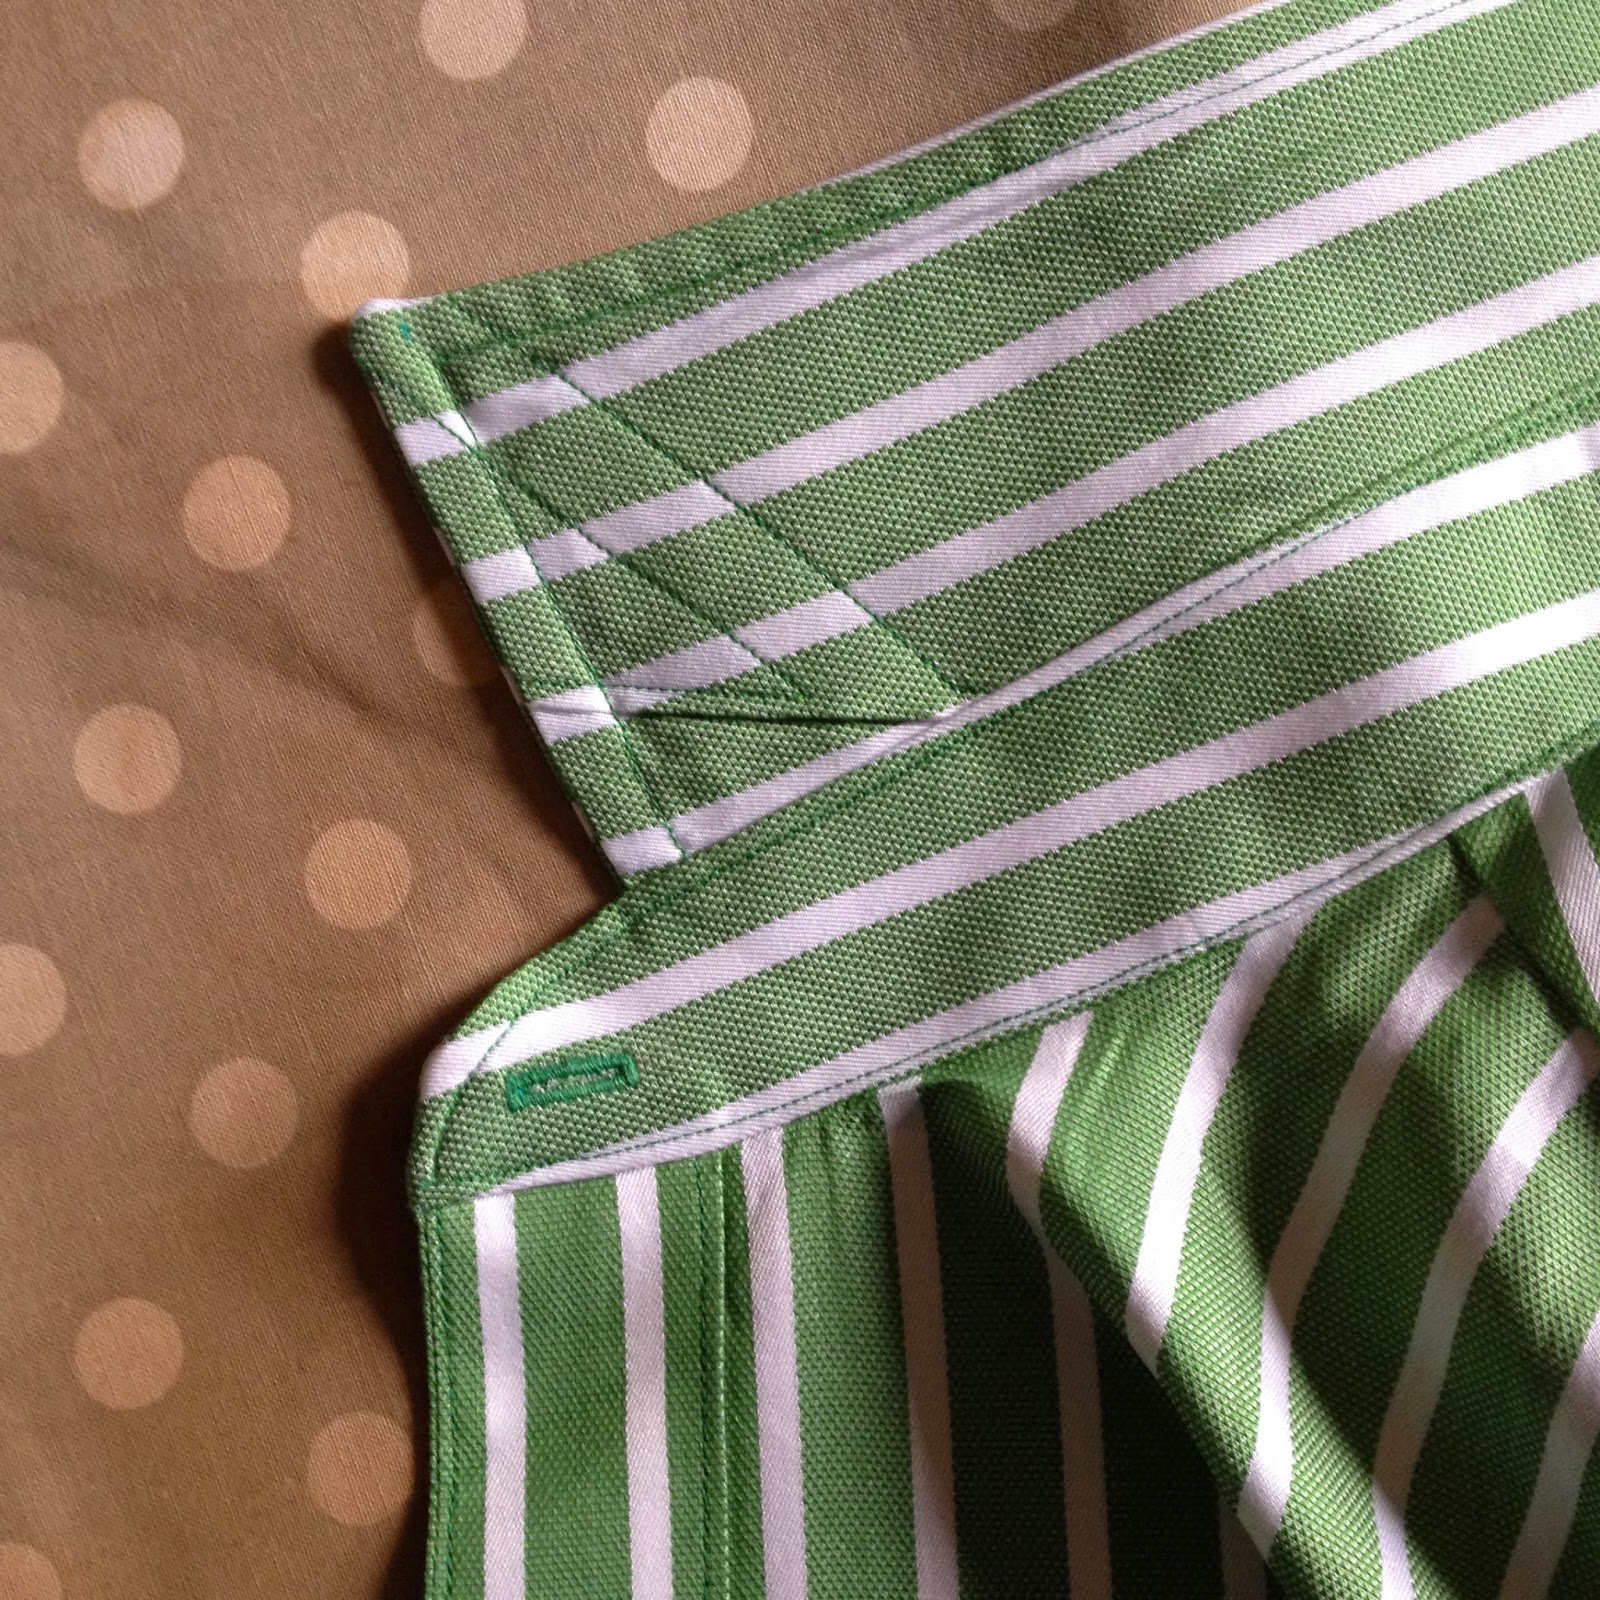
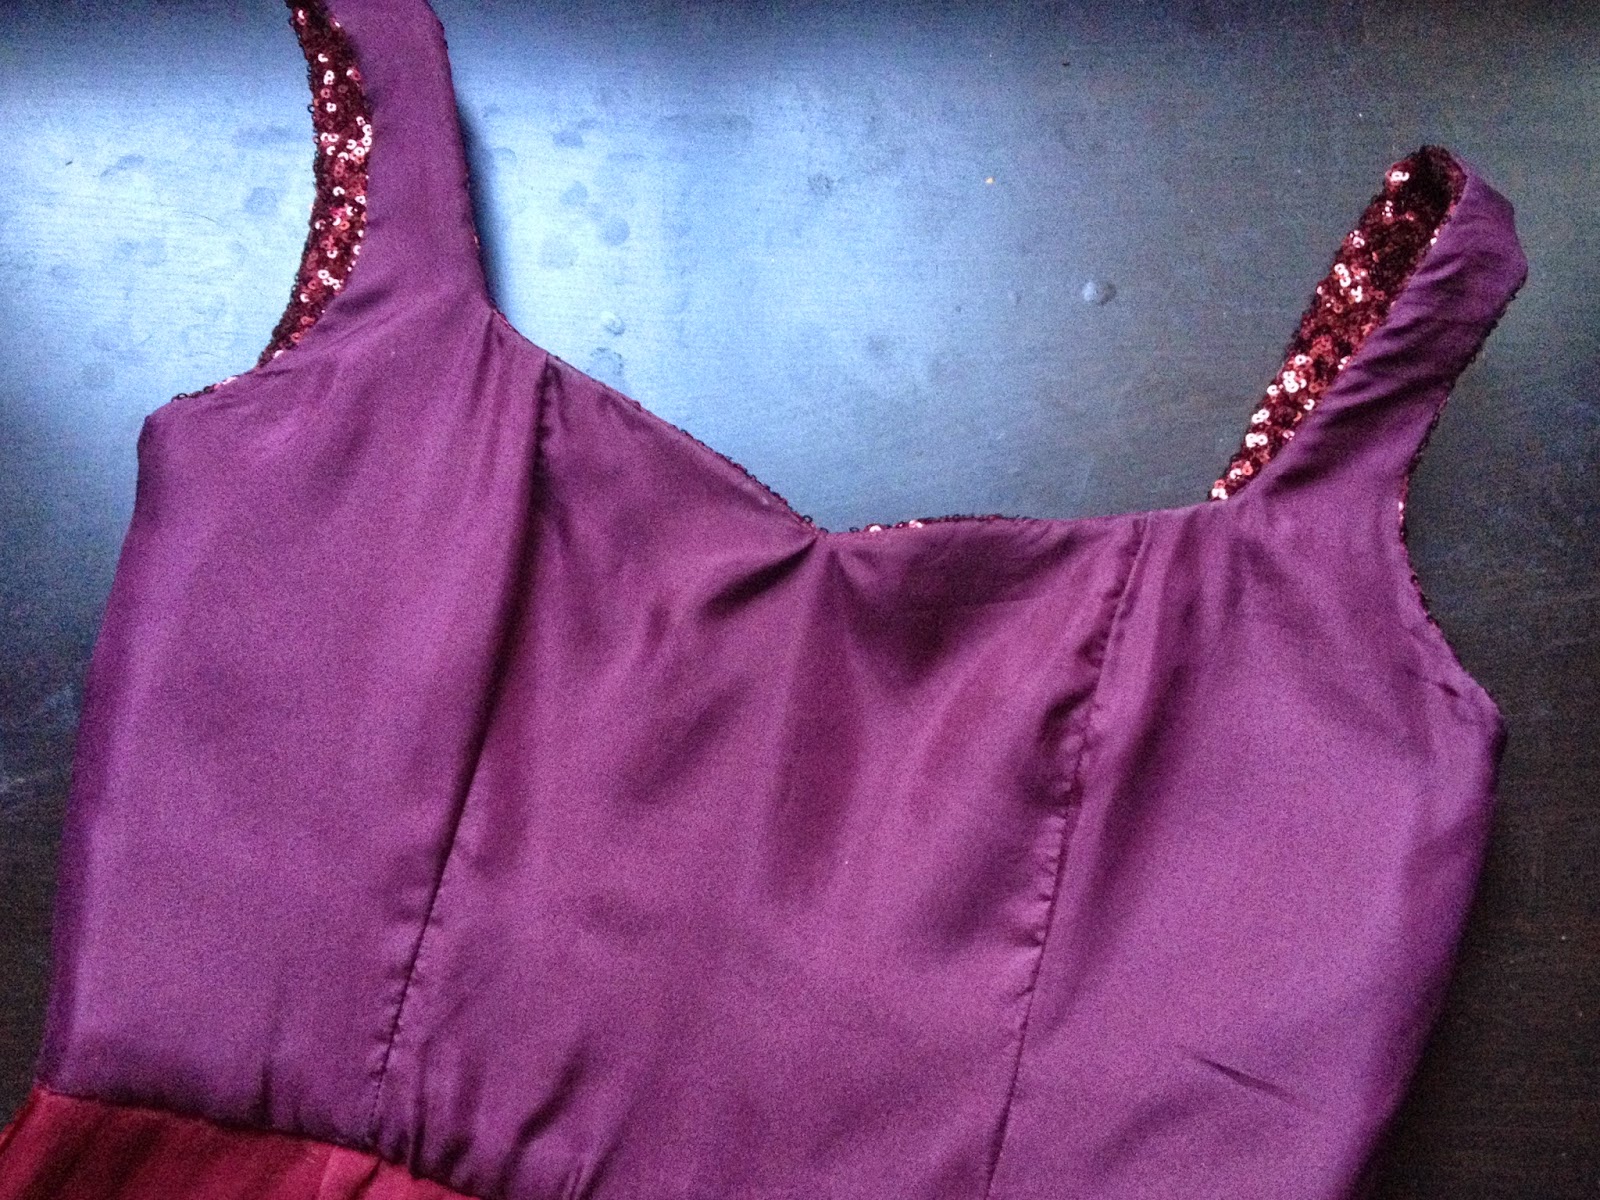
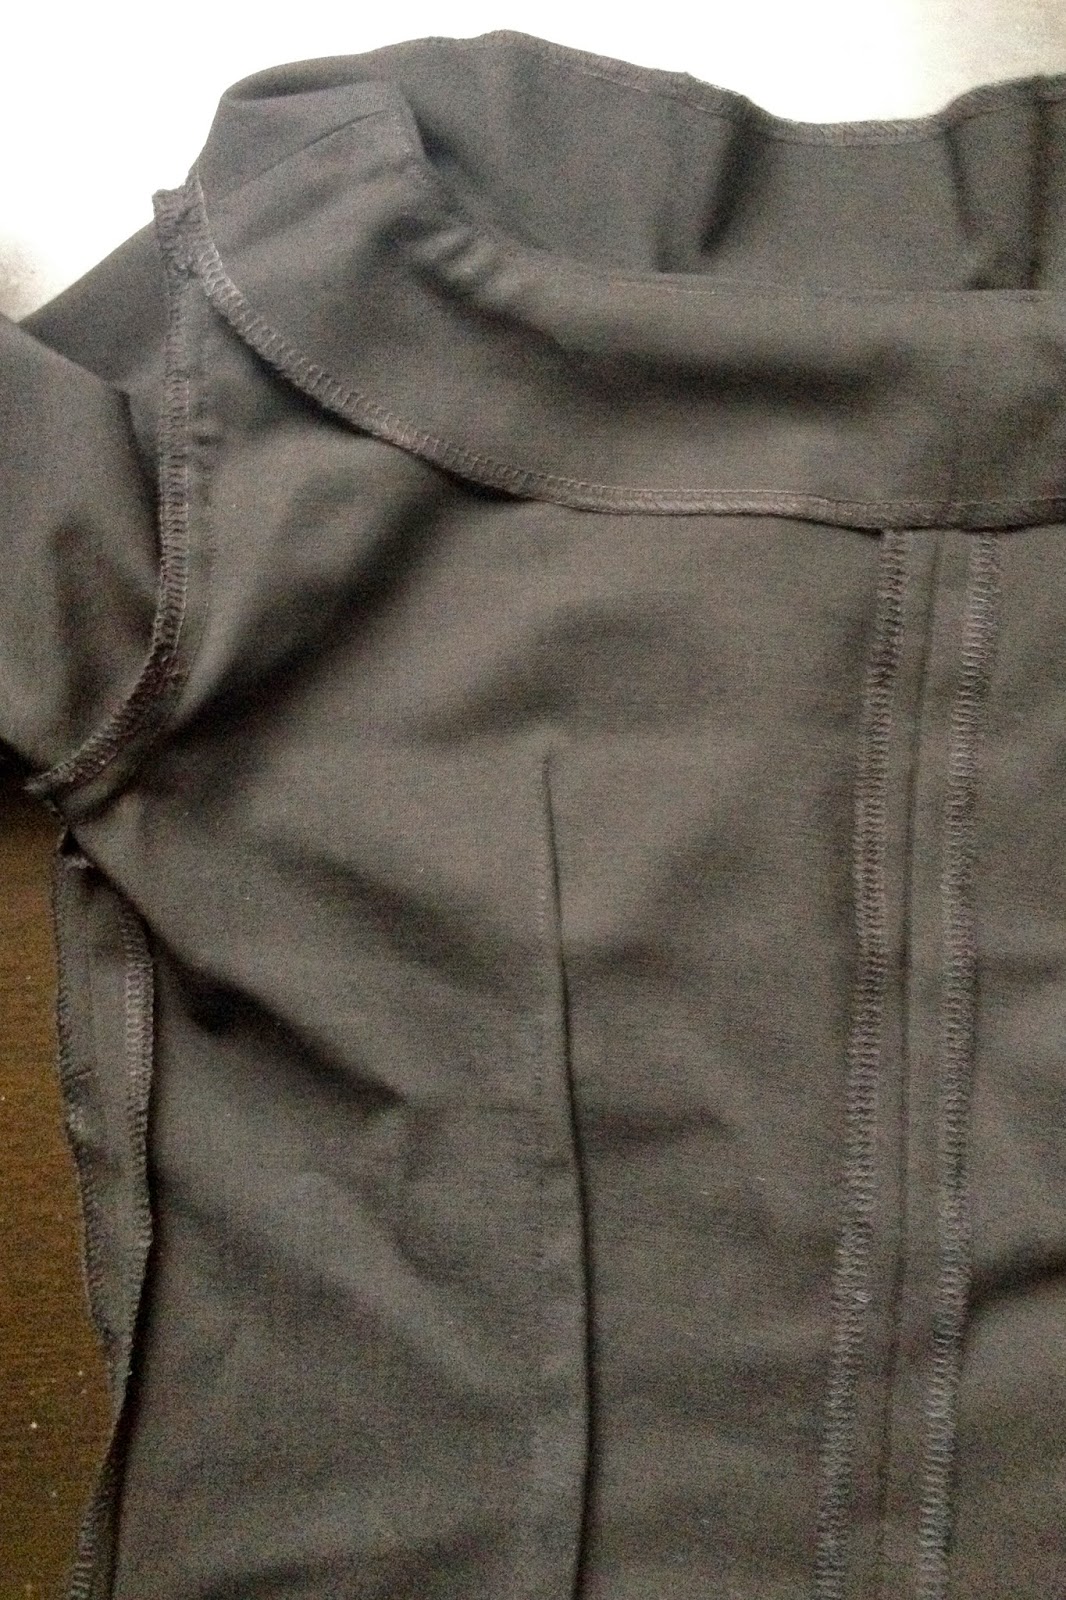
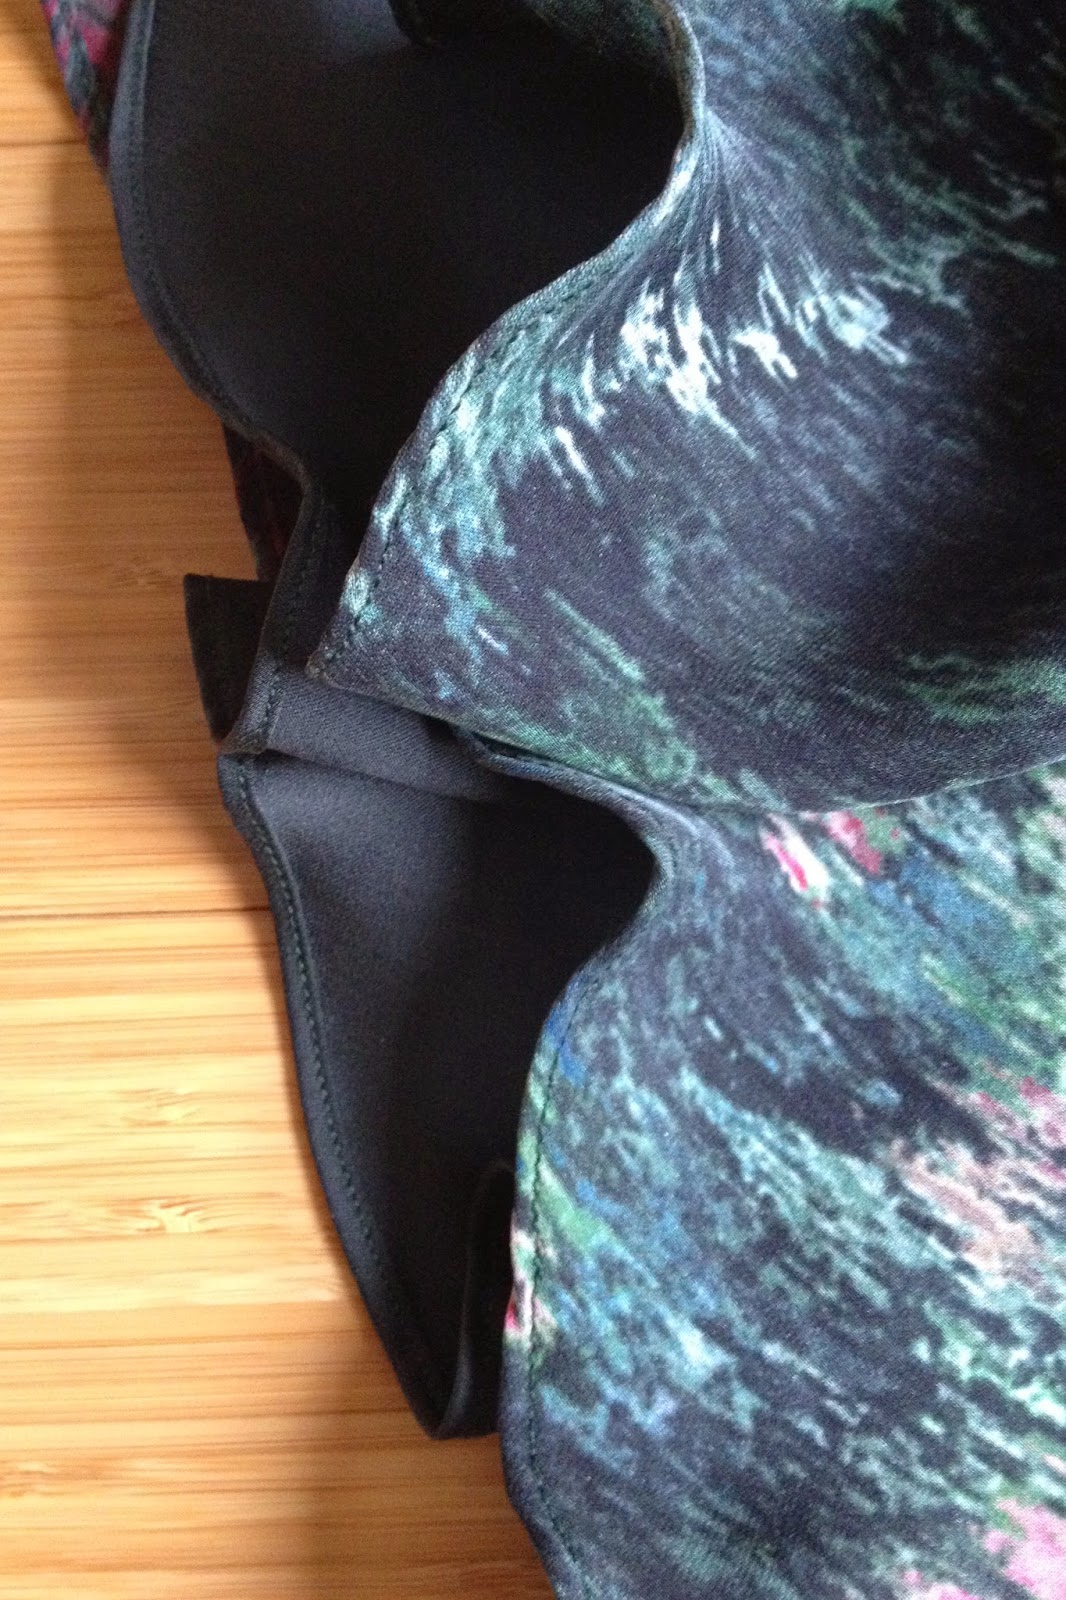
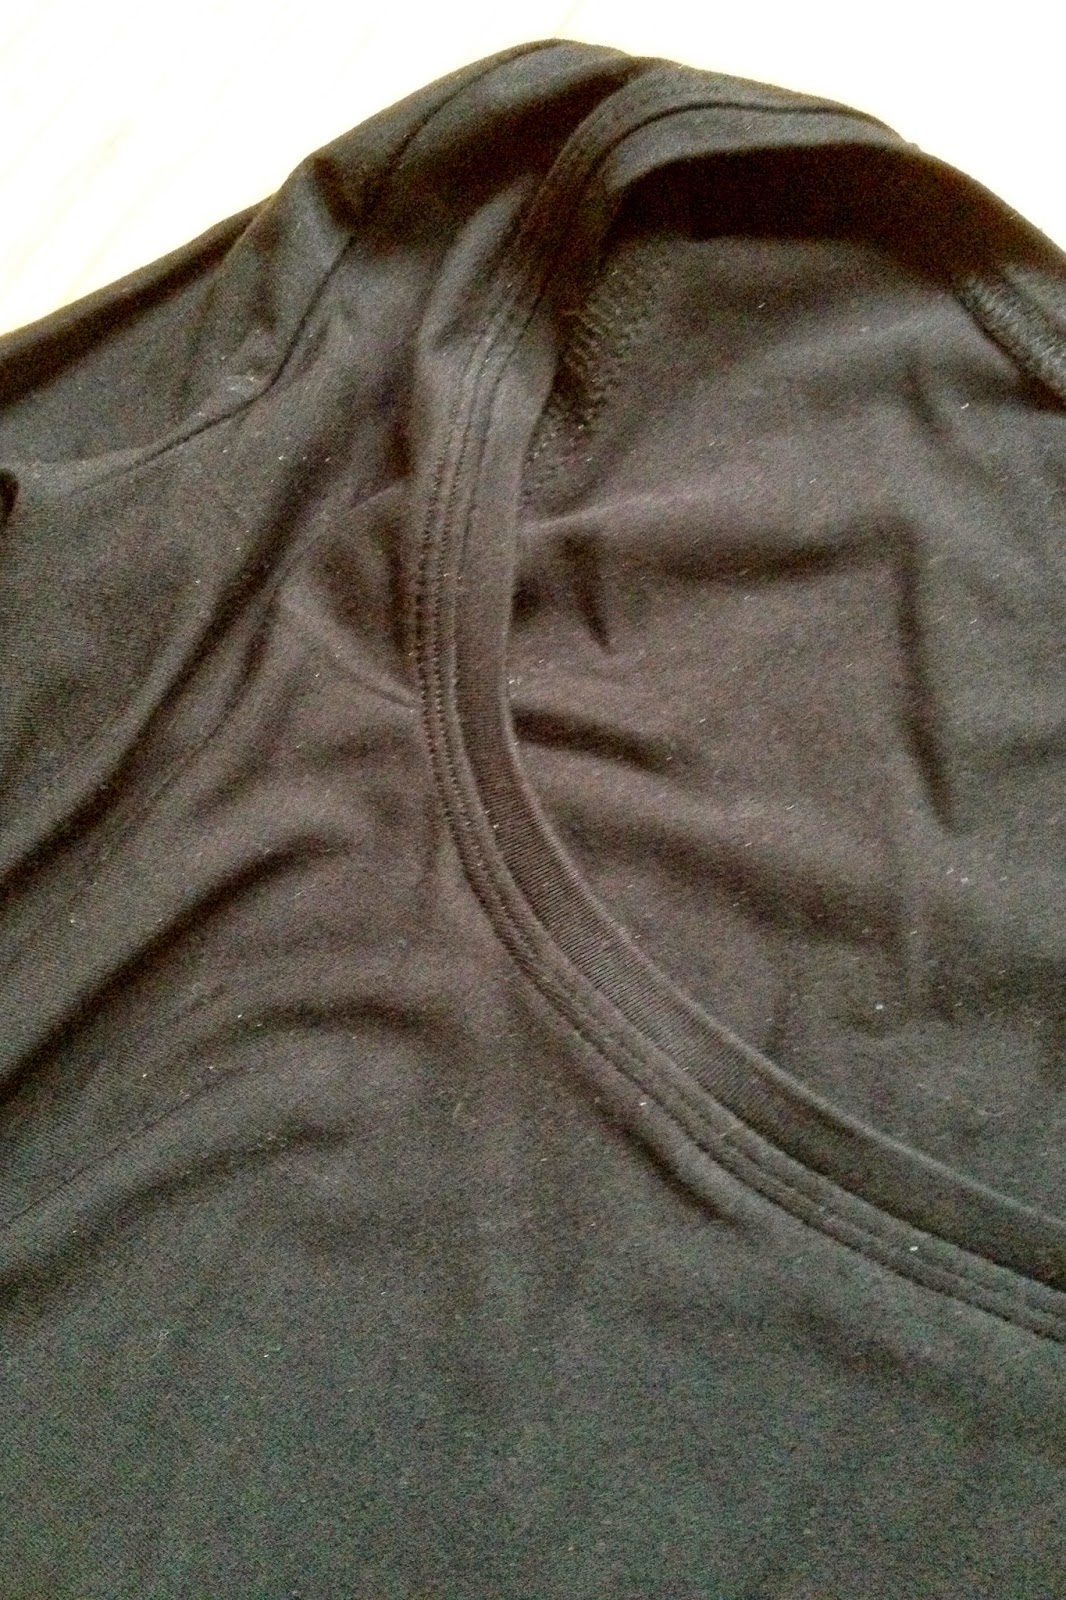
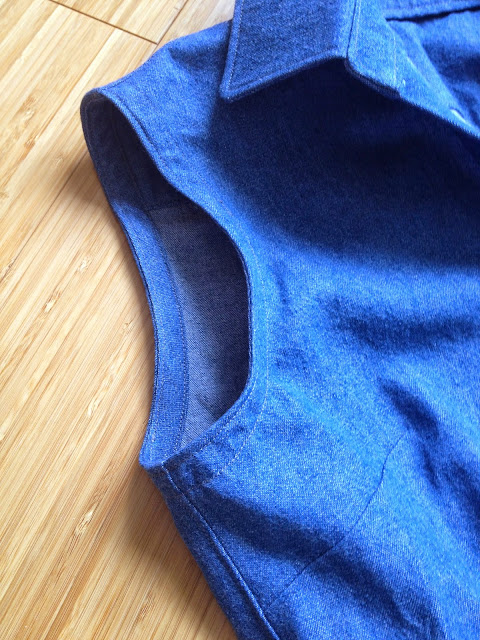
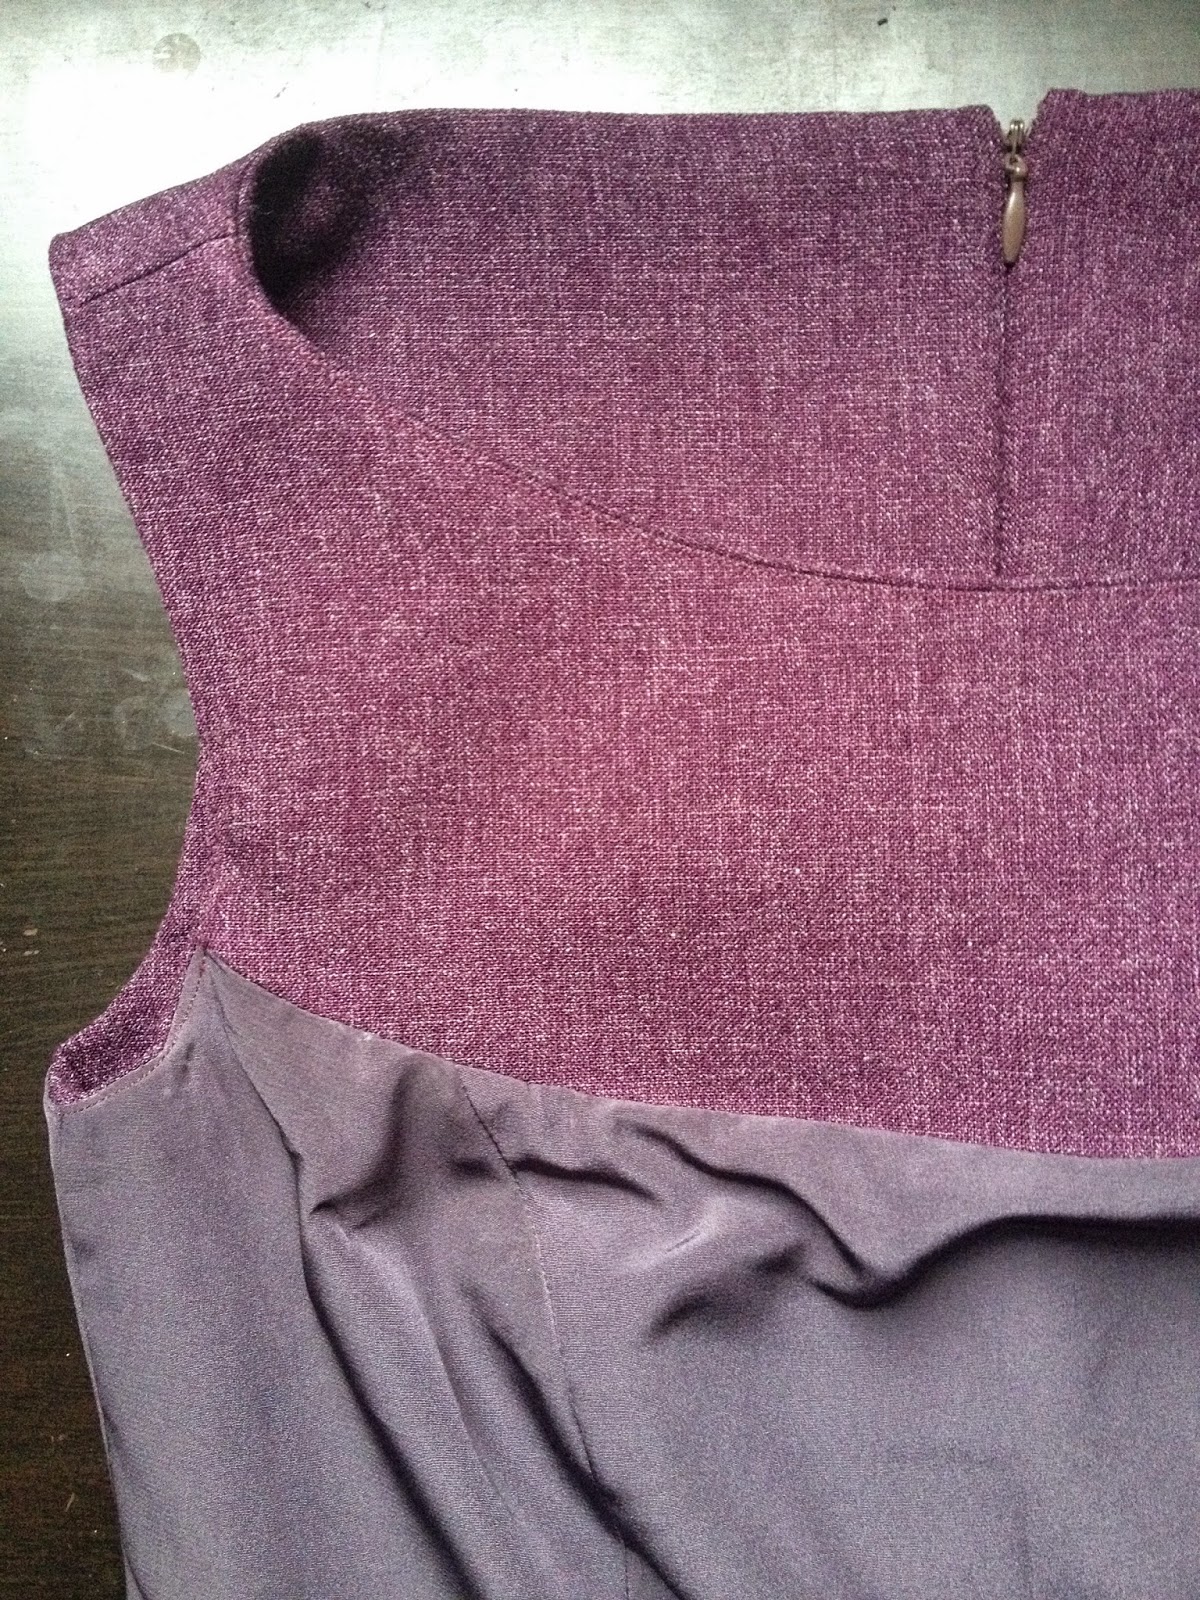
As I've become more confident with my sewing and the basic ways to put things together I sometimes tend to skim over the instructions of more straightforward patterns and follow my own tried and tested methods. With this particular pattern I made an effort to follow every step as written and I'm so pleased as I picked up some fantastic tips and new methods along the way. One thing I tried for the first time was stay stitching and then clipping the seam allowances of the princess seams before assembling them. I didn't find it made a huge amount of difference doing it that way round but it was probably marginally easier to ease the curves in. The instructions as a whole are quite lengthy (in a good way!) and each step is accompanied with a clear illustration. I found that they included some fantastic tips which I've never seen in other indie patterns. To give you one example; when stitching the yoke and facing together along the neckline and armholes you are instructed to pin them together with the raw edge of the lining protruding by 1/8". Just this small adjustment (when combined with under-stitching) made such a difference to how neat the neckline looks and when I turned it right side out the lining rolled to the inside almost without needing any encouragement or pressing!

Diary of a Chain Stitcher: Purple Marbella Dress from Itch to Stitch


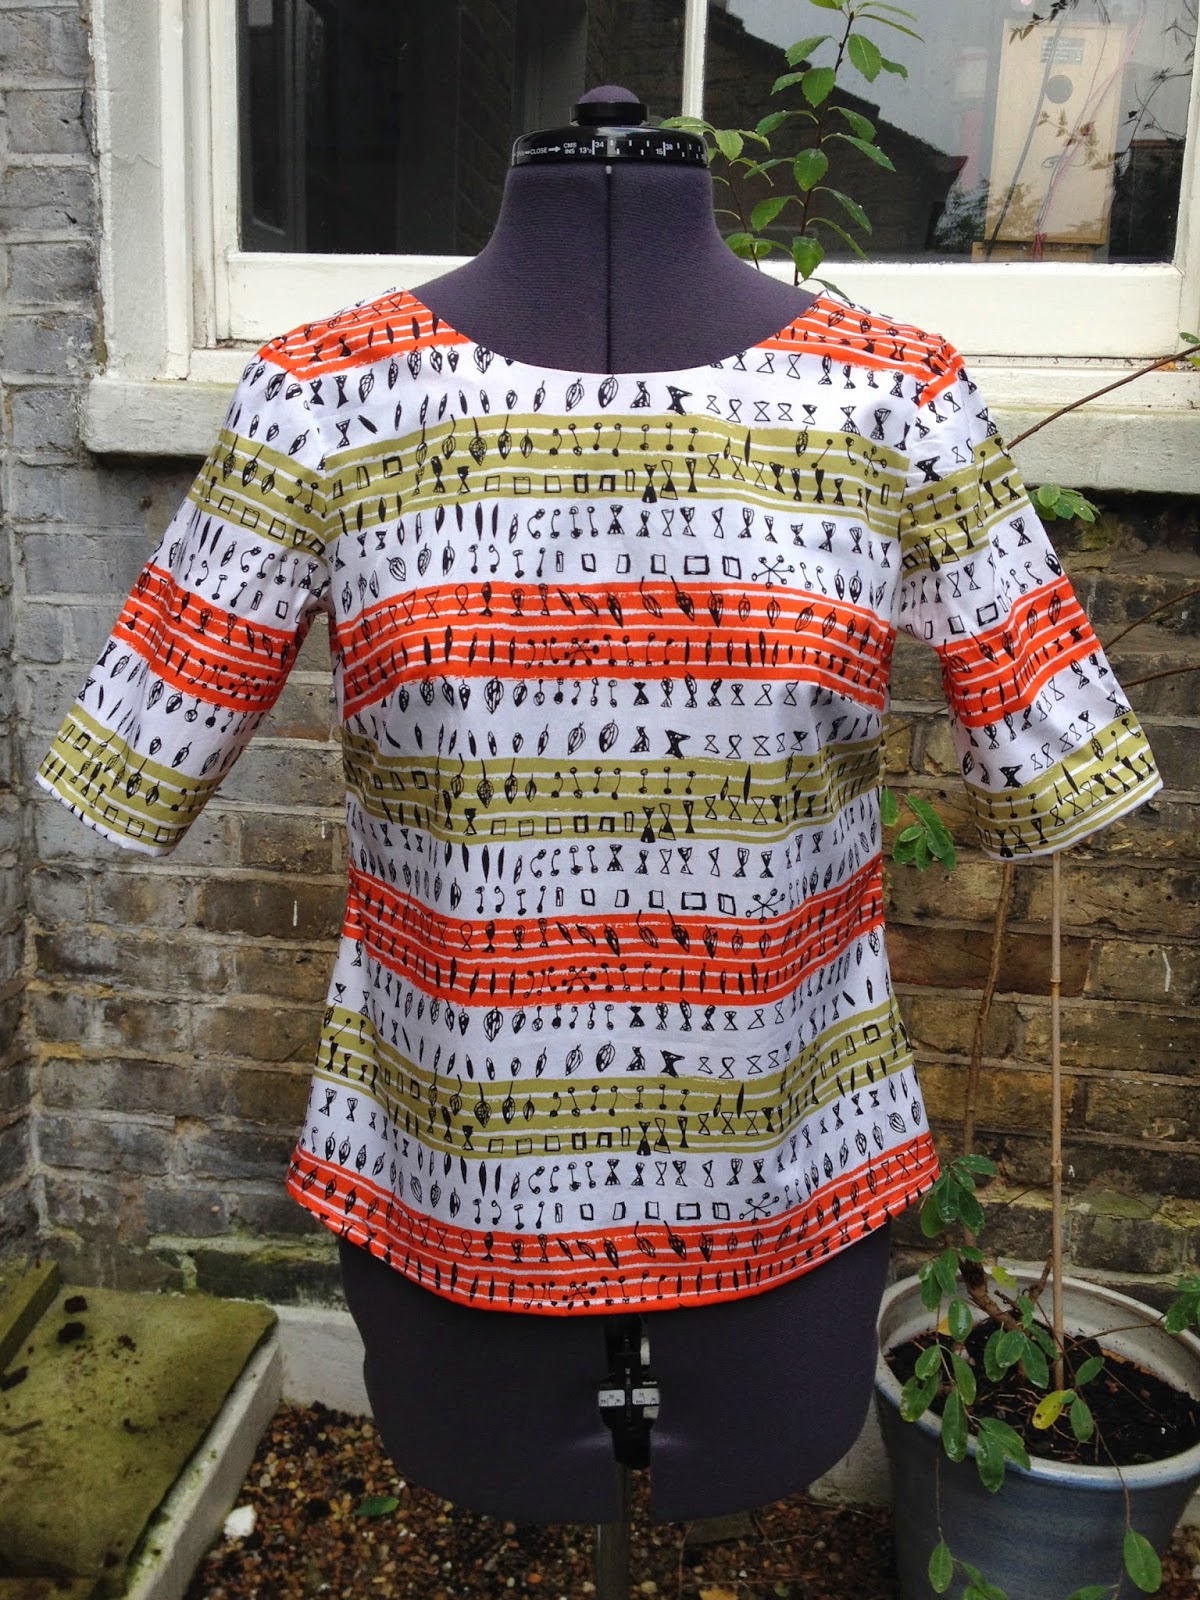
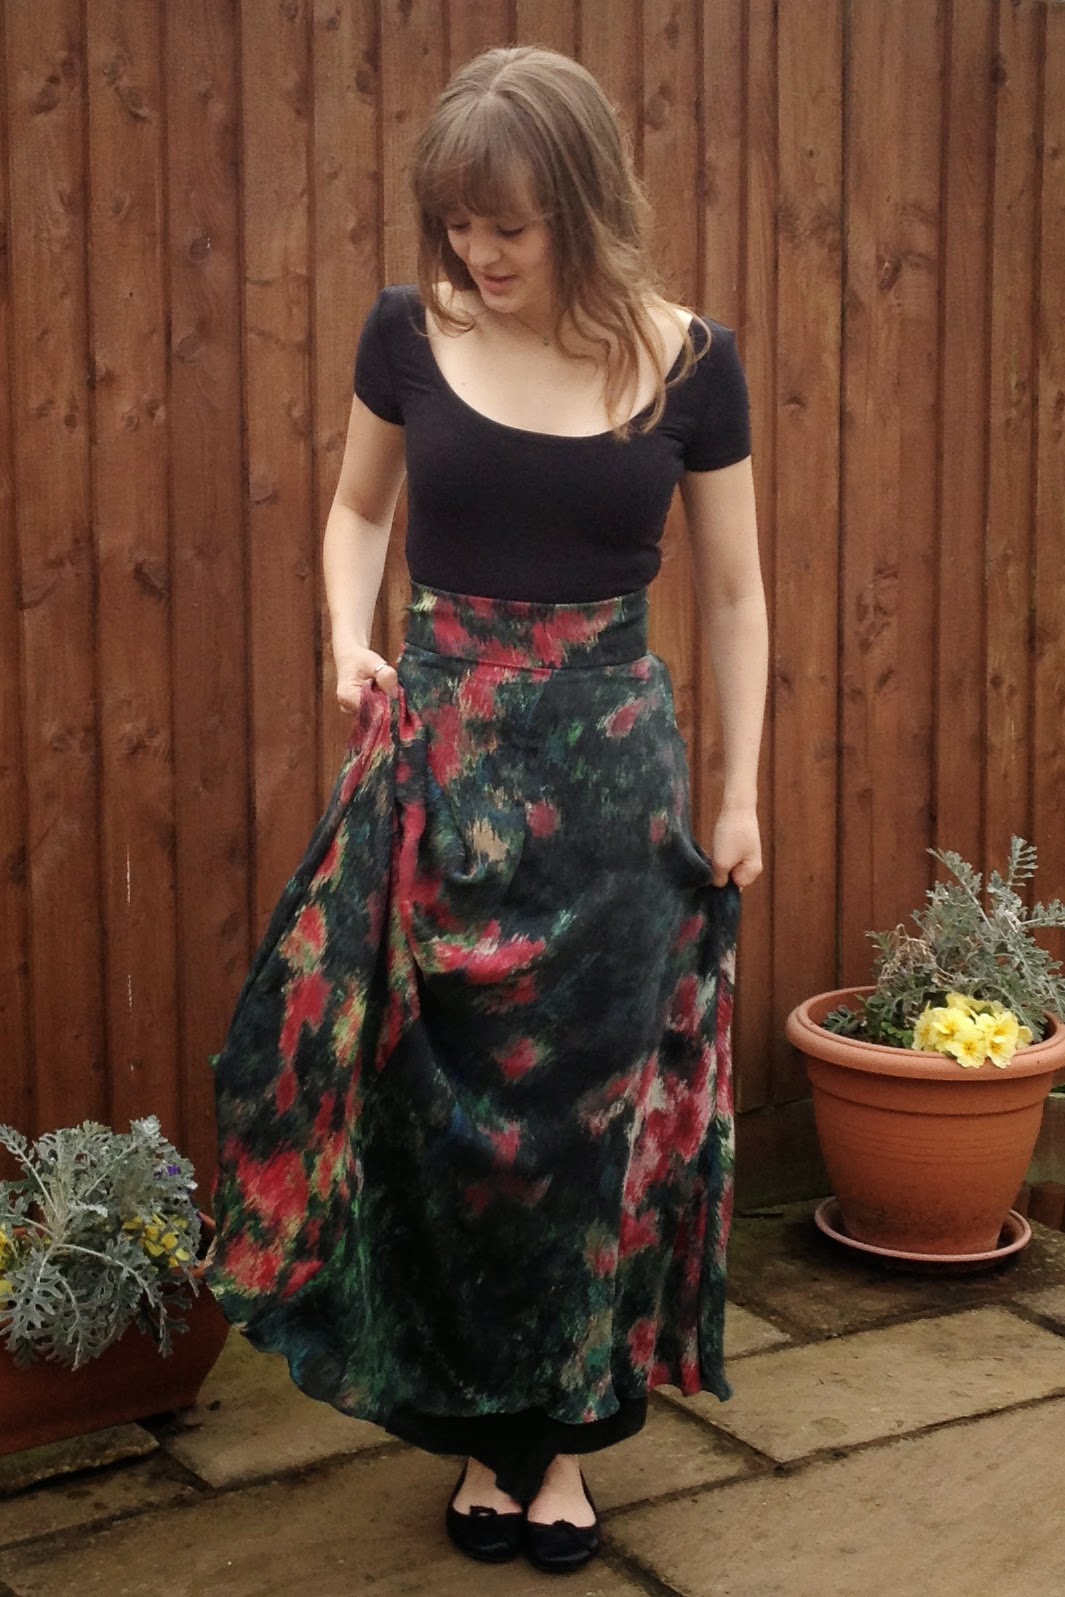
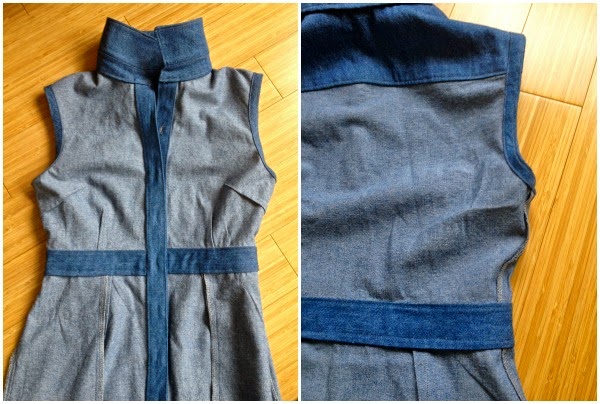
I chose to make the fully lined option and for this I used another fabric which has been in my stash for a while. I got it out of just a metre and I really like how it looks with the main purple. It's just a poly crepe but has a great weight and smooth finish for lining, but is a little static. I'm keen to make the unlined version which just uses the yoke pieces as facings. It has separate instructions at points and theres an interesting method for using bias binding to finish the lower parts of the armholes which I'd like to try. 

Diary of a Chain Stitcher: Purple Marbella Dress from Itch to Stitch

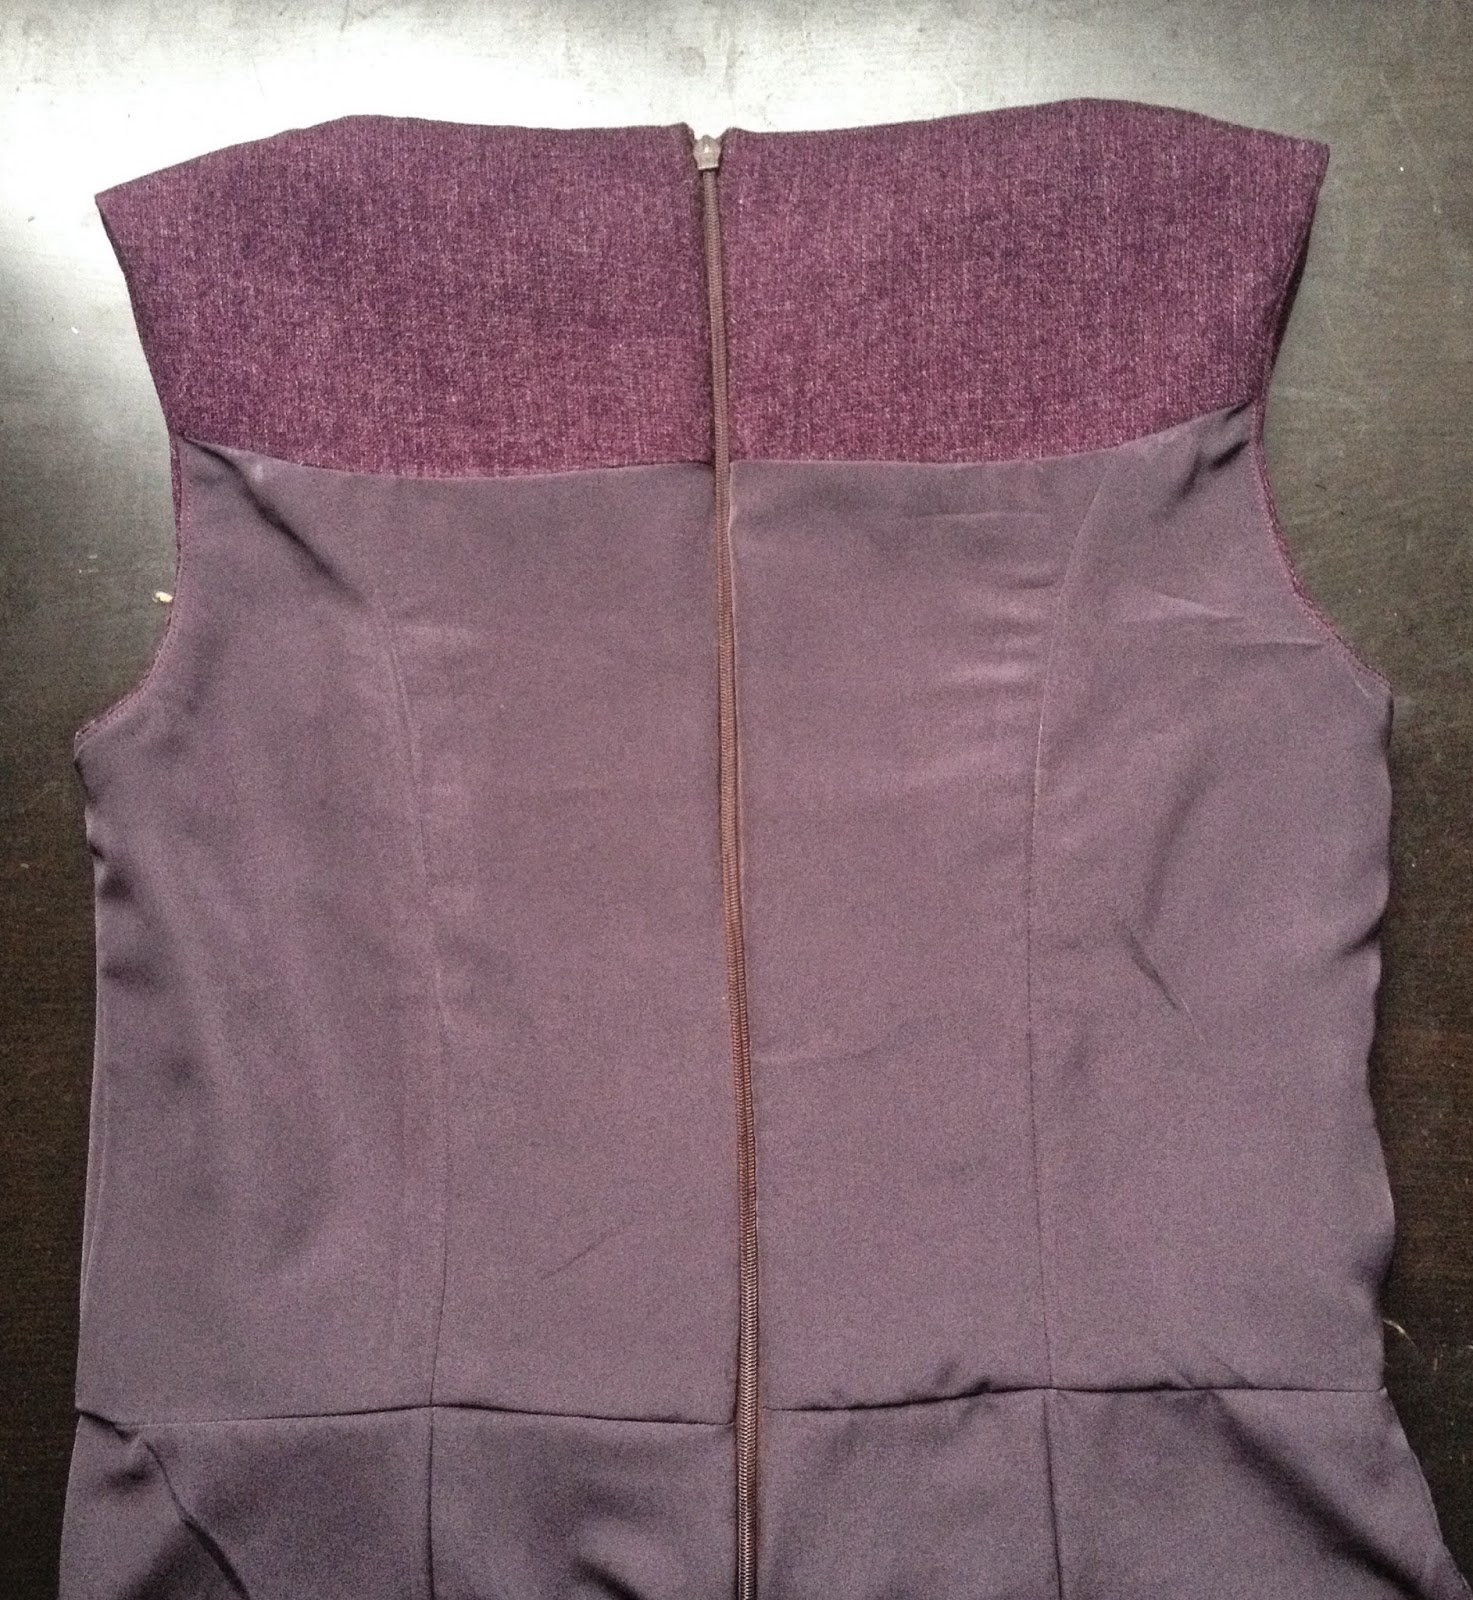
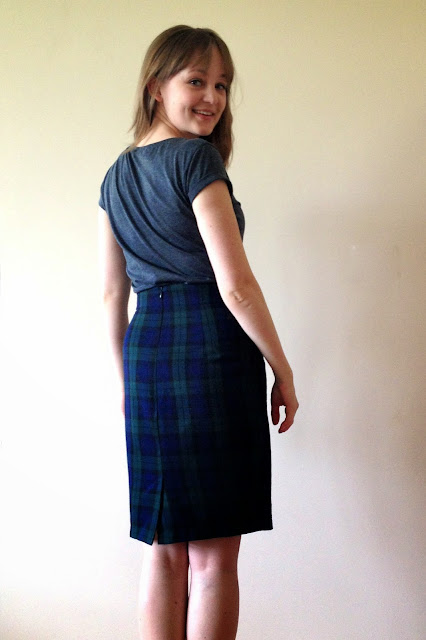
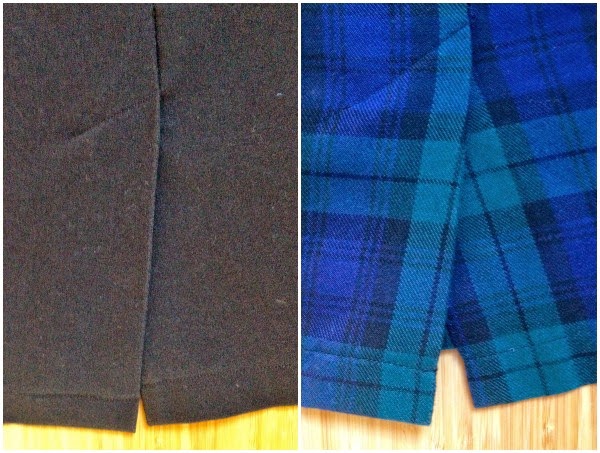
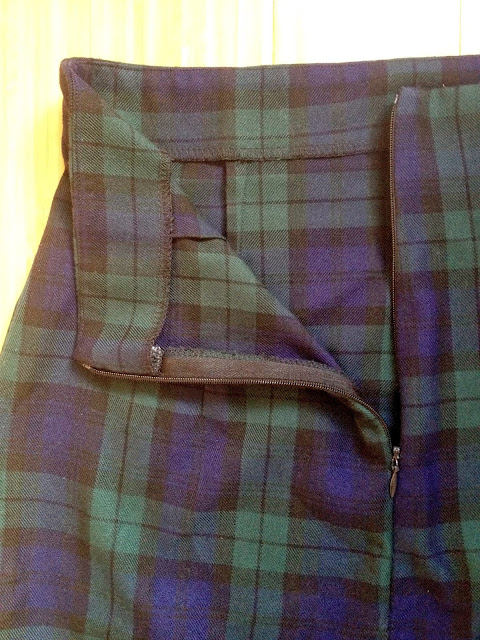
It was the little details of this pattern made me realise just how well thought out and professional it is; for example the separate hem length marked on the skirt pattern pieces for the lining. I loved all the thorough preparation information which included fusing strips of interfacing to the seam allowances of the shoulders, pocket openings, and zip opening before beginning any construction. I'm definitely going to be utilising a lot of the construction techniques in this pattern in the rest of my sewing in future. It would be a great pattern to tackle once you have a few garments under your belt and are looking to learn how to achieve better results. Kennis has actually just put out a call for testers for her new pattern which has so many variations there's 42 garments possible with the different combinations! I can't wait to see what is coming next.

Striped Italian Cotton Shirt

$
0
0
I've got a bit of unselfish sewing to share with you today and one of my first ventures into sewing menswear. This is actually the second shirt I've made from scratch, plus I did a bit of shirt customising earlier in the year too which I fully intend to share with you but I'm so pleased with this one I couldn't wait to blog about it! For my stepdad's birthday this year I promised to make him a shirt. This was way back in April and we had the fabric picked out and ordered by May so considering I finished this just a few weeks ago I was a bit slow about getting it done; sorry Peter! I'm blaming a hectic summer of work and feeling a bit nervous about getting this as close to perfect as possible without much practice! I'm pleased to report he was very happy with it though (and I'm delighted!) so hopefully it was worth the wait.

Diary of a Chain Stitcher: Green Striped Colette Negroni Shirt with Stand Collar

He picked out this gorgeous Italian cotton shirting from the Mood Fabrics website and it was a brilliant choice. It's great quality and so lovely to work with. The green is actually a bit brighter than it came out in photos. I'm not going to lie the stripe matching was another big reason for my nervousness about even getting started with this project but I enjoyed the extra challenge and it turned out to be really motivating and satisfying to work with a fun fabric rather than a plain colour or basic white.

I haven't done a lot of pattern matching before, especially not in wovens and with such a bold stripe. I spent a long time staring at the fabric and moving things around. I cut everything that needed matching on a single layer and pieces that were to be cut on the fold I traced out into one large piece so I could cut it flat. It took a bit of maths to work out the spread of the stripes across the two front pieces and placket but I got there in the end. I'm really pleased with how it turned out with the exception of the sleeve plackets which I didn't attempt to match at all. I hadn't made enough of them to be able to even begin to fathom what stripe was going to end up where once they were folded and turned through!

Diary of a Chain Stitcher: Green Striped Colette Negroni Shirt with Stand Collar

I am so pleased with how the pocket lines up. I cut this piece by laying the paper pattern piece onto the fabric shirt front piece, lining it up with the placement markings and factoring in the seam allowance. Then I used a pencil to mark where each of the stripes were around the top and bottom edges of the pocket. I could then simply match up these marks with the stripes of the fabric as I laid out out to be cut. It worked out perfectly and the pocket almost disappears into the shirt front! I picked up this pattern matching tip from Sew Busy Lizzy's post on her gorgeous waterfall coat.

Diary of a Chain Stitcher: Green Striped Colette Negroni Shirt with Stand Collar
I love the burrito method for constructing the lined yoke!

The other bit of pattern matching I did was to have the stripes running across the yoke and continuing down the sleeves. I had done a lot of looking at RTW striped shirts to help me decide on placement of the stripes but, although I knew I wanted to cut the yoke on the cross-wise grain, when it came to cutting out the sleeves I couldn't think of what exactly I was trying to match. With a ladies top I might match stripes where they intersect at the front and back of an armscye and use a notch to do so but for the life of me I couldn't work out the best thing to do with the shirt. I was watching a bit of Modern Family that evening when I suddenly spotted the stripes running across the yoke and down the sleeves of Cam's shirt! I literally jumped up out of my seat and Ste thought I'd gone a bit nuts. I was thinking 'thank goodness I've over-ordered on the fabric and still have enough to cut new sleeves'...but when I checked the sleeve pieces I had cut I realised by very happy accident they were just about going to match up anyway!

Diary of a Chain Stitcher: Green Striped Colette Negroni Shirt with Stand Collar

So enough about stripes. You probably want to know what pattern I used. It is in fact the Negroni from Colette Patterns with a few noticeable modifications. I used the Negroni patten for the first shirt I made (which was very similar in style to this one when finished) despite it having a casual convertible collar rather than the stand you see here and a simple front facing instead of a button placket. You might wonder why I picked it when such a main feature of the design isn't what I wanted but I had various reasons. Firstly, I couldn't find a single pattern (big 4, indie, bursa or vintage) which incorporated all the design elements I wanted so knew I'd have to make some changes. Secondly, it was my first foray into shirt making and following indie pattern instructions for new to me techniques had served me well thus far (and they did not let me down here). Thirdly, Peter from Male Pattern Boldness had run a very thorough shirt sew-along based on the Negroni which includes a brilliant post on how to add a more formal collar, stand and button plackets to the shirt. Finally, there are may design elements I do like about this pattern like the slim, modern cut and flat felled seams.

Diary of a Chain Stitcher: Green Striped Colette Negroni Shirt with Stand Collar
The seams are all flat felled or concealed as part of the construction

I asked my stepdad to let me borrow a shirt which he was happy with both the fit and collar style of. It came in so handy to have a shirt next to me throughout the entire construction process; both to check fit and what certain elements should look like when complete. So I highly recommend you have one to hand if making your first shirt. To begin with I measured this shirt against the main pattern pieces and found that the Colette size medium appeared to be a good match. I just took 1/2" off the sleeve length. I didn't have the luxury of having my stepdad around or even close by enough to try on the shirt throughout construction so measuring it up in this fashion was a nice reassurance that it wouldn't end up miles too small or big!

Diary of a Chain Stitcher: Green Striped Colette Negroni Shirt with Stand Collar

The next thing I used the RTW shirt for was to draft my new collar and collar stand. Following Peter's instructions you basically trace the collar and stand pieces of the shirt onto paper and then add seam allowances all around. I did a quick check to make sure that these pieces would fairly closely match the neckline of the Negroni and thankfully everything was looking good. I don't imagine, if you have chosen the pattern size based on the size of the RTW shirt as I did, that you would end up with much of a difference as the collar size increases on the Negroni in tandem with the chest size as it generally does in RTW. I was really apprehensive about the new collar the first time around but it worked out great with that shirt so I felt entirely confident in this method this time. After all, if you've lifted the collar size and shape directly from a shirt which fits you're pretty much guaranteed to get a result if you stick accurately to your seam allowances. I also followed Peter's instructions to draft and construct the left and right front plackets which was super simple as it's basically two long rectangles of the right width.

Diary of a Chain Stitcher: Green Striped Colette Negroni Shirt with Stand Collar

One more change I made was to add slots for collar stiffeners (or stays/bones if that's what you call them!) to the underside of the collar. This was actually pretty straightforward and I worked out how to do it by looking at the collar of the borrowed shirt. These need to be added before you start assembling the collar and involve using a second under collar piece. I'm thinking about doing a brief tutorial about it if anyone is interested? I'm so, so pleased with how this feature turned out. In fact it may be my favourite thing about the whole garment! As with my Archer Shirt I used Andrea from Four Square Walls' tutorial to guide me through the construction of the collar and this is absolutely my neatest one yet. All her little tips such as trimming down the interfacing and the under collar before construction really make such a difference to the finished result.

Diary of a Chain Stitcher: Green Striped Colette Negroni Shirt with Stand Collar

Another feature I'm really pleased with (despite the lack of stripe matching!) are the sleeve plackets. Now I get why Lauren says that she uses the Negroni placket pieces and construction method on all of her own shirts; the instructions are awesome, the process is much less fiddly than my other placket experiences plus all six I've done have turned out pretty fantastically with no unpicking. These are again my best yet, no doubt helped by how crisply this fabric pressed.

Diary of a Chain Stitcher: Green Striped Colette Negroni Shirt with Stand Collar

The one element I'd like to work on next time are the cuffs. I'm fairly pleased with them but think they could be a little neater, plus I really struggled when attaching them to the shirt to get the corners to meet the placket neatly. I'd like to try trimming down the inside cuff pieces just by 1/8" as I did with the under collar and inner collar stand as I think this would keep everything tight and flat and help the seam line roll away from the outside. Does anyone know of any wonderful shirt cuff tutorials which will improve my construction of them as much as Andrea's advice has improved my collars?!

Diary of a Chain Stitcher: Green Striped Colette Negroni Shirt with Stand Collar

To finish it off I considered using a bias facing to hem the curved edge as I've seen this mentioned a few times recently and on my archer is ended up a little twisted. However I found the curve of this hem shallow enough that the hem pressed in nice and flat when turned and stitched. The buttons Peter bought when he was with my Mum at a local sewing/craft fair which he said he was lucky to make it out of alive as everyone was going so crazy over fabric...sound familiar to anyone?! I sewed the bottom buttonhole horizontally and with white thread instead of green for a bespoke touch and dotted a little bit of fray check onto them once cut open to increase their durability. I ended up unpicking and redoing quite a few of the buttonholes to get them just right, I wasn't about to let down a good job with an uneven buttonhole!

I'm foreseeing some more menswear sewing in my future; I'll definitely be making some more shirts as I've enjoyed the experience so much. I picked up some light blue Paul Smith shirting from Fabrics Galore at the Knitting and Stitching Show a couple of months ago which feels so smooth on the skin so I can't wait to make that up. Just got to decide who the lucky recipient will be this time!

Plaid Flannel Alder Shirtdress

$
0
0
Diary of a Chain Stitcher: Grainline Alder Shirtdress in Mood Fabrics Plaid Flannel

This month's Mood Sewing Network project was all about cosy fabrics for me! The temperatures have dropped here in London over the last couple of weeks and all I want to wear is lots of soft and warm layers. I actually ordered this Blue Plaid Soft Cotton Flannel (unfortunately now sold out but there's still a little left in red!) back in February as part of my very first MSN order but haven't found the perfect use for it until now. I spotted the dress below on Pinterest a little while back and knew my plaid was destined to be my own version of it. This discovery also coincided with the release of Grainline Studio's Alder Shirtdress...match made in heaven!


I've wanted to sew something plaid for a while now but have been a bit daunted by the task of matching it. That was my real challenge with this garment, considering there are so many pattern pieces in a shirtdress and I thought a bold check like this (plus no sleeves!) would be a good place to start. I took on board a lot of Lauren's tips from her plaid matching post and cut the yoke and pockets on the bias so I didn't have to worry about matching them. I love the effect of the bias cut yoke in this chunky check. I considered cutting the button placket on the bias too but I liked the simplicity of the unbroken line across the front and didn't want it to look too busy.

Diary of a Chain Stitcher: Grainline Alder Shirtdress in Mood Fabrics Plaid Flannel

I cut absolutely everything on the flat which I really recommend. It's really difficult to make sure that the bottom layer you can't see is lined up as exactly as a plaid needs to be before cutting. The brushed surface of this fabric also means that the two layers have a tendency to grip together, which is great for sewing it up but when laying it out on the fold if you try and pull one layer into line some areas stay stuck together and things end up more off grain than they were before. To cut any 'on the fold' pieces like the back, I traced them onto paper so I could cut them flat. To cut any pieces which I needed two of like the front, I cut one then used that piece as the pattern piece to cut the second. This made it really easy to check that the plaid was a perfect mirror. You can see below that is almost disappears into the fabric beneath!


Diary of a Chain Stitcher: Grainline Alder Shirtdress in Mood Fabrics Plaid Flannel

When cutting the front and back pieces I was mostly concerned with getting the horizontal stripe to run continuously around the body, matching at front fastening and side seams. I'm really pleased with how that worked out. I also wanted the spread of vertical stripes to be symmetrical either side of the centre front. Despite spending quite some time working on this I made a bit of an error with the placket as I forgot that this pattern uses a 1cm seam allowance rather than 1.5cm. Thankfully it still ended up looking fairly even, just not exactly as I had first intended! The button placket is actually the one aspect of this garment that I'm not entirely happy with construction wise. I'm not sure what went wrong, perhaps I was getting distracted by trying to match the plaid but the width of the right and left plackets wasn't equal unless I turned under a tiny seam allowance which has made the finishing inside a little sloppy. I'll be paying more attention to that part next time!

Diary of a Chain Stitcher: Grainline Alder Shirtdress in Mood Fabrics Plaid Flannel

The flannel is lovely to sew with, both my machine and overlocker loved it and the layers stay put as you feed them through which helps with the matching. To be on the safe side I still pinned quite excessively at the top and bottom of each stripe to make sure everything lined up at the stitching line.

The Alder is as well drafted as I have come to expect Jen's patterns to be and has the same classic yet contemporary aesthetic. I cut a straight size 4 as I usually do with Grainline patterns and the fit is pretty good with not too much ease. I used the View A as I thought the gathered 'skirt' of view B looked a bit too voluminous for the windy British winter. I'll definitely be making that up in a lovely voile or viscose for summer though.

Diary of a Chain Stitcher: Grainline Alder Shirtdress in Mood Fabrics Plaid Flannel

I actually didn't follow the instructions all that closely to assemble this as I'd just made a man's shirt and was feeling pretty confident about the techniques involved. I take a look through the instructions for the collar assembly but found them quite confusing compared to the way I had been doing collars so I went back to my favourite method using Andrea's tutorial. It's not failed me yet! The way the pattern comes together basically means that all the raw edges are concealed and finished neatly. I chose to overlock the side seams together then press them towards the back and topstitch so from the outside it looks a bit like a traditional flat felled seam.

Diary of a Chain Stitcher: Grainline Alder Shirtdress in Mood Fabrics Plaid Flannel

It was the first time that I've ever had any real success with a bias tape finishing. It turned out so well on the armholes of this which was largely down to the fact that the flannel responded really well to heat and steam. The instructions for this are also really great and have you under stitch the bias tape to the seam allowances once you have attached the first side which makes the rest of the process so much easier. Hopefully adopting this technique will help next time I try it in silk! Despite the neat finishing the armholes gape a bit at the back which is either a fitting issue or due to things getting stretched out during assembly...I might try pinching out just a little next time and stay stitching the armscye once the yoke is attached to the back.

Diary of a Chain Stitcher: Grainline Alder Shirtdress in Mood Fabrics Plaid Flannel

When it got to the point of hemming as well as feeling too long I felt the dip of the hem was quite extreme on my 5ft 3" stature. The dress has some shaping but as you can see is still a very loose fit which is not a particularly common silhouette for me so to compensate for that I felt it needed shortening. I removed 2" at the centre front and back, curving out to nothing at the side seams. It still has a slight dip in the style of a men's shirt but I feel much more comfortable in it. I was planning to use a bias facing on the hem but as the curve was now more subtle it turned an pressed nice and flat.

I've had a lot of wear out of this dress already and bonus...I like it belted too!

Diary of a Chain Stitcher: Grainline Alder Shirtdress in Mood Fabrics Plaid Flannel

Tie-Dye Gabriola Maxi Skirt

$
0
0
Diary of a Chainstitcher: Tie-Dye Gabriola Maxi Skirt from Sewaholic Patterns

I always have big grand plans for summer sewing as it's my favourite time of year to dress for. I'm always so inspired by lightweight fabrics, abstract prints and breezy styles of summer garments. The list of things I would like to make is endless, however the summer months are usually the busiest time of year for me work wise so before I know it the good weather is vanishing and my dream list is still endless. I made a concentrated effort to get started early this year and am therefore happier with my summer wardrobe than I have been before. After seeing Sophie from Ada Spragg's stunning pattern tester version, one item that made it straight onto my summer sewing list when it was released earlier this year is Sewaholic's Gabriola Maxi Skirt pattern. I finished this a few weeks ago now so I am super pleased to get at least one version of it made up in time for plenty of wear!

Diary of a Chainstitcher: Tie-Dye Gabriola Maxi Skirt from Sewaholic Patterns

I was on the look out for the perfect Gabriola fabric on Goldhawk Road during Rachel's huge sewing blogger meet up back in May. I wanted to try out the sizing before sewing up anything too pricey and as the beautiful fullness of the skirt means that this pattern eats fabric I was after something cheap and cheerful. In case you were wondering, I started with 3 metres of 60" wide fabric and had nothing left but scraps when I was done! The fabric I chose was the very first bolt to catch my attention that day, loitering in the doorway of A to Z fabrics. It's very polyester but is just the type of print I am drawn to and at £3 a metre for a wearable muslin you can't go wrong! It wasn't the most enjoyable fabric to handle when sewing (there was a particularly nasty incident involving the iron, some melting and the recutting of a yoke piece!) but because of the full style of the skirt it remains very cool to wear and has a gorgeous drape.

Diary of a Chainstitcher: Tie-Dye Gabriola Maxi Skirt from Sewaholic Patterns

I had quite a debate with myself about which size to cut as although I am slightly bigger on the bottom half I am not as pear shaped as the figure Sewaholic Patterns are drafted for and I was keep for those lovely panels to fit snuggly around my top hip. In the end I decided to stick with the size 4 I usually cut for Sewaholic patterns and it's turned out pretty great. The waistband fits perfectly and although there is a bit of room around the hips it retains the intended flattering smooth shape well.
In general skirts tend to be fairly quick projects. Whilst this one is not a particularly lengthy project it may eat up more time than you expect because of all the small yoke panels and long skirt seams. I chose to overlock all my interior seams which made the whole process much quicker than a more involved finishing technique but if I was working with silk I would seriously consider french seaming everything. Plus I love looking at lovely tidy insides and just think how lovely all those intersecting french seams would look!

Diary of a Chainstitcher: Tie-Dye Gabriola Maxi Skirt from Sewaholic Patterns

If you are thinking about making your own remembering to mark your notches is key! There are lots of similar looking pattern pieces that are slightly (and importantly!) different. I then did spend a fair bit of time trying to decipher which was which from the notches later on so I would also recommend naming each pattern piece 'side front' e.t.c by pinning a scrap of paper to each piece. It didn't help me that my fabric was only very slightly different on the right and wrong sides so I had to work out which was right and left of each pair too!

Diary of a Chainstitcher: Tie-Dye Gabriola Maxi Skirt from Sewaholic Patterns

I really enjoy sewing which requires you to be neat and accurate and this is definitely one of those projects! I'm really pleased with the matching of the seams at the front but the centre back seam could be a little better... I was so keen to get this sewn up and start wearing it that I decided with this busy print I wasn't bothered by things being a few millimetres out but next time I will definitely try harder! I think abstract prints are the best way to go with this skirt if you are not going plain. I can imagine a directional or large scale print being a complete nightmare as there are so many different panels with intersecting seams being cut at different angles to the grain.

Diary of a Chainstitcher: Tie-Dye Gabriola Maxi Skirt from Sewaholic Patterns

I took 2" off the length the skirt, so as I'm only about 5ft3" if you are tall you definitely want to consider lengthening to begin with. My hem was 1" and I used my favourite method for sewing a curved hem; stitching all the way around 1/2" from the raw edge and then using that line as a guide to press up along, then pressing it in by the same amount again to hide the raw edge. I machine stitched the hem up as I was never going to achieve a totally invisible finish by hand in this very lightweight poly. 

Diary of a Chainstitcher: Tie-Dye Gabriola Maxi Skirt from Sewaholic Patterns

The only other change I made to the pattern was to the fastening at the back of the waistband. The pattern calls for the zip to be inserted up to the waistband which is constructed to overlap slightly and fasten with either a button or hooks and bars. I've never got on particularly well with this style of waistband so I opted to trim off the overlap and insert the zip right to the top. I'm really pleased with the clean finish of this.

Diary of a Chainstitcher: Tie-Dye Gabriola Maxi Skirt from Sewaholic Patterns

Overall it is a pretty straightforward make which I think a beginner could tackle. I think a seamstress of any level would need to take the construction nice and slow and pay attention to the instructions as there is room for error because of all the pieces to fit together but the only remotely tricky part is sewing the point where the skirt panels meet the yoke at the centre front. Gabriola is yet another cleverly thought out design by Tasia, she's got such a fantastic knack for considering how a pattern works with the curves of the body and drafting patterns that ladies want to wear. I love that this skirt is fitted flat at the waist, cut so flatteringly over the hips but still has all the fun of a full, swishy skirt!

Diary of a Chainstitcher: Tie-Dye Gabriola Maxi Skirt from Sewaholic Patterns

Quilted and Initialled White Russian Sweatshirts

$
0
0
Diary of a Chain Stitcher: Quilted and Monogrammed White Russian Sweatshirts from Capital Chic

Every since testing Sally from Capital Chic's White Russian Sweatshirt pattern back in the spring I knew that I wanted to make a couple more for this autumn/winter. I love that the cut is more slim and feminine than perhaps a traditional sweatshirt might be, it's got a really contemporary look to it. With this in mind I set out to look for some interesting loop-backed or fleece-backed sweat shirting or quilted fabric when I was with Sally at the Goldhawk Road meet up when Lladybird was in London. I was thinking black as I wanted to it be a warm layer I could pull on over a variety of outfits and my first version of the sweatshirt is a grey marl. Luckily I found just what I needed in Fabric House which is one of my favourite shops on that street for customer service and a good bargain!

Diary of a Chain Stitcher: Quilted and Monogrammed White Russian Sweatshirts from Capital Chic

I nabbed the last bit of this diamond quilted fabric for my first version. It's quite spongy and warm but feels more like a neoprene than a sweater knit to touch. It's got a smooth sheen to it on both sides and has a softer drape than a fleece backed fabric. It was perfect for this pattern. Sally pointed out that I wouldn't want to use the quilting for the bands so I needed to find something else for there. I ended up buying a metre of plain black fleece backed sweat-shirting along with a metre of the quilted stuff for the bargain price of £12. What makes it even more of a steal is that when it came to cutting I realised I had just enough fabric to make a second sweatshirt from the plain black fabric as it was quite wide. The pattern does suggest you will need 1.5m but if you are cutting a small size and get a bit creative with it on a wide fabric you can just about make a metre work.

Diary of a Chain Stitcher: Quilted and Monogrammed White Russian Sweatshirts from Capital Chic

I was wondering what I could do to the second top so that I didn't end up with two which appeared to be plain black. I was considering using one of the quilting designs that come with the pattern or adding some gems around the neckline as I've spied a few tutorials for this recently. Then I spotted the jumper below in French Connection and remembered Rachel's recent DIY project in which she used iron on transfers to add a slogan to a RTW sweater. Obviously the F on the inspiration sweatshirt is for the brand but I was instantly excited by the idea of a sweatshirt with my initial on the front. Coincidentally the pattern designer herself was recently inspired to customise one of her charity shop finds with an appliqué letter S which I love!

Diary of a Chain Stitcher: Quilted and Monogrammed White Russian Sweatshirts from Capital Chic

I bought my letter F transfer from Tee Transfers. They had a good choice of fonts, colours and sizes and for reasonable prices. Mine was the largest size (20cm) in burgundy in the 'Retro' font. I was pretty tempted by the metallic gold or silver too! Ironing on the transfer was really straightforward, it came with clear instructions which are also available on their website. My fabric couldn't take much heat so I just kept the iron over the transfer and paper for longer until the backing peeled off cleanly. I've since washed the sweatshirt a couple of times and while the letter looked a bit wrinkly when it first came out of the wash a quick iron from the reverse smoothed it out again.

Diary of a Chain Stitcher: Quilted and Monogrammed White Russian Sweatshirts from Capital Chic

For both sweatshirts I used the construction method I have recently come to favour when working with knits and used a narrow zig zag stitch to assemble the pieces, which makes it easier to be accurate, and then I finished all the seam allowances with my overlocker, trimming them down a bit as I went. I actually cut a size smaller than I did last time (the size 0) as I felt it turned out a little larger than it needed to be. This in combination with sewing it up on the machine rather than taking a bit of a guess at the seam allowance size on the overlocker has given me the fit I was after. The only other change I made was to use a 6/8" seam allowance to sew on the cuffs and neckband to shorten the sleeves by just a fraction and make the neckband a little skinnier.

Diary of a Chain Stitcher: Quilted and Monogrammed White Russian Sweatshirts from Capital Chic

I used a twin needle to finish the edges of the neck, cuff and hem bands and had success with both! I've had rather mixed experiences with a twin needle so was apprehensive about attempting it on these as they were looking pretty good without it. It actually handled the thick layers of the fabric really well considering it was dealing with two layers of band and two layers of the main fabric as the seam allowances are pressed together towards the body of the garment. I sewed using my standard straight stitch settings, with one needle stitching 'in the ditch' and the other through the main fabric catching the seam allowance as I went. I'm really pleased I decided to go with this technique as I think it adds a professional finish and also keeps the bands sitting nice and flat as they were bouncing back after just pressing and looking a little puffy.

Diary of a Chain Stitcher: Quilted and Monogrammed White Russian Sweatshirts from Capital Chic

I am so delighted with how these turned out. It took about 45 minutes to cut them both and then I made them in tandem in about 3 hours! I finished them about three weeks ago and have quite seriously worn one or the other nearly every single day since then. They look great with jeans or skirts and keep me nice and warm without feeling like the Michelin man when I've got my coat on top! I'm seriously tempted to make a whole load more as they are so satisfying to sew but how many sweatshirts does one girl need?! If I spot a perfect fabric though it might be quite hard to resist...

Diary of a Chain Stitcher: Quilted and Monogrammed White Russian Sweatshirts from Capital Chic

How To Add Collar Stay Slots to a Handmade Shirt

$
0
0
Diary of a Chain Stitcher: How To Add Collar Stay Slots to a Handmade Shirt

After I posted about the striped shirt I made for my stepdad a few of your expressed interest in a tutorial about how I added the slots to the underside of the collar to house collar stiffeners/bones/stays. So I've put a quick one together for you. I worked out how to do this by looking at a RTW shirt which had this feature and it's surprisingly quick and straightforward! It's my very first attempt at a tutorial so I apologise if any of my explanations don't make complete sense. Feel free to ask any questions you may have in the comments below.

Just to be clear before we start the slots need to be added to shirt before the collar is assembled. I'm not sure how you'd go about adding them to a shirt which is already made!

First things first you will need to cut yourself a third collar piece. If you are using a pattern which has separate upper and under collar pieces you will need one of the upper collar and two under collar pieces. Only the upper collar needs to be interfaced as usual. We will just be working with the under collar. If your under collar pieces are made up of two parts you can stitch those together along the centre before we begin.

Diary of a Chain Stitcher: How To Add Collar Stay Slots to a Handmade Shirt

Take one of your under collar pieces and, wrong side up, fold up the bottom corners (the corners which will be attached to the collar stand not the collar points). You want to fold them along a diagonal line which starts approximately 9cm along the bottom edge from the corner, and 5cm up the side. Give it a good press.

Diary of a Chain Stitcher: How To Add Collar Stay Slots to a Handmade Shirt

Now take your second under collar piece and lay it out with the right side facing up. Place the under collar piece with the folded corners on top of this piece also with the right side facing up (so the wrong side is against the right side of the piece underneath). Line up all the edges and pin in place. At this point you can baste together the long raw edges of the two pieces just inside the seam allowance but I didn't find it necessary.

Diary of a Chain Stitcher: How To Add Collar Stay Slots to a Handmade Shirt

Before we start sewing or marking sewing lines directly on to our fabric I found it useful to draw it out on paper first. You could do this directly on to your paper pattern piece or trace out another copy. We are now going to work out the placement of our collar stay slots which will be slightly different on each collar you make as it will vary depending on the size and shape of the collar and the length of your stiffeners if you have a particular set in mind. They are available in different lengths and but an average size is around 6.5cm from point to end and I based mine on this.

Diary of a Chain Stitcher: How To Add Collar Stay Slots to a Handmade Shirt


First draw on the fold line you made across the bottom corner (green line in my picture). Then draw on your stitching line so you can clearly see the seam allowances (red in my picture). Finally if you are going to be topstitching around the edges of collar when it is assembled draw this on at the correct distance away from the stitching line (purple in my picture). If you are not going to topstitch you can leave this out. We need to take this into account when positioning our slots as the stiffener will slide no further in than that line of topstitching and we need to ensure the length of the slot is long enough to contain them. If you are not going to topstitch you can leave this last line out.

Diary of a Chain Stitcher: How To Add Collar Stay Slots to a Handmade Shirt

Now use a ruler to find a line the length of your stiffeners (6.5cm in my case) which runs from the corner point of your topstitching line (or your regular stitching line if you are not topstitching) to your fold line. Draw this on in pencil.

Diary of a Chain Stitcher: How To Add Collar Stay Slots to a Handmade Shirt

This is the central line of our slot. We now need to draw on stitching lines either side of this line to make our slot just large enough to hold our stiffeners securely. Mine are 1cm wide (most are) so I have drawn lines parallel to the pencil line 0.6cm away on each side. These lines are black on my drawing.

Diary of a Chain Stitcher: How To Add Collar Stay Slots to a Handmade Shirt

Now transfer these two black lines to your fabric.

Diary of a Chain Stitcher: How To Add Collar Stay Slots to a Handmade Shirt

Stitch along these lines from the raw edge of the fabric towards the fold. For this tutorial I am using black thread so that it shows up nice and clearly in the pictures but of course you should use a thread which corresponds to your fabric. When you get to just a couple of millimetres away from the folded edge lower your needle, raise your presser foot and pivot the fabric around so you are lined up to stitch along the folded edge, sewing away from the collar stay slot. 

Diary of a Chain Stitcher: How To Add Collar Stay Slots to a Handmade Shirt

Sew a couple of millimetres away from the folded edge right along to the raw edge of the fabric.

Diary of a Chain Stitcher: How To Add Collar Stay Slots to a Handmade Shirt


And that's it! You can now assemble your collar as usual, using the piece we have just created as the under collar. Once completed you should have something that looks like this:

Diary of a Chain Stitcher: How To Add Collar Stay Slots to a Handmade Shirt

If you want some tips on constructing a collar (it can be a little fiddly!) I highly recommend this tutorial from Andrea at Four Square Walls. It's not failed me yet!

Sequin and Red Velvet Christmas Party Dress

$
0
0
When I tested the newly released Kim Dress from By Hand London I had an unexplainable urge to sew up that wrap skirt in a silk velvet. Something about making up a winter version with those little pleats and the drape of the overlapping petals said luxurious rich coloured velvet to me! At the time I had half brushed it off as one of those crazy sewing ideas that I never get around to realising but then I got an invite from the BHL girls themselves to a London sewing blogger Christmas do and it seemed like fate telling me to make this dress.

Diary of a Chain Stitcher: Sequin and Red Velvet Christmas Kim Dress

I'd never sewn velvet before so was still not 100% sold on the idea, as although the dress is quite straight forward to assemble there's a lot of seams going on for a first attempt with velvet. I decided to see if I could find any fairly inexpensive silk velvet on Goldhawk Road during the meet up when Lauren was in town. Lo and behold Unique Fabrics had silk velvet in a wide range of colours for £15/m which I thought to be pretty reasonable. I had a hard time deciding on the colour as there were some particularly stunning jewel tone greens but after a gentle nudge from my shopping companion Sally I was soon leaving with 1.5m of rich wine red. Not much later in the afternoon I became delighted with my choice when I spotted the perfect match of colour in baby sequins in A to Z Fabrics. I'm fairly sure if I had been shopping on my own my hesitance to work with not one two notoriously tricky types of fabric for the first time in the same project would have won out but at this point Sally turned on some serious enabling skills and a plan for a sequinned bodice and velvet skirt was born. I love it when inspiration for a project comes from the fabric and I don't think I could have got a better colour match if I had tried!

Diary of a Chain Stitcher: Sequin and Red Velvet Christmas Kim Dress

As I've made this exact variation of the Kim before the main challenge with this project was the choice of fabric. Fitting wise I cut the size UK 10 again but made a few changes based on my first version. I took 2" off the length of straps (1" from the back bodice piece and 1" from the front) plus I took 1" out of the side seams under the arm (1/2" at the front and 1/2" at the back) grading out to nothing at the waist. This totally solved all the issues I had last time and I now have a nice snug fit. In fact it's a little too snug across the bust and I would probably do a small FBA when making again, which makes sense as BHL draft for a B cup. I sewed the length as it is which is unusual for me with a BHL skirt but that cross over at the front comes up quite high. I did lightly tack it together at one point to avoid any unnecessary flashing!

Diary of a Chain Stitcher: Sequin and Red Velvet Christmas Kim Dress

My decision to use the combination of sequins and organza for the bodice became the best idea ever as it was so much easier to work with than the velvet. Trying to get those bodice seams smooth and snuggly fitting with the shifty pile working against me would have been a total nightmare! The sequins were attached to a slightly stretchy mesh which wasn't ideal for this project as it's close fit needs a woven. To combat this I underlined each piece with silk organza which also helped add some structure to the design. The organza was all hand basted to the sequins which is a little time consuming but not too bad on such small pieces. Along with topstitching it's secretly one of my favourite sewing related tasks!

Diary of a Chain Stitcher: Sequin and Red Velvet Christmas Kim Dress

Because the sequins were so tiny I decided to give sewing them like any other fabric a go rather than going through the trauma of trimming them out of all the seam allowances. I used a normal stitch length but a slightly thicker than normal needle (I think it was a 90) to try and combat any breakage and I had no trouble. I did slightly reduce the pressure of the foot because of the bulk of the sequins. Once the seams were sewn I checked the seam line on the right side for any sequins that had got caught and were sticking out at funny angles and trimmed them away. I didn't finish these seam allowances as they are all concealed within the lining.

Diary of a Chain Stitcher: Sequin and Red Velvet Christmas Kim Dress

Pressing required some thought and trial and error with all the fabrics involved in this dress. The silk organza was a huge help as I could press is from the reverse using a scrap of silk organza as a pressing cloth and get a nice crisp edge. I tested this beforehand and discovered I could use a medium heat and no sequins would melt. During my internet research about velvet I had discovered that one of the golden rules was to never ever press it. I kind of ignored this and gave it a go on a scrap! I ran just the tip of a steamy iron along the seams with very light pressure to ease the seam allowances open. The velvet responded really well to this and I couldn't spot any damage to the pile. I also did this to make the hem sit smoothly and at the top of the pleats to get them to sit right. I think lots of steam and light pressure is the key.

Diary of a Chain Stitcher: Sequin and Red Velvet Christmas Kim Dress

To combat the slightly gapey neckline I had last time I added stay tape to the seam allowances here, cutting it a little shorter than the neckline and easing it in. I also under-stitched as recommended but got a little carried away and forgot to do this before sewing up the armholes as instructed so could only get a little way along each strap! I ended up using pretty much the full 1/2m of the sequins, the same of the organza and around 80cm of the velvet. The silk habotai lining came from my stash and was in small scraps which luckily the various small bodice pieces could just about squeeze onto.

Diary of a Chain Stitcher: Sequin and Red Velvet Christmas Kim Dress

Despite being relieved that I only had to deal with it for four of the pattern pieces the velvet was actually a little easier to handle than expected. It was a total NIGHTMARE to cut out as it shifts all over the place and it's very easy to end up with a pattern piece which looks nothing like it was intended to. But it wasn't all that bad to sew.

I cut all of the velvet pieces on a single layer (but if you really have to cut something on the fold cut it with right sides facing out as when you've got two right sides together the nap will make everything shift off grain even more). I used lots of pins, especially along that curve as it had the potential to get very wobbly. Following advice from various online sources I cut the velvet with the nap of the fabric running up from the hem of the skirt (so running my hands down the skirt would actually be going against the pile). I didn't really understand the reasoning behind this until I mentioned it to Winnie at the Christmas party as she had received similar advice. It's for when you sit down which makes complete sense, as you slide towards the front of the chair you will be smoothing the pile rather than disturbing it!

Diary of a Chain Stitcher: Sequin and Red Velvet Christmas Kim Dress

When sewing I followed the direction of the nap and again slightly reduced the pressure of the foot so as not to damage the pile. I used a standard needle and lots of pins. When sewing you cannot avoid placing right sides together so lots of pins are key to stop shifting. Because I was sewing to a fairly tight dealing by this point I just pinked the seam allowances as the velvet didn't fray too badly. It's holding up well but in future I'd probably choose to use a satin binding for a hong kong finish. I chose to hand stitch the hem which was incredibly time consuming but well worth the effort. I never imagined I'd be able to achieve two such smooth curves in this fabric! Machine stitching across the nap would have ruined it and produced a very visible line.

Diary of a Chain Stitcher: Sequin and Red Velvet Christmas Kim Dress

I'm so delighted with this dress and felt fantastic in it at the Christmas party. It's one of those garments that despite the frivolity of it feels so comfortable because it fits well. I hope I can find lots more occasions to wear it; New Year's Eve is next! I hope you all have a wonderful Christmas. I've got plans to eat and drink and laugh a lot so I've got a couple of end of year Top 5 posts scheduled for the next week or so. I'll see you in the New Year! Merry Christmas!

Diary of a Chain Stitcher: Sequin and Red Velvet Christmas Kim Dress

December Indie Pattern Update!

$
0
0

Sorry that last month's update of news from the Independent Sewing Pattern community is coming to you a little later than usual. I allowed myself to become completely absorbed in the festive season this year and am only just getting back on track! I hope you all enjoyed some time off with your loved ones too and are looking forward to 2015! It's been a slightly quieter month as I'm sure designers have all taken some well earned time off but I'm sure more snippets of news have fallen through the cracks than usual so feel free to make additions to the list in the comments. I've only included news up to the new year, anything that has happened in the last couple of days will be included in January's update.

New Pattern Companies/First Releases!

  • I've long been a fan of The Little Tailoress so I was really excited to see Ami launch her very first PDF pattern this month. The pattern is called the Emmeline Tee and is a versatile dart-less tee for knit or woven fabrics; I particularly love the sequin version. It's also worth taking a look at Ami's tutorials as she has some amazing sewing skills, just check out her collection of coats!

New Patterns

  • April Rhodes released the Popover Poncho pattern. It looks like a great pattern for a beginner and features a cosy cowl neck and hoodie style front pocket. A lovely way to showcase a spectacular fabric I think.
  • There have been some great seasonally appropriate new releases over the last couple of months and Jennifer Lauren has just added the Enid Sweater to the mix. It fits perfectly with her usual Vintage aesthetic and has a bias cut bodice with options for a square or rounded neckline. This is also the first of her patterns to be available in two additional larger sizes.
  • I've been toying with the idea of making myself a coat as I desperately need a new one but I don't really have the time at the minute to do it properly. Seeing the release of Pauline Alice's new Quart Coat nearly made me take the plunge anyway. I absolutely love the unique design details of it and have a feeling that if I don't make it this winter I will for next!
  • Another coat pattern to tempt us is Marilla Walker's Freemantle Coat. It's an on trend cocoon style with three variations including a shorter jacket. She also shared a knit version on her blog the other day which looks great as an oversized cardigan!
  • If you're on the hunt for the perfect t-shirt pattern for you Lindsay Woodward has recently released the Phlox Tee. It's a lovely basic with a number of sleeve and neckline variations. 
  • Thread Theory released their very first womenswear pattern! I must admit that I have bought a couple of the men's sewing patterns but haven't yet sewn them up because the lure of sewing something for myself normally wins...maybe I'll have more success with the Camas Blouse! It's an elegant design with a yoke, v neck and narrow front button plackets.
  • Cali Faye released the Brenna Coat. It's a PDF pattern with a modern oversized cut and relaxed draped style. I'm looking forward to seeing this made up in a variety of fabrics!
  • The most recent release from Compagnie M is the Julia Sweater. It fears dolman sleeves and large cuffs and is a PDF pattern for knit fabrics.
  • Melissa from Fehr Trade released the Surf to Summit Top which I think has to be her best activewear release yet! Not only are there patterns for both women and men, it has numerous variations and optional extras to make it suitable for a whole variety of sports from a surfing to cycling.
  • The third and latest release from Muse Patterns is the Natalie Dress. It's another pattern for knits and has three length options. I love the slightly 1940s style gathering and triangular panel at the centre of the bust!

Upcoming!

  • Marilla Walker hinted that she will be releasing a tights pattern soon after drafting a block to make up a number of really impressive pairs for herself over December. Those lacy ones are my favourite!
  • Itch to Stitch put out a call for testers for the new Idyllwild Top & Dress at the start of the month. I'm really looking forward to this knit pattern. With all the variations of necklines and sleeves it's possible to create 42 different garments! Kennis has set up a private Facebook group for testers to discuss their findings which I think is a fantastic idea.

Sew-Alongs

  • Rhonda from Rhonda's Creative Life ran a sew-along throughout December on the Sew News blog for the Sewaholic Robson Coat. I absolutely love this pattern and highly recommend it for a first experience of sewing outerwear, the addition of the sew-along will make it even easier!
  • The sew-along for Christine Haynes'Marianne Dress is starting on her blog on 6th January. If you've ever wanted to make yourself the perfect breton knit dress now is your chance!

Other Exciting News

  • Papercut PatternsSigma Dress and Riegel Bomber patterns are now available as PDFs. I've had my eye on that bomber for ages and what with the Riegel Bomber January challenge happening too it's now even more tempting!
  • The latest addition to Sewaholic's PDF pattern arsenal is the Alma Blouse. Tasia must be getting close to having her whole collection available in digital form! 

And here's your monthly dose of Indie sewing inspiration to give your 2015 sewing a kick start!


  • Sonja's Isabel Marant inspired sweatshirt version of Papercut Pattern's Undercover Hoodie made me want to straight up copy it I liked it so much! A great use of colour blocking to personalise a wardrobe staple.
  • Amanda's pineapple print Colette Iris Shorts are so fun! What a brilliant fabric. I can't wait for summer to come around this side of the equator so I can make up some printed shorts of my own!
  • Carly in Stitches actually made up the Thread Theory Finlayson Sweater for her nephew but I love it on her! I love the fair isle ponte she found and her decision to combine it with plain black for the collar, cuffs and hem.
  • Jennifer did an amazing job on her electric blue Sewaholic Minoru Jacket. Doesn't that colour look amazing on her?!
  • Karen used an absolutely stunning silk for her Sew Over It Pussy Bow Blouse and got such a beautiful finish on all the lovely details. The buttons and loops on the cuffs are to die for!


2014 Round Up!

$
0
0
It's taken me a little while to get motivated to write this round up of last year and onward look into the next but finally writing it has made me feel incredibly inspired to get sewing! It's been so satisfying to look back at how much my sewing has improved over 2014; it was a great sewing and blogging year for me and my interest in and passion for garment sewing has only increased the more I've sewn. Some of my personal highlights of 2014 have been sewing related, in particular meeting up with many of you in person in London and making friends from all over the world online. I'm continually amazed by your lovely comments and how many people are interested in reading this blog!

Some of the brilliant sewing related memories from 2014! Pics thanks to Katie, Alex and Brian Doherty

I did a quick count up and I made 41 garments this year which was a lot more than I thought I had! Although I end up posting completed garment posts fairly regularly throughout the year (as I often don't post things until they've had a couple of wears) my sewing productivity goes up and down in fairly irregular peaks and troughs because of the time I get to sew. I'm self-employed so sometimes I go through spells of working weekdays, evenings and weekends with very little time to sew and then I'll end up with a couple of weeks free to sew to my heart's content. I kind of love it that way and thoroughly enjoy my little 'sew-cations' but it does make any kind of sewing schedule impossible! I'm so pleased to discover that I've managed to be that productive though!

I'm fairly happy with how successful I was at achieving the goals I set myself at the end of last year although I totally failed at making myself a pair of trousers! I did sew up a muslin of Sew Over It's Ultimate Trousers but got way too bogged down in and confused by the fitting issues I had. I'm hoping to have more success with a different pattern then revisit them as you'll see below. I do feel a hundred times more confident about working with knit fabrics than I did this time last year, being excited about using my overlocker made such a difference! I do still prefer working with wovens as there's something about the unpredictability of one knit compared to the next unnerves me, but I'm more confident about getting a good result now. My final goal last year was to push myself to try new sewing techniques and I really feel like I achieved this one and then some! This year I worked with so many fabrics I never thought I'd try, I boned garments, mastered zips and rolled hems, used every foot on my sewing machine and made shirts, t-shirts, dresses, skirts, coats and cardigans.

To look back in more detail I've roughly adopted the format of Gillian's Top 5 Series as it's a great concise way to look back over the year. I'm just going to do hits, misses and goals and I'm starting with the hits!


  • Oscar de la Renta Silk Chiffon Dress- This dress is hands down the best thing I have ever made. And I can't believe I'm saying that about something made from silk chiffon! I put a lot of time and thought into all elements of this and it's proof that taking your time and putting in the effort pays off.
  • Striped Italian Cotton Shirt - Second best thing I've ever made. It's the fourth shirt I've made, counting two Archer's for myself and one previous Negroni, and the closest to a professional finish I've as yet achieved. So proud of that collar and stripe matching.
  • White Russian Sweatshirts - I know these are technically two of my five garments but I'm counting them as one. These have become total wardrobe staples and I feel great in them. They would be my most worn garment of the year if it wasn't for...
  • Polka Dot Laurel Blouse- I love this top. When I don't know what to wear in the morning I fall back on this every time. It's flattering and comfortable and fits so great. I've since made three more variations of this pattern which will be making an appearance soon!
  • Pink Floral Flora Dress - I had a hard time picking my 5th hit as there are so many other garments I made this year which I love but in the end it had to be this dress. It was one of those instances when the match of pattern and fabric work out perfectly and despite the pink being a total departure from the norm feels just so very 'me'.

And now for the misses. I haven't made anything this year which I would count as entirely a huge failure as every project has taught me something important but there's often something about a completed garment which means I'm not quite satisfied with it once worn. Next year I'm going to take some projects a little slower and set myself more realistic deadlines. Towards the end of this year I taught myself that a bit of time with the unpicker can make a huge difference!


  • Polka Dot Chloe Blazer- Despite being really proud of this as my first venture into tailoring and wearing it a lot in the spring this has recently found it's way into the charity shop bag as now my skills have developed I can't stop seeing the flaws in it.
  • First Striped Renfrew Top - I'm still not entirely sure what went so wrong with this one but it ended up huge compared to the other two. Add to that the poor quality fabric and this one was destined for the bin.
  • Tie-Dye Gabriola Maxi Skirt - I adore the swish of this skirt and fit over the hips but my super cheap fabric choice let this garment down. The thin polyester sticks to my legs and feels horrible to wear. I've got plans for a soft voile version for this summer.
  • Dior Linen Look Silvia Dress - I'm so disappointed that this isn't the success I wanted it to be as the fabric is so gorgeous. Luckily I still have enough left for another project. The fit on this is poor and the tulip skirt doesn't feel flattering. 
  • White Floral Flora Dress - I really liked this dress when I finished it but it got the grand total of zero wears this summer as every time I put it on something just didn't feel right. The skirt length feels odd on me without heels and my decision to self line the bodice in the cupro was a bad one. Despite actually being a good fit, in a double layer of this fabric combined with the scale of the print it feels voluminous and unflattering.

The main thing I established last year is that, whilst I enjoy the satisfaction of completing a quick project in an afternoon, it's the learning aspect of sewing that I enjoy the most and giving myself new challenges is what inspires me to keep going. Whether it be working with a different fabric, learning a new technique or making a particular type of garment for the first time there's always more to learn and I love that. I've managed to tick off a fair few things on my technique checklist this year as well as adding quite a few new ones! Next year I'd like to keep going with this, keep learning and keep trying new things. Some of the specific challenges I'm interested in are:

  • Sewing jeans. Despite sewing up some fairly frivolous garments (mainly for the enjoyment of learning how to make them!) I spend a lot of my time in jeans, tops and trainers for work. So I think it's about time I made myself a pair of the most used things in my wardrobe! This goal will hopefully be ticked off fairly quickly as I'm already armed with Heather Lou's Ginger Jeans pattern (exactly the style I like), my supplies and her detailed sew-along to hold my hand.
  • Tailoring. After my dabble in tailored garments with the Chloe Blazer piqued my interest in sewing this kind of clothing I decided I needed to go right back to basics and do some research into tailoring techniques before trying again. My brother got me Claire Schaeffer's 'Couture Sewing: Tailoring Techniques' for Christmas and I'm enjoying this as much as her initial couture book. Does anyone have any more recommendations for tailoring advice or good patterns to begin with? I would definitely like to make a coat but don't think I'll get time to do my research and make one well before the end of winter so that might have to wait until autumn.
  • Bra making. I've been going back and forth on feeling inspired to try this one, I think as it seems like SUCH a different thing to what I normally sew. Just getting to grips with the materials required gets my head into a bit of a spin! But then I see some of the bras that you guys have been making (I'm looking at you Novita, Tasia and Caroline!) and I don't think I'm going to be able to resist trying it myself! I'm tempted to treat myself to 'Demystifying Bra Fitting and Construction' by Norma Loehr from Orange Lingerie which I've heard really good things about but think I might leave this goal until later in the year when I can give it some more focus.
  • Working on fit. I tend to dive into new sewing challenges headfirst without much fear but the one aspect of sewing which I still feel nervous about is fit! This was actually one of my goals last year and while I have got better at noticing problems with the fit of my clothes (and now find it so difficult to buy RTW because of this!) I still feel quite overwhelmed by the enormity of the subject at times. It's the identification of the correct resolution to the problem that I tend to find difficult as there seems to be such a huge number of possible adjustments and reasons for wrinkles/excess fabric or drag lines. I'm going to try and not get too bogged down in labelling the problem and instead look at it more simply in terms of where fabric needs adding or removing. All advice will be much appreciated so if you ever spot a fit issue please feel free to comment!
  • Drafting my own blocks/slopers. The main reason I'm keen to do this is so I can compare my blocks to commercial patterns to get an idea of the fitting problems I might encounter before I even begin. I'm particularly hoping this will help when it comes to trouser fitting! Upon the recommendation of a few people I asked for Winifred Aldrich's 'Metric Pattern Cutting for Womenswear' for Christmas to help with this goal. I've never been all that inspired to start drafting my own patterns but a quick flick through the guidance that this book provides has already slightly changed this...we'll have to see what happens!

Despite these ambitions all I aim for next year is to continue enjoying sewing as much as I do now. I do want to sew clothes I'll wear but I also want to sew what I WANT to sew. Although I wear a lot of handmade clothes sewing is my hobby and is more to me than a way providing myself with something to wear. I sometimes like to sew things that I might not wear more than once just for the enjoyment and experience of making them and I see that on it's own as a worthwhile investment. I'm definitely going to continue this in 2015! I also don't want to put pressure on myself to complete projects to unrealistic deadlines (or even to complete them at all!) or to sew when I might not be in the mood. Here's to a year of successful and enjoyable sewing in 2015!

Little Black Laurel Dress

$
0
0
The first completed garment I've got to share with you in 2015 is actual one of my final projects of 2014. It racked up a fair few wears in those last few weeks of 2014 too! They don't lie when they say having a classic little black dress in your wardrobe will save your bacon for any occasion; this dress worked perfectly for pre Christmas cocktails, pub drinks, lunches and even an afternoon tea!

Diary of a Chain Stitcher: Little Black Colette Laurel Dress in Mood Fabrics Wool Sateen

Ever since making my polka dot version of the Laurel blouse from Colette Patterns I'd had a plain black version of the dress variation on my mind. I'd had such success with the style and fit of the blouse on me that I'd been dreaming about it in all kinds of fabrics and variations to be honest! For this dress I used this gorgeous wool sateen from Mood Fabrics and only needed just over a metre. It's kind of like a fairly lightweight suiting with a small amount of stretch, I bet it would make a lovely pair of trousers. It's hand is very smooth and it was lovely to sew with. I pre washed it on a gentle cycle in the machine as I was hoping this would be a big success and I'd want to be able to easily and regularly wash it. Then I gave it a good steamy press and it came up beautifully. It didn't need any other special treatment and I finished all the seams on my overlocker.

Diary of a Chain Stitcher: Little Black Colette Laurel Dress in Mood Fabrics Wool Sateen

I dove straight in and cut the size 2 as I had done with the blouse, presuming that it was drafted exactly the same. Spoiler alert, they're not! If you lay the front blouse piece onto of the front dress piece you'll see that the main difference is in the shape of the armhole. On the blouse pattern piece the armsyce dips inward quite dramatically just above the bust which seems a little odd to me and incidentally my blouse is slightly tight across the chest at this height. The dress pattern piece doesn't dip in in the same way and the armhole shape looks much more normal so I didn't make my planned alteration of adding some width in this area. The fit turned out fairly well but I do have a couple of small wrinkles here which I think indicate that I need a little more room across the lower bust next time. I think the bust points could also do with being lowered a tiny bit.

Diary of a Chain Stitcher: Little Black Colette Laurel Dress in Mood Fabrics Wool Sateen

Once the basic shift was assembled and before the sleeves were set in I popped it on to assess the fit. To be honest it felt like a bit of a tent and not the flattering, figure skimming shift I imaged. Comparing the pattern pieces the width of the dress and blouse are very similar but I think the blouse still feels flattering with this much ease because of the shorter length and the fact that you are not hiding any of your shape below the waist. A bit of pinching and pinning later, I decided that it could be salvaged by taking it in down the side seams. I took out 1" on the double from each side seam from the waist to hem and graded out to nothing at the underarm as I didn't want to loose any ease across the bust. That's 4" in total that I removed from below the waist!

Diary of a Chain Stitcher: Little Black Colette Laurel Dress in Mood Fabrics Wool Sateen

My rather makeshift fitting worked out pretty well as I love the shape of it now. I've transferred the alteration to the pattern pieces so I can copy it next time. However, it does tend to ride up a little/not fall back into place without a tug when I stand so I think I could do with a little more room around the bum. I'll probably take slightly less out of the side seams from just above the hip to the hem. The only other change I made was to take 1 1/2" off the length. I expected that I would need to as I'm fairly short and (after pinning the hem up at different heights and inspecting in the mirror) I found going as short as I dared made this silhouette work better for me. After a number of wears I feel like I got the length spot on as I feel comfortable sitting, standing and even going up and down the escalators from the tube! It's not really practical for work but I've got a lot of evening and weekend wear out of it as I say. I hemmed it with two turns of 1/2" before machine stitching.

Diary of a Chain Stitcher: Little Black Colette Laurel Dress in Mood Fabrics Wool Sateen

I omitted the zip in this as I knew from making the blouse that I could get it on and off without a fastening. Thankfully, partly due to the stretch in this sateen, this still worked once I had taken in the side seams! If making in a fabric with no stretch whatsoever I would need to include the zip now I have slimmed it down. You can see from the rear picture that I had some trouble setting in these sleeves and I'm not particularly happy with the final result but they are at least comfortable and wearable. I'm wondering if the issues I had with easing the sleeve heads in compared to blouse version were caused by the fact that the armholes are different shapes so the length the sleeve head has to be eased into is different? Despite my issues with the sleeve heads I do love this length of sleeve!

Diary of a Chain Stitcher: Little Black Colette Laurel Dress in Mood Fabrics Wool Sateen

I drafted my own facing for the neckline (as I did for the blouse) instead of using bias binding to finish it as recommended by the pattern. I don't often have much success with this technique and trying to get the binding to sit flat around this shape of neckline on my first version of Laurel was a total nightmare which I ended up giving up on. I still had some trouble getting the neckline to lay flat but clipping, under stitching and thoroughly pressing the edge sorted that out. I also caught the facing down with a few hand stitches at the centre front and back and shoulder seams to prevent it trying to flip to the outside.

Diary of a Chain Stitcher: Little Black Colette Laurel Dress in Mood Fabrics Wool Sateen

Despite the construction issues and tweaking of the fit that I still need to do on this pattern I'm delighted with this super wearable addition to my wardrobe! It dresses up or down with different shoes and I love it with a skinny belt too. Have any of you got any other pattern recommendations for a classic little black dress?

January Indie Pattern Update!

$
0
0

I don't know about you but I don't know where January has disappeared to! It's been a wee bit hectic around this parts and from the looks of the amount of news I've got to share with you it's been a hectic one in the indie pattern designer community!

New Pattern Companies/First Releases!

  • Erin launched her new pattern company Seamstress Erin Designs. There are currently just accessories patterns available but she has got some garment patterns in the works!
  • The next new indie pattern company in town is Lileth & Eve and they are looking for pattern testers! It sounds like they've got some really good drafting and design experience between them so I'm looking forward to seeing their first release.
  • Beth from Sew DIY released her very first PDF pattern; the Lou Box Top. It's a simple and versatile top with six possible variations. It's probably the exact kind of thing I need more of in my wardrobe at the minute to be honest!

New Patterns

  • Hot on the heels of her stunning Quart Coat Pauline Alice has released the Eliana Dress. I love both the sleeveless and raglan sleeve variations of this peasant blouse style dress.
  • Kennis from Itch to Stitch has been a busy bee recently and has released two new patterns this month! The first was the Idyllwild Top and Dress which along with having 42 different variation combos is available for the bargain price of just $1! All proceeds from the sale of this pattern are being donated to charity. The second pattern was released just this week and is the Paulina Top which is pattern for knits with a woven fabric contrast.
  • I know a lot of people have been waiting with baited breath for the Grainline Studio duffle coat pattern and after it's release this month I've seen quite a few Instagram posts of the paper versions landing on doormats across the world! It's named the Cascade, has hood and collar variations and I love the front zip feature concealed behind the toggles to provide extra warmth.
  • Sewaholic released two beautiful shirt/blouse patterns this month; the beautiful sewing of the samples had me drooling! The Granville is a classic and fitted shirt drafted as usual for the more pear shaped of us and the Oakridge is slightly more feminine with a neck tie variation.
  • Sew Over It released the kit for their Pencil Skirt pattern this month and many of you may be pleased to know that they have now released the pattern to purchase separately in PDF form. I had the pleasure of testing the pattern and I love it to bits! Just need to find some time and light to take photos and I can share it with you!
  • Marilla Walker released the Alice Pattern for tights and leggings. I love it when I see patterns released for garments or items which you less usually see sewn. I'm really intrigued by how you would even begin to sew tights!
  • The Jasper Sweater/Dress is the most recent release from Paprika Patterns. It's designed for thicker knits and has options for a hood or chunky collar. There will be plenty of tutorials and tips available on the site to accompany it.
  • The new Raglan Sleeve Shirt Dress from Salme Patterns is just as chic and classic as I have come to expect from Elisa's patterns. Make sure to sign up to her mailing list for discounts!
  • Style Arc's new patterns for January were the Elita Designer Top, the Fern Woven Top, the Brooke Woven Skirt, the Melinda Knit Tunic, the Rita Ponte Skirt and the Lani Woven Tunic. I'm always impressed with the contemporary and unique designs Style Arc put out and am sorely tempted by more than one of these!

Upcoming!

  • There's a new dress pattern coming from Jennifer Lauren Vintage at some point in February. From her last post it sounded like it was back from the testers and being brushed up before release!
  • The next pattern from Blue Ginger Doll is named the Alicia Shorts. I love the unique design details that Abby includes in her designs so I'm really looking forward to seeing her twist on shorts.
  • Thread Theory's second womenswear pattern is coming soon. They are the Lazo Pants and if you fancy a bit of a preview they were photographed with their recently released Camas Blouse. Love that waistband!
  • There are two new patterns coming from Skinny Bitch Curvy Chic this month! Betsy hasn't yet let slip even a clue as to the type of garments the might be for so I can't wait to see!

Sew-Alongs


Other Exciting News

  • The two new patterns from Sewaholic include lots of new features which are set to become standard for all their designs at some point. They now include sizes 18 & 20, have free downloadable French instructions, metric measurements on the envelope and are available in PDF format straight away!
  • There are also three more Sewaholic patterns available in PDF form alongside the paper; the Pendrell Blouse, Cordova Jacket and Robson Coat.
  • I'm so excited to see Jen over at Grainline Studio doing so well and her business developing into selling paper patterns as I love her designs and drafting. The Tiny Pocket Tank and Portside Travel Set patterns are now available in printed form.
  • Straight Stitch Designs have also branched out into paper versions of their patterns. Sometimes there's nothing better than some lovely packaging is there?! They are currently available for pre-sale in Kimberley's shop.
  • Also printing up a paper pattern storm is Elisa from Salme Patterns! Sometimes there's nothing better than some lovely packaging is there?! I can't wait to see these as I love her simple, clean design aesthetic. 

Phew, after all that I feel like I can't have missed much this month but as always if you know of any more news you'd like to share let me know in the comments and I'll add it in! To finish up here's your monthly dose of inspiration from the sewing blog community. Make sure to remember to share your finished garments with the hashtag #indiesewing on Twitter or Instagram, it's a great way to find some new blogs to follow and get some ideas!


A Cotton Laurel Blouse for my Mum

$
0
0
Diary of a Chain Stitcher: John Lewis Heritage Collection Cotton Laurel Blouse from Colette Patterns

Today I've got a completed garment to share from last year which for once isn't for me to wear! When I made my polka dot blouse version of Colette Pattern's Laurel back in June last year my Mum spotted it and decided she quite liked the simple lines of it for herself which I wasn't surprised about as I had thought it was just her sort of top! I really love the proportions of it and particularly the shape of the neckline and length of the sleeves. A few weeks later she popped in to see me when I was taking part in the John Lewis Sewing Bee and while she was in the store chose fabric for her own version. It's a quilting weight cotton from the Heritage Collection they released for their 100 year anniversary and I only needed just over a metre even with cutting the pieces to line up the coloured stripes. I don't usually sew with this sort of cotton as I prefer to wear drapier fashion fabrics so it was a bit of a treat for me to work with a fabric which is so straightforward to cut, sew and press!


Diary of a Chain Stitcher: John Lewis Heritage Collection Cotton Laurel Blouse from Colette Patterns


The main reason I don't usually sew garments for other people is because I am nervous about achieving a good fit, particularly when that person isn't around to try it on throughout the construction process. However, with this I felt fairly confident as my Mum is a very similar size, shape and height to me and tried on my top for me! It was a good fit so I cut the same size 2 for her; the only issue she had was the same as mine which was feeling a bit restricted above the bust. (I made this before my Black Laurel Dress and so before I discovered the strange difference in the drafting of the armholes!) I made the adjustment I was planning on doing for my next version for myself to add a bit of width at this point. I simply taped a scrap of paper behind this part of the pattern piece and drew in a new curve at the point where the armscye dips in, adding about 1/2" at the narrowest point and smoothly blending it back into the original line. I just did this to the front pattern piece as the back fit beautifully. I did however measure the length of the total armhole (subtracting the seam allowances) and check that it was still roughly the same as the length of the sleeve head so I didn't end up with too little or too much to ease in when setting the sleeves.

Diary of a Chain Stitcher: John Lewis Heritage Collection Cotton Laurel Blouse from Colette Patterns

In general the stripe matching wasn't too tricky on this as there are not many pattern pieces to match (just side seams and a centre back seam) and the bold bands of colour are quite wide. The only thing which bothered me for a while is that the bands are made up of a series of smaller stripes which kind of wiggle across the fabric and this means the widths of the bands vary at different points. After a bit of thought I decided there was no way to conquer this irregularity and I just had to accept that the widths of the bands may be slightly different where they met at the side seams. I'm really happy with how the placement of the pattern works with the darts and how that orange stripe appears to curve down over the bust. I won't lie...that was a happy accident!

Diary of a Chain Stitcher: John Lewis Heritage Collection Cotton Laurel Blouse from Colette Patterns


Because of the irregular widths of the bands I wasn't too bothered about any exact matching at the armholes but I did know I needed to consider the placement of the stripes on the sleeves to avoid it looking like a hot mess where things intersected and also to keep the design of the top looking balanced. Once I had cut my front pattern pieces I marked on the tissue where the bands of colour began and ended then used this to roughly work out where I wanted the orange and green bands to lie on the sleeve head, using the notches as a guide to match things up. I drew this onto the sleeve pattern pieces so it was super simple to cut. I was really happy to have the paper version of the pattern opposed to the PDF at this point as I could see straight through the tissue! I'm really pleased with how the sleeves turned out as when Mum's arms are by her sides the colours appear to run straight across the garment, through the body and sleeves.

Diary of a Chain Stitcher: John Lewis Heritage Collection Cotton Laurel Blouse from Colette Patterns

I again used a facing I drafted myself to finish the neckline rather than using the bias tape recommended in the pattern instructions as I found this really tricky to manage around the tight curves at the shoulder seams. As with my original Laurel blouse and subsequent versions I still had real trouble getting the neckline to lay flat, particularly in this crisper cotton despite vigorous pressing. I clipped the seam allowances right up to the stitching line every half inch or so and then under stitched all the way round. Once the edges of the facing were then tacked down by hand at the shoulder seams and centre back I was happy with the finish. On my polka dot version I had to resort to topstitching to stop the facing flipping out to the right side and I really didn't want to have to do that on this one as it would have been much more obvious crossing the various colours.

Diary of a Chain Stitcher: John Lewis Heritage Collection Cotton Laurel Blouse from Colette Patterns

The only other change I made this time was to turn and press a small hem on the sleeves rather than using bias tape. It is a lovely clean finish which worked well in this weight of cotton but I might revert back to using a bias tape on future versions. On my polka dot blouse I used a lovely soft inch wide rayon binding which makes the sleeve edge really comfortable and also the width of it seems to help the sleeve sit nicely against the arm.

Diary of a Chain Stitcher: John Lewis Heritage Collection Cotton Laurel Blouse from Colette Patterns

I finished all my seams on the overlocker and turned the hem up twice before machine stitching which turned out beautifully in this lovely cotton. The insides look really clean and tidy and you get a really nice crisp edge when pressing.

After seeing the things that I have been sewing Mum has been tempted recently to buy herself a sewing machine; all I need to do now is persuade her that she'll love sewing as much as I do and she can make herself some more blouses!

February Indie Pattern Update!

$
0
0

There has as always been a lot going on in the world of indie sewing pattern design this month. I have spotted in particular lots of calls for pattern testers on individual pattern company blogs so if that's something you've been interested in doing keep your eyes peeled! I haven't listed them here as the deadlines to apply tend to be super speedy and have all passed by the date of publishing this!

New Pattern Companies/First Releases


  • The very first pattern from Sewing Avenue is the Camellia Top and the even better news is that it's completely free to download! It's a simple shape with just two pattern pieces which Sarah is going to be showing you how to manipulate to create a wide variety of top designs!


New Patterns

  • Heather Lou from Closet Case Files continues to release contemporary and chic designs which fill holes in our pattern collections with her latest offering - the Carolyn Pyjamas. I'm not usually one for wearing a traditional full PJ set to bed but now I'm dreaming about making a silk pair! It has an extra smaller size than her other patterns too.
  • Abby from Blue Ginger Doll released a whole collection of four PDF patterns which mix and match to create a selection of beautiful outfits. The range includes the April Skirt, Anne Top, Abby Singlet and Alicia Shorts.
  • The latest By Hand London dress pattern is currently available on presale at 15% off! It's called the Sophia Dress and features unusual angled darts on both the skirt and bodice as well as options for a fitted skirt and a flared skirt with godets which I can't wait to try out!
  • The Cowl Neck Dress is the new PDF pattern from Sew Over It. As with all their patterns it looks to be a great wardrobe staple as well as being super speedy to sew! I think you could make a whole variety of dresses from it depending on fabric choice.
  • Jennifer Lauren released the Felicity Dress which I can't wait to sew in breezy cotton for summer! The bodice is shaped with gathering around the neckline and there are options for a gathered or three quarter circle skirt.
  • The latest pattern from Sew Caroline is the Downtown Tunic. It has a relaxed fit and features either a peplum or button front skirt to be made in contrasting fabric.
  • The Bellevue Top is the most recent release from Straight Stitch Designs. It's a pattern designed for a mixture of knit and woven fabrics which is really interesting and has options for a facing or band finishing along with differing sleeve lengths.
  • Waffle Patterns have just released the Marmalade Gathered Jacket. I really like the combination of design elements in this one; it's got a lovely sporty feel. Plus it's 20% off until 6th March!
  • UPDATE! Lindsay from Design by Lindsay released a FREE pattern for a faux fur jacket. It's a simple boxy shape which looks like it would be a fun project if you fancy something different. She's got some great tips for sewing faux fur too!

Sew-alongs


Upcoming!

  • Scandinavian pattern company Named are releasing their Spring collection of 12 new patterns tomorrow (March 1st)! I always love that they release a whole collection at once and am so excited to see what they have come up with this time! Five of the designs will be available in an expanded size range; up to a UK 22/US 18.
  • There's a new pattern coming soon from Deer and Doe which Eleonore has been working really hard on. We know it's called Cardamome but I haven't spotted any other clues as to what type of garment it might be!
  • Marilla Walker is developing a pattern for a classic a-line denim skirt which is going to come with a maxi length option - so wonderfully nineties! Keep an eye out on her Instagram for more sneaky peaks.
  • Skinny Bitch Curvy Chic have got a couple of patterns coming our way in the next few days. They're called the Pinot Pants and the Cabernet Cardigan; love the boozy naming!
  • The next pattern from Itch to Stitch is going to be the Emily Culottes which you can get a full run down on by following the link. After sewing up the Marbella Dress I'm really keen to try another of Kennis' patterns; the instructions were brilliant!

Other Exciting News

  • Elisa from Salme Patterns revealed her very first paper patterns! Seven designs from her gorgeous collection of classic styles are now available to buy in paper as well as PDF form.
  • By Hand London re-released their Charlotte Skirt pattern as a PDF with updated instructions. I've made a fair few of this dream of a pencil skirt and seeing it pop up in my feed again has reminded me to try out a version with the ruffle hem
  • Paprika Patterns re-released their Jade Skirt PDF pattern. It now has an improved design and larger size range so if you were tempted before now is the time to buy!

As per usual I feel like there's a lot I've missed (particularly in the non-existent sew-along section this month!) so feel free to point out any other gossip you've heard of in the comments and I'll be sure to add it in! To wrap this up here's some of your inspiring completed projects I've spotted this month:


  • Emmie's tropical Anna Dress has got me desperate for summer; partly for the sunshine and partly so that I can sew some gorgeous things like this! Doesn't that print look stunning on her?
  • I was eagerly following Leisa 's progress with her lace Archer Shirt and my jaw dropped when I saw the completed garment. Sewing a garment with so many pieces and tricky elements in a fabric as tricky as lace AND doing it so beautifully deserves a round of applause!
  • I don't usually include designer's own versions of their patterns here but I'm completely in love with Pauline Alice's biker jacket variation of her Quart Coat. That fabric! I'm making one.
  • Rachel's printed playsuit version of the Holly Jumpsuit is so fun and comfortable looking. I really got into the practicality of playsuits last summer and will be trying out this pattern combo soon I think!
  • Kirsten's monochrome silk/cotton Carolyn Pyjamas are what is seriously tempting me to buy this pattern! Loving the piping and the monogrammed pocket!

March Indie Pattern Update

$
0
0

Well I don't know how it's been for you but for me March has been one of those months that has flown past yet the start of it feels forever ago! I was looking back over my notes for the round up this month and started to wonder if some of the bits at the top of the list were actually from February it seemed such a long time since I'd read about them. Anyway there's a lot of juicy news to get through so I'm going to crack on...

New Patterns

  • Marilla Walker released two new PDF skirt patterns this month. The first is the Ilsley skirt and it's free! It features a hem which curves at the side seams and elasticated waist. The second is the Evan Skirt which is a classic a-line skirt with jeans style fastenings, pockets and yoke; perfect for sewing up in on trend denim!
  • The Pinot Pants and Cabernet Cardigan are the new releases from Skinny Bitch Curvy Chic. Both patterns are made for knits, the Pinot Pants look super comfy yet flattering and the Cabernet is a casual boyfriend fit cardi with three silhouette options. Betsy is publishing free add ons for the patterns on her blog so keep your eyes peeled; I love the idea of the yoga waistband.
  • Melissa from Fehr Trade has yet again tempted me to start sewing my own running gear! She released the Steeplechase Leggings this month which are as usual very cleverly thought out; including no inner leg seam (making them perfect for sports such as horse riding too!). I'm really intrigued by how these would sew up.
  • The latest release from Straight Stitch Designs is Laurelhurst. It's a pattern for knits for a simple yet chic wrap style cardigan. I like that the sleeves are still fairly slim which keeps the design looking balanced and flattering.
  • I'm always excited about a new release from Sewaholic Patterns and their latest is the Davie Dress for knits. I love it. I'm getting it. That's all I have to say!
  • The Melissa Dress, Blouse and Skirt is the new release from Muse Patterns. It's got loads of cute V shaped design features and provides lots of opportunity for playing around with contrast fabrics.
  • The Named spring collection was released! Called Ticket, it is inspired by a dream trip around the world. As usual I'm severely tempted by more than one, particularly the Asaka Kimono and Beverly Twisted Bikini. Thinking about wearing them together has got me desperate to get on a beach!
  • Sew Over It released their PDF Knicker Pattern which was originally available as part of their knicker kit. I think they'd make a lovely gift for someone or treat for yourself!
  • The most recent pattern from Gray All Day is the Athena Top. It's a casual draped top which can be made in knits or wovens and is the kind of design that you don't realise you're missing from your wardrobe until you have one!
  • Schnittchen released the Tina Jacket for which they have provided a step by step tutorial for sewing up on their blog. I love the model's plaid version and there's also a sleeveless vest variation.
  • French company Republique du Chiffon released a free PDF pattern this month! It's called the Caroline Dress and I love the relaxed style and shaped 1920s dropped waist. Just remember that the instructions are in French so prepare to wing it or spend a lot of time on Google translate if you're not a french speaker!
  • Kennis from Itch to Stitch released her next pattern hot on the heels of the last. They're called the Emily Culottes and they look so lovely and on trend in any length I've seen them made up in!

Sew-alongs

  • The sew-along for Sew Over It's recently released Cowl Neck Dress pattern is currently happening over on their blog. I'm really intrigued by this pattern as it looks so simple yet so chic on Lisa!
  • Jennifer Lauren's sew-along for the Felicity Dress has started over her blog. She's going to be taking the pace nice and easy, the last post isn't scheduled until mid june, which I think sounds like a lovely way to tackle a project and takes all the time pressure off!

Upcoming!

  • Steph from Cake Patterns has a whole new collection coming soon! She pre-released the new patterns at the Brisbane Stitches & Craft Show but it will be available internationally at some point in April.
  • Tilly and the Buttons gave us a little tip off that she has two new patterns being tested and due for release in the spring. Sure to be big hits no doubt!
  • Willow and Co currently have two women's patterns out for testing which should be due for release in their online shop fairly soon. They are the Aberdeen Jacket and Valencia Women's Tunic which you can see sneak peeks of on their Facebook page.
  • Katie from Papercut Patterns has hinted at her new collection over on Instagram.

Other Exciting News


I can't get over how many new releases there have been this month! We're spoilt for choice! As usual let me know in the comments if you think there's anything I've missed. I'm going to finish up with a little dose of indie sewing inspiration to get you motivated to sew! Don't forget to share your projects on Instagram and Twitter with the hash tag indiesewing so we can all check them out.


  • Sallie's military inspired version of Sewaholic's Minoru Jacket is jaw droppingly awesome and professional looking. She made some fairly substantial changes to the pattern including those lovely bellows pockets and I love the combination of navy with gold hardware.
  • Carly in Stitches'midi length Tania Culottes are such a great garment! The body of the fabric she's used is perfect to hold the shape. I'd been eyeing up a couple of recent releases from the big 4 but hadn't thought to just lengthen my Tania pattern!
  • Charlotte's version of the Goldstream Peacoat is so cool! What a lucky man! And while you're at it check out her amazing Carolyn Pyjamas which she marbled the fabric for using shaving foam!
  • Sew Busy Lizzy's green Eliana Dress is a beauty. That style suits her down to the ground. I've got a very similar RTW dress which I love and it might be about time for me to recreate!
  • I think I might need a navy duffle coat after seeing Jenny's version of the Cascade Coat from Grainline. It's a real classic garment that I don't think will ever get dated.

Printed Silk Maxi Skirt and Bamboo Jersey Bodysuit

$
0
0
Diary of a Chain Stitcher: Printed Silk Maxi Skirt and Bamboo Jersey Bodysuit with Mood Fabrics

Spring finally seems to have arrived here in London, which is a good job as I jumped the gun a little hoping for the warmer weather with my most recent handmade ensemble for the Mood Sewing Network! This gorgeous abstract printed silk georgette jumped out at me from the computer screen back at the end of last year and I couldn't resist using that month's allowance to snap up a few yards despite my plans for it being a garment more suited to the warmer months! It's exactly the kind of organic and non-descript print that I like; to me it looks like a kind of blotchy pixelated floral. In reality the colours are a bit more vivid than it comes across in these garment photos and it's got a gorgeous smooth hand and drape. The picture below does the print a bit more justice.

Diary of a Chain Stitcher: Printed Silk Maxi Skirt and Bamboo Jersey Bodysuit with Mood Fabrics

If you haven't come across a silk georgette before I always think it's like a chiffon but heavier. Most have a slight crepe-like texture to them, as this one does, and while not as sheer as chiffon they are not opaque. Bearing this in mind (and knowing I would end up making a summer dress or skirt from it which would be worn in bright sunlight) I ordered a couple of yards of this Theory dark green stretch silk georgette to line/underline it. I deliberated over this choice for quite some time as I wondered it choosing a lighter or brighter colour for the lining would bring out the colours more but when it arrived I was delighted with the colour match and weight of it when combined with other piece. This georgette is slightly different to the first as one side of it has a satin like sheen which makes it lovely to wear against the skin.

Diary of a Chain Stitcher: Printed Silk Maxi Skirt and Bamboo Jersey Bodysuit with Mood Fabrics

I had initially thought I would make a fairly simple dress with a flared skirt but a couple of days of sunshine reminded me of my ongoing love for maxi skirts in the summer months and also got me thinking about a vintage maxi skirt pattern which I've had in my stash for a while; Style 4218 from 1973. I knew these two fabrics were going to be a fairly tricky combo to sew with so the simple four panelled design and waistband looked like a perfect choice. Because each panel is so full at the hem I only just managed to squeeze my pieces out of the 2.5 yards I had ordered and therefore thinking about pattern placement wasn't really an option! I had thought this wouldn't be a problem as the pattern is so abstract but in fact the majority of the colourful blotches run closer to one selvedge than the other so as I could fit two panels across the width of the fabric one panel ended up darker and less colourful than the other. As the print is fairly uneven throughout I don't actually mind how it looks assembled in the end but I wish I'd had a bit more fabric so I could have played around with the spread of the colour. So there's a lesson for you all and one I won't forget again...when working with a print of any kind it's always worth ordering a little bit extra!

Diary of a Chain Stitcher: Printed Silk Maxi Skirt and Bamboo Jersey Bodysuit with Mood Fabrics

As georgette is semi-sheer I debated using the dark green as an underlining so all the seam allowances were concealed beneath both layers rather than between the two. But in the end I decided the top layer was opaque enough to prevent any of these insides showing through and used it as a lining. I'm really pleased that I kept it separate to the top layer as having it hanging free gives some really gorgeous extra fullness and movement to the skirt...although it did mean I had two huge hems to contend with!

Diary of a Chain Stitcher: Printed Silk Maxi Skirt and Bamboo Jersey Bodysuit with Mood Fabrics

When sewing I used a size 70 sharps needle in my machine to prevent any snagging and actually my machine handled both of these delicate and rather slippery fabrics pretty well. To preserve the delicate silks I used french seams throughout with the exception of the side seam where the zip is inserted, which I overlocked the edges of before assembling. Apart from pattern placement the one major challenge I encountered with this project was levelling off the hem. I popped it on my tailors dummy overnight and by morning the hem had a dramatic handkerchief effect! It actually stayed put for a good week longer as I just couldn't face trying to get it even. In the end it was time consuming but not too painful. I tackled the top layer first and finished it, before cutting the lining ever so slightly shorter. I used my rolled hem foot which I have found to be by the far the speediest way of hemming delicate fabrics such as these and love the fluted effect it gives to the two layers together. I actually hemmed both layers before sewing up the final seam where the zip is. This is a technique I often use when doing a rolled hem as starting and finishing at a raw edge is so much easier than along a continuous curve. Then I sew up the seam and tack down the seam allowances at the hem by hand.

Diary of a Chain Stitcher: Printed Silk Maxi Skirt and Bamboo Jersey Bodysuit with Mood Fabrics

One of the interesting features of this pattern is the deep waistband which is 3" wide when assembled. I did use the dark green georgette as an underlining on the waistband pieces to provide an extra layer of thickness and structure and hand basted these together along with a layer of silk organza as interfacing. I think this width of waistband could actually do with a bit more structure, and I'd probably add this to both the main band and facing next time. Construction wise I assembled the waistband and attached the facing, under stitching the top edge, before attaching the top layer of the skirt to the bottom of the waistband and the lining to the bottom of the facing. Once the zip was inserted I stitched in the ditch by hand to catch the bottom of the waistband and facing together and help keep things sitting correctly.

Diary of a Chain Stitcher: Printed Silk Maxi Skirt and Bamboo Jersey Bodysuit with Mood Fabrics

The top is actually the Nettie Bodysuit from Closet Case Files which I think the close fit of makes for a great pairing with the high waist of this skirt. I've been wanting to sew with some more bamboo jersey ever since I had such success with it on my version of the Bronte Top so I ordered a small amount of a couple of colours from the selection on the Mood Fabrics website (this is the black solid which is now unfortunately sold out). This particular bamboo definitely lived up to the high expectations I had after my first experience. It's dreamy to sew with. I chose to sew all my seams with a narrow zig zag stitch for accuracy and strength and then finished them off on my overlocker as I really like this professional look inside. Both my regular machine and overlocker loved this jersey, it pressed beautifully, didn't shift as I cut it and for once I hd no trouble with my twin needle which I used to finish the sleeves and topstitch around the neckline and leg holes. I want to make all of my knit projects out of bamboo now; it's so soft and snuggly to wear to boot! I actually managed to squeeze two out of the 1.5 yards of the black I ordered (the second having long sleeves and a different neckline) so I am planning to do a more detailed post about my experiences with the pattern itself in the next week or so.

I'll probably be wearing my Nettie with more seasonably appropriate skirts and jeans for at least the foreseeable future but I'm dreaming about wearing this skirt in the summer sunshine!

Diary of a Chain Stitcher: Printed Silk Maxi Skirt and Bamboo Jersey Bodysuit with Mood Fabrics


Bamboo Jersey Nettie Bodysuits

$
0
0
I mentioned in my last post about my Silk Georgette Maxi Skirt that I was going to write a separate post about the Nettie Bodysuit I was wearing with it so I could go into more detail about the pattern. I actually made a couple of these in tandem using the same black bamboo jersey from Mood Fabrics for both and they've both become a wardrobe staple! I had originally intended to make just the one but I had 1.5 yards of the jersey and whilst laying the pattern pieces out to cut I realised I could just about squeeze in two so I just kept cutting!

Diary of a Chain Stitcher: Bamboo Jersey Nettie Bodysuit

I was a little slow on the uptake with this pattern as I've never thought of bodysuits as something I need in my wardrobe (all I can remember is wearing them as a kid so it seemed a little odd to return to that!) but as usual seeing lots of other bloggers absolutely rocking theirs persuaded me to give it a whirl. And now I'm not looking back! I'd spend the far too brief UK summer months wafting around in floaty skirts of preferably maxi but also midi and mini length too if I could and do so as much as I can. But I always end up a little stuck for tops to wear with them which will both suit the style of the bottom half, tuck in smoothly and stay put. Enter Nettie to solve all these problems and also help with the additional one of summer skirts combined with draughty tube station escalators!

Diary of a Chain Stitcher: Bamboo Jersey Nettie Bodysuit

The pattern comes with two neckline and three back options as well as three sleeve lengths. The one I am wearing with my maxi skirt is the scoop neck and mid back with short sleeves. I love this sleeve length for wearing the summer and the scoop back is gorgeous. It's just the right height to wear with a bra although I will admit to having a bit of trouble keeping bra straps from poking out of this one and preventing it from slipping off the shoulders. I think with the higher neck the scoop back would sit more securely in place (and vice versa) and also part of my problem is being caused by the bodysuit being a little long and so the shoulders are not pulled taught enough.

My second version has the high back, scoop neck and long sleeves. This one is so comfortable it's like wearing a hug! I love the snug fit of the sleeves and combined with the super soft and smooth bamboo jersey it's just dreamy! I briefly touched on this in my last post but if you are yet to give bamboo a try you must find a reason too. It's both lovely to wear and sew with, it recovers and washes well and presses and stitches beautifully. I'm yet to struggle to achieve a nice neat finish with bands made out of it.

Diary of a Chain Stitcher: Bamboo Jersey Nettie Bodysuit

I'm still not 100% confident sewing up knits so approached this project with mild apprehension. I feel like it's going to take many more knit projects to get me used to how different stretch fabrics behave but I did find Heather Lou's instructions and sew-along for this pattern to be really informative. I have, however, found my preferred construction technique which I adopted for both of these. I sewed all the seams on my regular machine with a narrow zig zag and then finished them on my overlocker. I find this makes for strong and accurate seam stitching whilst still giving that professional look to the insides which I love. I used the twin needle on my regular machine to hem the sleeves and also along the neckline and leg openings after attaching the bands as I like that finish and method for keeping the seam allowances in place. I don't want to tempt fate but I think I've really cracked how to get my twin needle to behave now!

Diary of a Chain Stitcher: Bamboo Jersey Nettie Bodysuit

I did skip the snap crotch feature on both of these. I'm not overly bothered by the hassle of going to the toilet in a bodysuit, I think it's as much of a faff to try and get the snaps done back up to be honest! Also there's just something about the snap crotch that seemed a step too far back towards my childhood wardrobe! Now I know how much I love wearing these though I think I will give it a try next time, more for the experience of sewing one than anything else.

The only other thing I'd change next time would be to shorten the suit by 1.5" at the lengthen/shorten here line on the front and back (unless I was using a knit with less two directional stretch). I'm really pleased with the fit in general, not too tight or loose but when I first completed them they had no where near enough vertical tension. Worth bearing in mind if you too are on the petite side. I took out 1" on the double at the crotch seam to combat this and now they fit much better but it's not an ideal alteration and they could probably do with a bit more. I'm 5ft3" and quite short in the body so probably should have thought about this beforehand but with limited knit experience I felt like a duck out of water with this style so chanced needing to write it off as a learning experience if sewing it up as drafted was a total disaster. I probably should have made one before cutting the other but I was too tempted by the speed of sewing one alongside the other! The sleeves are just fractionally long, I'll remove 1/2" next time.

Diary of a Chain Stitcher: Bamboo Jersey Nettie Bodysuit

I've got some of this same jersey in a delicious purple waiting to be cut and definitely need to get my hands on some more neutrals to sew up into Netties and wear with an assortment of colourful skirts. Next up is a short sleeved version with the high back and let's not forget there's a dress variation to try yet too!

Diary of a Chain Stitcher: Bamboo Jersey Nettie Bodysuit

April Indie Pattern Update!

$
0
0

So April has been an excellent month for new pattern releases! Which is very dangerous for me as after a crazy few months I have the majority of May off and have basically no plans apart from to sew! A lot of fabric has been pre-washed over the last couple of days and the cutting is about to commence...I can't wait. Anyway onto what you all came here for!

New Indie Pattern Companies!


  • Lilith & Eve are launching in the next week with their first design LE101; a drapey blouse with a fun back which you can see a sneak peak of on their site. Both Sarah and Nicole are trained in fashion design and their patterns will each feature two entirely different styles to reflect their personalities.
  • Maison Fleur have just launched with a collection of three PDF patterns including a Box Pleat Skirt, Fit and Flare Skirt and gorgeous Summer Blouse pattern which is so 1950s with the shoulder ties! Love the artwork on these!


New Patterns

  • Deer and Doe released the first two patterns from their jersey collection. The panelling on the Brume Skirt is really interesting me and the cropped style of the Ondee Sweater may be the perfect filler for a gap in my wardrobe!
  • See Kate Sew released the Soho Blouse which features an angled yoke and sleeves. The bohemian style is right up my alley and I just love the flattering cut of those sleeves from the side!
  • The Luna Top is the latest release from Liola Designs. I've been after making some simple but interesting tops for spring/summer and the style-lines of this one have sucked me in!
  • I'm also seriously tempted to purchase the new Sea Change Top from Lily Sage & Co. I love breezy styles like this paired with skinny jeans and can imagine it working beautifully in vividly printed kimono-style silks.
  • Tilly and the Buttons released her new pattern, the Arielle Skirt! It's a chic fitted skirt with buttons running down the side which I think compliments the rest of her collection just perfectly. I love the option to use a lining and facing combo too.
  • My ongoing love for maxi dresses meant major excitement when I saw the design of True Bias' most recent release; the Southport Dress. I adore the rayon challis sample Kelli has made.
  • Republique du Chiffon released a whole new collection this month. I never envisioned myself wearing anything like it but I am loving that Dominique Jumpsuit!
  • The eagerly anticipated Morris Blazer from Grainline Studio is here! It's designed for stretch wovens or stable knits and would be a great stylish alternative to a cardigan. I know I'm not alone in my high opinion of Jen's drafting skills so this classic, casual jacket is bound to be a winner.
  • Kennis from Itch to Stitch released the Jaqueline Hoodie PDF pattern. It's nothing like the usual casual hoodie you might expect, featuring epaulettes, a double breasted front with buttons  and inseam welt pocket. She also put out a tester call for her Lindy Petal Skirt which looks lush.
  • I find it hard to keep track of the Style Arc new releases but this month I did spot the new Cleo Knit Dress and Cleo Tabard patterns which can be bought together as an outfit pack or separately. I'm really intrigued to see this one made up and worn.
  • Seamstress Erin has released her first pattern for women! It's called the Conifer Skirt and is a knit skirt in two lengths with the option to add tiered layers. It's Erin's first pattern to be available in print as well as PDF too! 
  • Finally, not really a complete new pattern release but an idea which I absolutely love and hope more designers try, Muse Patterns released a Knit Sleeve Pack featuring patterns for four sleeve styles to work with any of their patterns so far. I think the tulip is my favourite!

Sew-alongs

  • The sew-along for the new True Bias Southport Dress started on Monday. The posts can all be found over on the True Bias blog so there's plenty of time to catch up or refer back to them later.
  • There hasn't been a sew-along as such for Tilly's new Arielle Skirt but I've spotted a number of really useful blog posts on the slightly trickier aspects of the construction such as fitting and attaching the lining. Be sure to check them out if you're planning to make it.
  • A sew-along for Seamstress Erin's new Conifer Skirt will be coming soon over on her blog. This pattern also has a video sew-along available to purchase with the pattern if you want an even more thorough visual aid!

Upcoming!

  • Christine Haynes revealed over on her blog that she has been working on a new pattern which will be released soon! It's called the Sylvie Dress and is designed for woven fabrics.
  • I loved the design of Dixie DIY's self drafted cut out dress so I was delighted to spot her call for testers for it to be produced as a digital pattern. I've got my eyes peeled for the release of that one!
  • I absolutely adore both of my pairs of Tania Culottes so I'm really excited to see that Megan Nielson's patterns are going back into print next month! With a slight rebranding (and more length options!) the Tania's will be one of the first available in paper form along with the popular Darling Ranges Dress and her new Brumbie Skirt.
  • Lisa Comfort from Sew Over It's next book 'Sew Over It Vintage' will be released on June 18th. Her first was a real beauty with the styling of her shops carried through so I'm looking forward to seeing what this one contains.
  • Katie from Papercut Patterns hinted on Instagram that her new collection is very nearly ready. Her designs are always very unique but wearable so I can't wait to see!

Other Exciting News

  • Christine Haynes released her Derby and Chelsea dresses in PDF format (both are still available on paper too). That means her entire collection is now available digitally and to celebrate all the PDF patterns are 25% off until the end of the day on Sunday! Her Rosemary Collar pattern is now only available as a PDF.
  • It's been a busy month for Christine as her latest book 'How to Speak Fluent Sewing' was released too. It's a guide to sewing and fabric terminology which sounds like just the thing I wish I had owned when I started!
  • By Hand London made the very sad announcement that they will no longer continue to produce paper patterns or custom printed fabric. It must have been a very difficult decision for the ladies but the new direction for the company and focus on PDF patterns definitely counts as exciting! Their remaining stock of paper patterns have been selling like hot cakes (Anna, Elisalex, and Flora are already sold out) so if you want to get your hands on any get in there quick!
  • The hugely popular Ginger Jeans pattern from Closet Case Files is now available in French. I've had my first pair cut out for ages and they are one of the first projects on my list to sew during my time off!
  • Another pattern I've got two of on my list of things to sew is the Moss Mini Skirt from Grainline Studio. This is now available in paper form and both this version and the PDF have been updated so the pattern is now slightly longer and includes more notches.
  • Thread Theory's last three releases, the Finlayson Sweater, Jutland Pants and Camas Blouse are soon to be released in paper format. The Camas will be their first ladies wear paper pattern!

Phew that feels like a lot. So much exciting stuff coming up too, I'd better get cracking with my list before it gets any longer! To finish up here's your monthly dose of indie sewing inspiration!

  • That stunning cotton jacquard has found it's perfect pattern match in Sara's Coco Jacket. It's the perfect clean and simple design to showcase such a wonderful fabric.
  • Lauren's entire handmade outfit had me drooling at the computer screen! A sunshine yellow Hollyburn Skirt and a Cabernet Cardigan made in nautical stripy double knit...yes please! She also made some totally awesome linen Carolyn Pyjamas which I wanted to include!
  • It was Helen's version of the Sea Change Top that first brought the pattern to my attention. That bold green print looks so stunning on her! 
  • I think the Holly Jumpsuit pattern may have been made for a flamingo print and this linen that Rachel used for her playsuit version may be the perfect flamingo print! Love it!
  • I clearly hadn't looked enough at the line drawings for Named's new collection as I didn't spot the stunning nine panels and double vent feature of the Zaria Skirt until I saw Inna's. She used a Nano Iro double gauze which I mistook for rich velvet at first glance and now want to make!

Two Ultimate Pencil Skirts

$
0
0
Diary of a Chain Stitcher: Tartan Ultimate Pencil Skirt from Sew Over It

Well this post has been a long time coming as I tested this Ultimate Pencil Skirt pattern for the lovely ladies at Sew Over It way back at the end of last year and made another using the tartan fabric from their kit in February. Both versions have seen a lot of wear since, in fact the tartan is rapidly becoming one of my most worn handmade garments, so I thought it was about time I got some pictures and shared the details with you!

Diary of a Chain Stitcher: Black Stretch Crepe Ultimate Pencil Skirt from Sew Over It

For my testing version I used this black crepe from the Sew Over It online shop. It's got a slight stretch to it which makes for a super comfortable skirt but it is particularly important to interface the waistband facing in this instance to retain the fit in that area. The crepe sewed up beautifully, the stitches disappear into it, but it really did not respond well to pressing! I used a medium heat, as high as I could go without risking a melting/burning situation, but it still tended to spring back. Some vigorous clapping and under stitching really helped though.

Diary of a Chain Stitcher: Black Stretch Crepe Ultimate Pencil Skirt from Sew Over It

I cut between the size 8 and 10 as my measurements fell exactly between the two. This version could now stand to be a little tighter as I've lost a bit of weight since I made it. For my second skirt I cut the straight size 8 and it fits like a glove. It's just snug enough for my liking but is surprisingly comfortable and easy to walk and sit in despite the tartan having no give whatsoever. The pattern recommends 1.3m of fabric but I actually managed to get both versions out of just 90cm (140cm wide) before removing any length.

Diary of a Chain Stitcher: Tartan Ultimate Pencil Skirt from Sew Over It

I gave quite some quite detailed feedback on my experience with the pattern and was really delighted about how it was taken on board. I know a few changes were made after testing, the most obvious being the addition of a lengthen/shorten here line above the kick pleat. In my test version I removed 2" of length from the hem. To make it my preferred length I really needed to remove more but I was worried about making the vent too short to serve it's purpose and also loosing too much of the gorgeous side seam shaping which is one of the best features of this pattern. Being such a shortie, for my second version I removed 2" at the lengthen/shorten here line and still took off 3" from the bottom before hemming! It has made the vent a fair bit shorter than intended but I am much more comfortable with the length and movement of this version.

Diary of a Chain Stitcher: Ultimate Pencil Skirt from Sew Over It vents

The instructions and illustrations are clear and concise and it's definitely a project a beginner could tackle but I think a bit of sewing know-how is useful to get the most out of it. I did get a bit puzzled about the centre back vent instructions during testing but using the released version from the kit it made complete sense and achieves a lovely clean and professional finish. The only time I veered away from the instructions was when attaching the facing. My preferred method for doing this is to sew it to the waistline all the way around, including over the ends of the zip. I use my regular zip foot to sew the ends of the facing to the zip tape along the centre back seam before trimming the top corners and turning it out. I find this makes for a much cleaner and less bulky corner at the top of the zip.

Diary of a Chain Stitcher: Tartan Ultimate Pencil Skirt from Sew Over It

One of the things I've always really liked about Sew Over It instructions is that they have you overlock/finish the seam allowances before construction. This might be something that a lot of you do anyway but it's not how I usually work and for a simple project like this it makes for a really satisfying and quick assembly process. You do have to be careful not to trim anything off with the overlocker and messing up your sizing but it does prevent any nasty overlocker blade accidents!

Diary of a Chain Stitcher: Black Stretch Crepe Ultimate Pencil Skirt from Sew Over It

You can either purchase the printed pattern as part of a kit (which includes the tartan wool blend fabric, interfacing, zip and thread) or separately as a PDF download. I really love this particular tartan and can report that it's been wearing fairly well. As I pre-washed it in the machine this is how I've been washing the finished skirt and after three months of being in regular rotation I'm just starting to notice some bobbling now.

Diary of a Chain Stitcher: Tartan Ultimate Pencil Skirt from Sew Over It

I will hold my hands up and admit to not putting all that much effort into matching the plaid as I figured that the shaping of the side seams meant that nothing was going to line up all that beautifully anyway. I did make sure that I cut the pieces so the plaid would be symmetrical either side of the centre front and back but I cut everything with the fabric folded when usually with a pattern matching challenge like this it's best to cut each piece in a single layer. As the main pattern pieces fitted next to each other on the fabric I did line them up so the horizontal lines of the tartan ran through the same point, using the notches and hemline as a guide. I'm pretty pleased with how the side seams look as a result!

Diary of a Chain Stitcher: Tartan Ultimate Pencil Skirt from Sew Over It

The super high waist and lack of a waistband is my favourite feature of this pattern. It's really feminine and flattering and I feel great in it. It's definitely one of those patterns that has me rummaging through my stash as soon as I've finished one version to see what other fabric I've got that would work for it so I'd expect to see a few more of these in the future!

Denim McCalls 6696 Shirtdress

$
0
0
I'm so excited to share my latest completed garment with you today! It was one of those projects which seemed to come together without any struggles and just worked. I'm so pleased with the style, fit, fabric, and finishing I managed to achieve.

Diary of a Chain Stitcher: Denim McCalls 6696 Shirtdress

I'm sure many of you will recognise the pattern as the infamous McCalls 6696 shirtdress which has been taking the sewing blogosphere by storm over the last year or so. I can see why everyone has been raving about it; it's a fantastic pattern and is so enjoyable to put together. The cut is beautiful and it has some gorgeous design details. Not only that but it comes with bodice pattern pieces for different cup sizes and the construction method is spot on. I love the way the insides have turned out, especially with the contrast of the right and wrong sides of this lovely denim!

Diary of a Chain Stitcher: Denim McCalls 6696 Shirtdress

I've been thinking about making a denim shirtdress for a while now, they keep popping up all over my Pinterest! I think they're a great staple to have in your wardrobe and with changes in styling can work through all seasons. Then I found this beautiful washed denim in Unique Fabrix on Goldhawk Road and my mind was made up! It was so lovely to work with and great for this pattern as the washed quality means it's not too stiff, thick or heavy. I'm very tempted to head back and buy a bit more in a different shade to make myself a little seventies style button up skirt!

Diary of a Chain Stitcher: Denim McCalls 6696 Shirtdress

I then deliberated over what pattern to use for some time as I already have the Grainline Alder and Colette Hawthorn in my pattern collection but neither of them seemed quite what I was after; I wanted something more fitted than Alder and not quite as feminine and full skirted as the Hawthorne. I then remembered Clare from Sew Dixie Lou's gorgeous chambray version of 6696, decided it was just what I needed in my life and treated myself to the pattern! Boy was that a good decision. It's one of those patterns that as soon as you finish you want to start all over again. It's a good thing I didn't have any other suitable fabric in my stash or I could have disappeared down a shirtdress rabbit hole and the rest of my sewing queue would have gone out thew window!

Diary of a Chain Stitcher: Denim McCalls 6696 Shirtdress

I made View C, sleeveless with the more fitted skirt. I was so keen to make this dress just perfect that I actually made a muslin of the bodice which is fairly unusual for me! I'm always a bit wary of the amount of ease in the sizing of the big 4 patterns so I measured the flat pattern pieces to work out what size would probably fit best. The envelope suggested a size 12 but my measuring indicated I would be a size 10 maximum so I cut this with the A/B cup (which I also don't understand as that's not my usual size but I followed their measuring guide!). It was a pretty good fit as is. The only change I made was to shorten the bodice by just shy of an inch and the waistband now sits perfectly. Looking at the final dress in photos I think it's a little roomy in the shoulders so next time I'd skim a bit of width off the armholes or possibly even size down to the 8 with a C cup as I could probably stand to loose a bit of ease in the waist too. I like this shape of skirt to finish above the knee on me as I think my frame gets a bit overwhelmed by them being longer so I took 3.5" off the bottom and used 1" for the hem.

Diary of a Chain Stitcher: Denim McCalls 6696 Shirtdress

The main change I made to the pattern was to remove the gathering from the centre back. I quite like it as a feature in the version with the full skirt but I wanted to keep my straight skirted version streamlined and also felt like the gathering would be too bulky in the denim. To do this I removed a wedge from the centre back of the pattern piece, 3.5" at the top where the back piece joins the yoke, and 6" from the waist seam. One of the things that I really liked about this pattern (which I have to say I miss from a lot of indies) is how clearly aspects like the waistline, centre back and bust points are marked on the pattern pieces. It makes making alterations like this and analysing fit SO much easier. Marking things like this on pattern pieces and muslins is definitely something I will take forward from this project.

Diary of a Chain Stitcher: Denim McCalls 6696 Shirtdress

The pattern doesn't instruct you to topstitch your seams; the yoke, plackets and waistband are all finished with slip-stitching. As I was using denim I really wanted to incorporate some topstitched detail but I wanted it to be quite soft a subtle so chose to use the same mid grey thread I was using to construct it. Topstitching is actually one of my favourite sewing activities, I don't know why! I'm really pleased with how it turned out on this. I didn't use a special foot or anything, I just used the edge of my foot as a guide and the fabric took it beautifully. It also meant that I could get out of all that hand sewing as I just pressed under the edges that would have been slipstitched, pinned them in place from the right side and secured them with the topstitching.

Diary of a Chain Stitcher: Denim McCalls 6696 Shirtdress

Most of the insides end up cleanly finished if you follow the instructions. The only change I made was to complete the yoke using the burrito method rather than slipstitching the inside yoke piece to the shoulder seams as recommended. I finished any visible seam allowances using a light grey thread on my overlocker. It's true what they say about grey thread; it really does blend in with nearly anything and I'm really pleased I bought some cones of it a few weeks ago. While I'm looking at the insides and thinking about it I'm just going to take a moment and say how much I love the angled pockets on this pattern. I might end up using the skirt pieces to make my denim skirt just because I like the pockets so much!

Diary of a Chain Stitcher: Denim McCalls 6696 Shirtdress

The only aspect I'm not super happy with my finishing on is the collar stand. It's always a tricky element and in this denim it proved even more so. The topstitching worked out great but it was tucking in the seam allowance at the centre front points that proved tricky in the denim. It needed trimming down quite a bit so as not to be too bulky but I ended up with such a small allowance it was really hard to keep it tucked in neatly. As always I used Andrea from Four Square Walls' collar tutorial and trimmed down the interfacing, under collar and inner stand slightly which helped both with bulk and to keep everything sitting correctly.

Diary of a Chain Stitcher: Denim McCalls 6696 Shirtdress

I chose to use a mid weight fusible cotton interfacing after much deliberation. I was worried about it being too stiff and heavy, particularly on the button plackets where there is a double layer but it's worked out perfectly.  I made my own bias binding from the denim to finish the armholes rather than using shop bought and am so happy with how this looks. The buttons came from Goldhawk Silks & Trimmings and were just what I was after; the metal look of a traditional denim shirt dress but still delicate and small. I only needed 9 as I had shortened it beyond the bottom button and omitted the one on the collar stand which I would never use. I had a bit of trouble with the buttonholes because the bulky seam allowance where the band meets the bodice/skirt was pushing the foot off centre but I got there in the end with a bit of unpicking!

Diary of a Chain Stitcher: Denim McCalls 6696 Shirtdress

As well as being ridiculously pleased with this new addition to my wardrobe I really learnt a lot from the process of making it and enjoyed that too. Despite my usual tendency to plough on ahead with a project because I have such limited time to sew I think I've finally cracked realising just how valuable it is to give myself a bit more time to think about fit and whip up a muslin if necessary. This one took no time at all and even though I barely made any adjustments I can see difference!

Two Emmeline Tees

$
0
0
Diary of a Chain Stitcher: Silk Georgette Emmeline Tee from Little Tailoress

One of the main things I had on my list of garments to sew during my recent 'sew-cation' was an assortment of simple but interesting tops to wear with jeans throughout the spring and summer. My job can be fairly hands on so despite trying my hardest to find reasons to wear pretty dresses and maxi skirts I often find myself reaching for skinny jeans or shorts in the mornings. Spring hits and every year I think I wish I had more chic tops that I can sling on when still half asleep and feel great in all day. I've tried out quite a few t-shirt and blouse patterns in the last few weeks and despite my continuing love for the versatility of Grainline's Scout Tee I think I might have hit the jackpot with Emmeline from Little Tailoress!

Diary of a Chain Stitcher: Silk Georgette Emmeline Tee from Little Tailoress

Ami offered to send me a copy of the paper pattern shortly after she released it at the start of the year. While I was looking forward to making it and could see where it would fill a gap in my wardrobe I wasn't as enthralled by it at first glance as I am now I've made up a couple of versions! It is cut beautifully, and the result is both flattering and comfortable. I can just about squeeze it out of a metre so I'm really excited that it might also be the perfect pattern for using up a lot of the fabrics in my stash!

Diary of a Chain Stitcher: Emmeline Tee Sewing Pattern from Little Tailoress

One of the things I was most impressed with about the pattern were the instructions. I already knew from reading Ami's blog that she has some serious sewing skills and experience with techniques up her sleeve and it really shows in the depth of information provided. The instruction booklet felt like a little textbook. There are six sets of instructions in total, one for each of the three variations using both knits and wovens. I first tried out variation 2, with raglan sleeves in a lovely berry coloured silk georgette from Mood Fabrics. I cut the size XS which I was a little wary about as only a bust measurement is given but as it has a relaxed fit this turned out perfectly. For me personally it has just the right amount of ease.

Diary of a Chain Stitcher: Silk Georgette Emmeline Tee from Little Tailoress

I really love the shape of the neckline; both the width of it and the way it cuts down just beneath the collar bones. The neckline is also the aspect of this project that I'm the most proud of! I followed the instructions exactly and despite using a delicate silk it's the best binding finished I've ever achieved! When I realised how narrow the binding would turn out I was slightly apprehensive of this step but, partly because the georgette pressed so well, it was fairly painless.

Diary of a Chain Stitcher: Silk Georgette Emmeline Tee from Little Tailoress

I did get a little confused about how to achieve the turn back cuffs with this one as, after describing how to secure the deep hem on them, it wasn't detailed in the instructions. In the end I just pressed them back by the amount I thought looked best, though I might catch them back with a stitch at the top and bottom for added security.

Diary of a Chain Stitcher: Silk Georgette Emmeline Tee from Little Tailoress

I've decided that despite usually being very lightweight silk georgette is one of my favourite silks to work with. The slightly textured and matt nature of it means that it seems to slip about less than a crepe de chine or chiffon might. I cut this out using my shears without any extra measures like cutting sandwiching it between tissue paper and had no problems with it shifting off grain. I used plenty of pins within the seam allowances and took the sewing nice and slow. It's also a pretty resilient fabric so I've been washing it on a delicate 30 degree cycle in my machine with no trouble. If you are intending to wash your silks by machine make sure to pre-wash your fabric in exactly the same way to prevent any unexpected shrinkage or damage when the completed garment in washed.

Diary of a Chain Stitcher: Cotton Jersey Emmeline Tee from Little Tailoress

For my second version I chose variation 1, which has kimono style sleeves and I used a soft cotton jersey which I picked up in the recent £1/m Cloth House sale. It is printed with a silver foil effect which I love but unfortunately a fair bit of the silver wore off when I pre-washed the fabric. I quite like the more subtle look it now has at least and the wear doesn't seem to have continued with further washes. Who can complain when a £14/m fabric is knocked down by that much anyway! I've still got over a metre of this one left so answers on a postcard for what else I could make with it please!

Diary of a Chain Stitcher: Cotton Jersey Emmeline Tee from Little Tailoress

I had the same straightforward experience sewing up this one as the first. A different pattern piece is used for the neckline for the knit versions (as obviously it's not cut on the bias like a woven and it's shorter so it will be stretched out to lay flat). I really like the slim width of the resulting neckband. I used my twin needle to finish this off although it is not called for in the instructions. I just like the way this looks and also like how it helps keep the seam allowance securely tucked under.

Diary of a Chain Stitcher: Cotton Jersey Emmeline Tee from Little Tailoress

As has become normal practice for me with knits I used a narrow zig zag to assemble it, then finished the seams on my overlocker. The jersey was really lovely to sew with and responded well to a nice hot and steamy iron. The instructions were much more explicit about the cuffs on this version and after pressing I slipstitched these in place by hand as described.

Diary of a Chain Stitcher: Cotton Jersey Emmeline Tee from Little Tailoress

I do prefer my woven version to the knit which I think is down to the weight of the jersey being a little heavy for this style of top and not hanging quite right. I'm keen to try out one of the other variations in a lighter weight knit. Both of these have been in and out of the wash at least a couple of times already and I can see them getting a lot of wear over the summer. I so enjoyed making them and already have another waiting to be cut. I'm looking forward to seeing what Ami releases next!

Diary of a Chain Stitcher: Cotton Jersey Emmeline Tee from Little Tailoress
Viewing all 396 articles
Browse latest View live